Nachhaltige Designarbeit

Warum Nachhaltigkeit wichtig ist

Warum es wichtig ist, Werte für eine positivere Entwicklung in die persönliche Arbeit mit einzubeziehen wird vor allem dann klar, wenn das Ausmaß und die Geschwindigkeit betrachtet werden, mit welcher der Klimawandel voranschreitet. „Der Mensch“ ist nicht nur verantwortlich für das Aussterben zahlreicher Arten und einen massiven Rückgang der Biodiversität, auch wird dieser Trend auf Kosten einiger Miliarden Menschen ausgetragen, die dafür in Armut leben müssen und Schwierigkeiten haben ihre Lebensqualität aufrecht zu erhalten. Ungefähr 20 Prozent der weltweiten Bevölkerung sind sogenannte „over consumers“, sie verbrauchten 83 Prozent der Ressourcen. Bis zur Mitte des 21. Jahrhundert wird es die größte Herausforderung sein, unter einer stetig wachsenden Bevölkerungszahl die Folgen einer sozialen sowie Klimakrise zu bewältigen.1

Nachhaltigkeit als wicked Problem

Nachhaltigkeit zu erreichen kann auch als “wicked problem” definiert werden. Der Begriff, welcher auf Rittel und Webber (Ulm School of Design) zurückgeht, versucht komplexe Probleme der Gesellschaft zu beschreiben, die sich weder einfach charakterisieren noch endgültig lösen lassen, und nach einer komplexeren Untersuchung sowie ganzheitlichen Lösungsstrategien verlangen.2

Ein wicked problem ist also ein Problem, dass in unzählige weitere, größere Problem-Verstrickungen eingebettet ist, was nicht selten auch mit den unterschiedlichen Perspektiven zu tun hat, aus denen man es betrachten kann.3

(Bieling 2020)

Welche Arten von nachhaltiger Designarbeit gibt es?
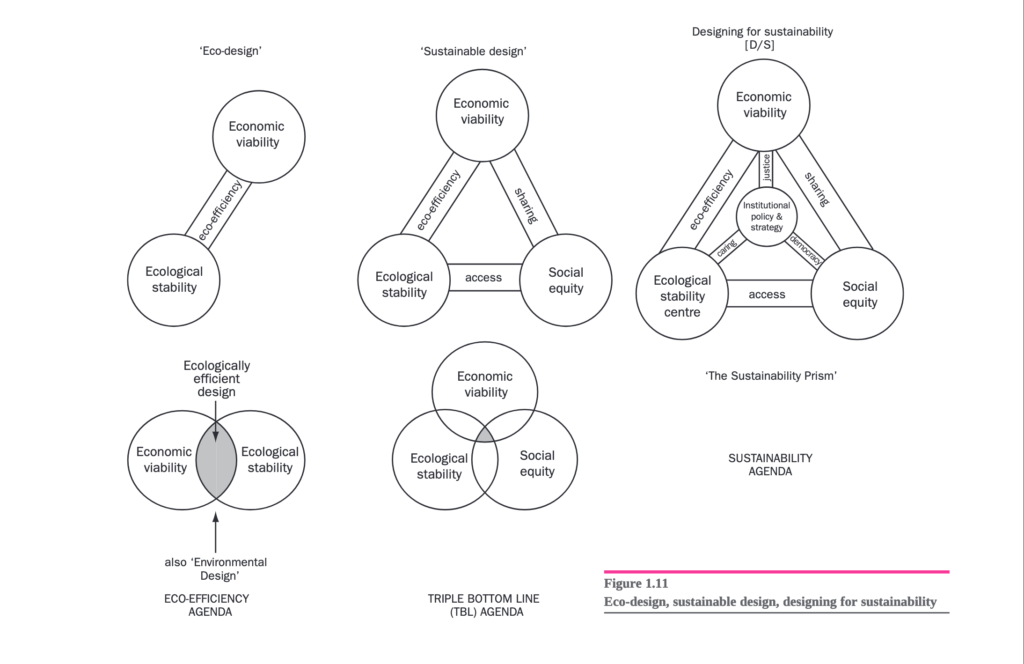
Fuad-Luke, Alistair (2009). design activism. beautiful strangeness for a sustainable world. Earthscan. London, S.25

Die Grafik aus dem Buch “Design Activism. Beautiful strangeness for a sustainable world” zeigt das “Nachhaltigkeits Prisma”, welches die ökologischen, ökonomischen, sozialen und institutionellen Strukturen verbindet und deren Unterschiede darstellt.

Leitlinien um Nachhaltigkeit in Designprozesse einzugliedern

Sustainable graphic design is the application of sustainability principles to the field of graphic design. 4

(Ndem 2019)

Ndem beschreibt in seiner Arbeit über die Rolle von Designer*Innen für ökologische Nachhaltigkeit die Orientierung an den vier Säulen: Kultur, Gesellschaft, Ökonomie und Ökologie. Demnach würde nachhaltiges Grafik Design entstehen, wenn sich diese Werte im Gestaltungsprozess selbst sowie in der Wahl der Materialien/des Mediums wiederfinden. Weiters geht es darum diese Werte weiterzugeben.5 Einen weiteren Rahmen für nachhaltige Entwicklung definieren auch die 17 Ziele der Vereinten Nationen in ihrer Agenda 2030(Sustainable Development Goals).6

Weil sich im Design Haltung und Werte manifestieren, können diese dadurch auch aktiv vermittelt werden. Ebenso lassen sich die SDG durch Design in die Sprache und Codes von Produkten, Dienstleistungen, Geschäftsmodellen und Infrastrukturen übersetzen.7

Liedtke, C.; Kühlert, M.; Huber, K.; Baedeker, C. (2019)


Peter Claver Fine empfielt Design-Studierenden sechs Prinzipien, wie sie nachhaltige Werte in ihre Arbeit miteinbeziehen können.

  • A reform minded approach to design
    Reform sollte immer ein Bestandteil der Rolle von Design sein.
  • A holistic approach to design
    Design sollte interdisziplinär und Medienneutral sein.
  • An international spirit
    Auch wenn Design lokal stattfindet, sollte es in einem Konzept von Globalisation betrachtet werden.
  • A rejection of assumptions
    Dieser Punkt bezieht sich auch auf vergangene Bewegungen in der Designgeschichte. Jede Avant Garde Bewegung hat ihren Ursprung darin, in Frage zu stellen was Design überhaupt bedeutet oder bedeuten soll.
  • A commitment to fundamentals
    Mit der Bekenntnis der Grundlagen beschreibt Fine „truth to materials“ und „truth to process“. Mit der „truth to materials and process“ wird erläutert, dass gewählte Materialien und ihre Produktionsweisen direkte ökologische Auswirkung haben und Designer*Innen durch ihre Wahl auch erheblichen Einfluss auf Weiterentwicklung und Durchsetzungsvermögen haben.8

Designers cannot wait for the right client to come along and offer the opportunity to improve our world. It is in both cases a matter of self-preservation.

Peter Claver Fine (2016)
Quellen:
1 Fuad-Luke, Alistair (2009). design activism. beautiful strangeness for a sustainable world. Earthscan. London
2 Bieling, Tom (2020). Wicked Problems mehr denn je?! Gedanken zu Horst Rittel. In: DESIGNABILITIES 
Design Research Journal, (07). https://tinyurl.com/ya6h3ayh ISSN 2511-6274 (3.12.2021)
3 Bieling, Tom (2020). Wicked Problems mehr denn je?! Gedanken zu Horst Rittel. In: DESIGNABILITIES 
Design Research Journal, (07). https://tinyurl.com/ya6h3ayh ISSN 2511-6274, S. 2 (3.12.2021)
4 Ndem, Emmanuel Joseph (2019). The place of a graphic designer in environmental sustainability. in: International Journal of Engineering Applied Sciences and Technology. Vol. 4. 251-257
5 Ndem, Emmanuel Joseph (2019). The place of a graphic designer in environmental sustainability. in: International Journal of Engineering Applied Sciences and Technology. Vol. 4. 251-257
6 United Nations. Global Sustainability Goals. https://sdgs.un.org/goals (3.12.2021)
7 Liedtke, C.; Kühlert, M.; Huber, K.; Baedeker, C. (2019): Transition Design Guide – Design für Nachhaltigkeit. Gestalten für das Heute und Morgen. Ein Guide für Gestaltung und Entwicklung in Unternehmen, Städten und Quartieren, Forschung und Lehre. Wuppertal Spezial Nr. 55, Wuppertal Institut für Klima, Umwelt, Energie. Wuppertal. Online verfügbar: https://wupperinst.org/design-guide ISBN 978-3-946356-13-4
8 Claver Fine, Peter (2016). Sustainable Graphic Design: Principles and Practices. Bloomsbury Academic.

AR in Education #3: Technological aspects of AR

Hello again! In this 3rd blog entry I will give an overview of the technology behind AR that makes the magic happen. Let’s go.

Technology

To superimpose digital media on physical spaces in the right dimensions and at the right location 3 major technologies are needed: 1) SLAM, 2) Depth tracking and 3) Image processing & projection

SLAM (simultaneous location and mapping) renders virtual images over real-world spaces/objects in the right dimensions. It works with the help of localizing sensors (i.e. gyroscope or accelerometer) that map the entire physical space or object. Today, common APIs and SDKs for AR come with built-in SLAM capabilities.

Depth tracking is used to calculate the distance of the object or surface from the AR device’s camera sensor. It works the same a camera would work to focus on the desired object and blur out the rest of its surroundings.

Then the AR program will process the image as per requirements and projects it on the user’s screen (For further information on the “user’s screen” see section “AR Devices” below). The image is collected from the user’s device lens and processed in the backend by the AR application. 

To sum up: SLAM and depth tracking make it possible to render the image in the right dimensions and at the right location. Cameras and sensors are needed to collect the user’s interaction data and send it for processing. The result of processing (= digital content) is then projected onto a surface to view. Some AR devices even have mirrors to assist human eyes to view virtual images by performing a proper image alignment.

Object detection

There are two primary types used to detect objects, which both have several subsets: 1) Trigger-based Augmentation and 2) View-based Augmentation

Trigger-based Augmentation

There are specific triggers like markers, symbols, icons, GPS locations, etc. that can be detected by the AR device. When pointed at such a trigger, the AR app processes the 3D image and projects it on the user’s device. The following subsets make trigger-based augmentation possible: a) Marker-based augmentation, b) Location-based augmentation and c) Dynamic augmentation.

a) Marker-based augmentation

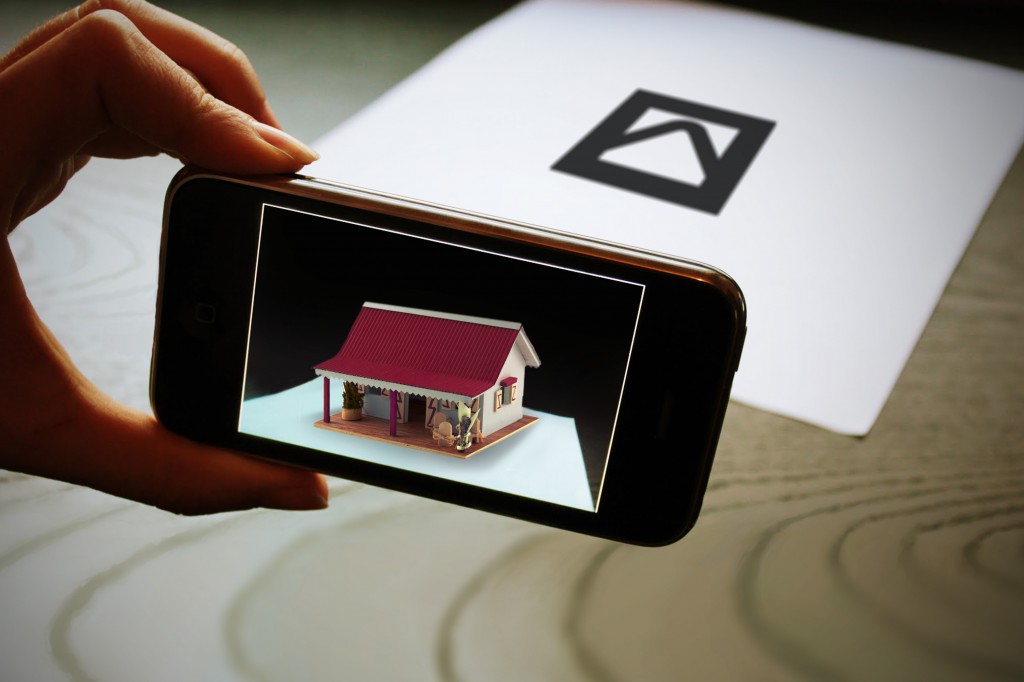
Marker-based augmentation (a.k.a. image recognition) works by scanning and recognizing special AR markers. Therefore it requires a special visual object (anything like a printed QR code or a special sign) and a camera to scan it. In some cases, the AR device also calculates the position and orientation of a marker to align the projected content properly.

Example for marker-based augmentation with a special sign as trigger

b) Location-based augmentation

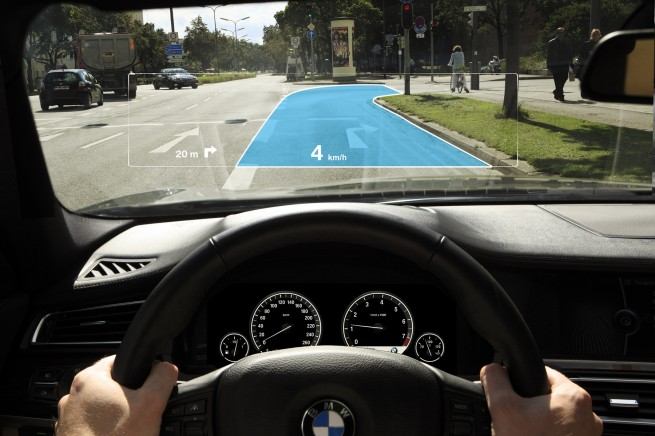
Lacotion-based (a.k.a. markerless or position-based augmentation) provides data based on the user’s real-time location. The AR app picks up the location of the device and combines it with dynamic information fetched from cloud servers or from the app’s backend. I.e. maps and navigation with AR features or vehicle parking assistants work based on location-based augmentation.

BMW’s heads-up display as an example of location-based augmentation

c) Dynamic augmentation

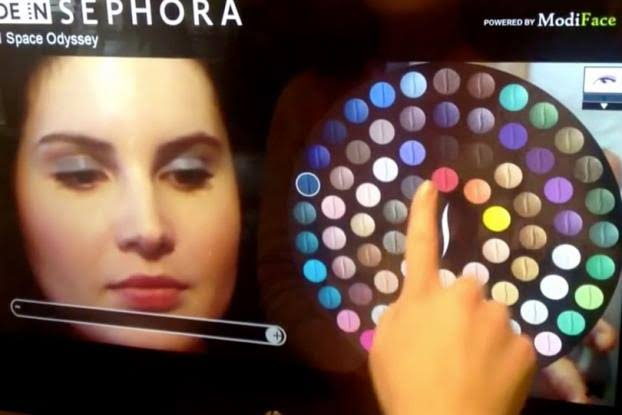
Dynamic augmentation is the most responsive form of augmented reality. It leverages motion tracking sensors in the AR device to detect images from the real-world and super-imposes them with digital media.

Sephora’s AR mirror as an example of dynamic augmentation. The app works like a real-world mirror reflecting the user’s face on the screen.

View-based Augmentation

In view-based methods, the AR app detects dynamic surfaces (like buildings, desktop surfaces, natural surroundings, etc.) and connects the dynamic view to its backend to match reference points and projects related information on the screen. View-based augmentation works in two ways: a) Superimposition-based augmentation and b) Generic digital augmentation.

a) Superimposition-based augmentation

Superimposition-based augmentation replaces the original view with an augmented (fully or partially). It works by detecting static objects that are already fed into the AR application’s database. The app uses optical sensors to detect the object and relays digital information above them.

Hyundai’s AR-based owner’s manual allows users to point their AR device at the engine and see each component’s name + instructions for basic maintenance processes.

b) Generic digital augmentation

Generic digital augmentation is what gives developers and artists the liberty to create anything that they wish the immersive experience of AR. It allows rendering of 3D objects that can be imposed on actual spaces.

The IKEA catalog app allows users to place virtual items of their furniture catalog in their rooms based on generic digital augmentation.

It’s important to note that there is no one-size-fits-all AR technology. The right augmented reality software technology has to be chosen based on the purpose of the project and the user’s requirements

AR Devices

As already mentioned in my previous blog entry, AR can be displayed on various devices. From smartphones and tablets to gadgets like Google Glass or handheld devices, and these technologies continue to evolve. For processing and projection, AR devices and hardware have requirements such as several sensors, cameras, accelerometer, gyroscope, digital compass, GPS, CPU, GPU, displays and so on. Devices suitable for Augmented reality can be divided into the following categories: 1) Mobile devices (smartphones and tablets); 2) Special AR devices, designed primarily and solely for augmented reality experiences; 3) AR glasses (or smart glasses) like Google Glasses or Meta 2 Glasses; 4) AR contact lenses (or smart lenses) and 5) Virtual retinal displays (VRD), that create images by projecting laser light into the human eye.

That’s it for today 🙂 

_____

Sources:

https://thinkmobiles.com/blog/what-is-augmented-reality/

https://learn.g2.com/augmented-reality-technologies

Reference works for Extended Guitar Performance #2

Albeit having used Google Scholar to find scientific articles extensively while writing my Bachelor’s thesis, I never considered using it for my Extended Guitar performance project – until today. It was a good decision for I discovered some great articles that deal with electric guitars and possibilities to further extend or evolve their sonic capabilities. One of these articles is briefly summarised below.

MIDI Pick

The first article I found documents the development of the so-called MIDI Pick. This special pick serves a dual purpose: on one hand, it can be used as a conventional pick to pluck the strings of an electric guitar and on the other hand, it functions as a pressure trigger, interpreting finger pressure exerted on it as analog or digital values. The pick itself is made of wood, rubber and double-sided tape with a force-sensing resistor mounted on it. The sensor is connected to an Arduino microcontroller and Bluetooth module is used to transmit the data by wireless means. The two latter items are attached to strap worn around the wrist. As already mentioned, the MIDI pick needs to be squeezed and the harder the pressure, the higher a numerical number is outputted. The output is received by a MSP/Max patch that relays the data to other patches. Furthermore, the MIDI pick can operate in serial or switch mode with the mode being controlled by a switch on the wrist. In serial mode, values between 0 and 127 are transmitted. In the switch mode, the pick sends a 1 when the pressure exceeds a certain threshold and a 0 when that pressure is exceeded again, essentially making the pick a toggle switch. In a live performance test, the developer successfully tested the MIDI pick, using it as a controller for a white noise generating patch. In this context, the developer also noted that being capable of adequately using the MIDI pick necessitated time and practice. The 2006 article also spoke about a future outlook involving a updated version of the MIDI pick, however, I did not find another article documenting the further development process of the pick.

Personal thoughts

This article is definitely interesting for my project because the latter will also involve using the pick one way or another to add to the sonic capabilities of the guitar. In fact, the notion of placing a pressure sensor opened a whole new world of possibilities for me as far as sensors are concerned. Let me explain: Until now, I only thought about mounting an accelerometer/gyroscope/IMU kind of sensor on the pick or the back of the hand in order to register e.g. the strumming movements of the hand. However, I see now that I need not to restrict my thinking to the afore mentioned sensors alone. While the idea of using a pressure sensor is evidently taken (XD), I immediately thought of a touch sensor, more precisely, a capacitive touch sensor. A capacitive touch sensor measures touch based on electrical disturbance from a change in capacitance and not based on pressure applied (in contrast to a resistive touch sensor). As far as applications in a guitar context are concerned, such a touch sensor may be used to trigger or activate an effect by double tapping on the pick for example. Admittedly, double tapping would not be possible with a conventional pick that needs to be held between thumb and forefinger all the time. However, by using a so-called thumb pick, a pick that is strapped to the thumb, the forefinger would be free to tap onto the underside of the pick in order to trigger a certain value. This idea will certainly find its way into my final project concept. Beyond that, the article also shows that it is possible to place a sensor on a pick without compromising playability.

Sources:

Vanegas R. (2007, June 6-10). The MIDI Pick – Trigger Serial Data, Samples, and MIDI from a Guitar Pick. Proceedings of the 2007 Conference on New Interfaces for Musical Expression (NIME07), New York, NY, USA.  https://dl.acm.org/doi/pdf/10.1145/1279740.1279812?casa_token=kT0EgXV1DtwAAAAA:WQ1bNZkrY9hVGEbT4nQbTd8kk6Miz5_ZPl6ZkRCHTPXQPFpULPva5_QQ3GLr6tGDKq-NZTF0cjF3gA

http://roy.vanegas.org/itp/nime/the_midi_pick/

Reference works for Extended Guitar Performance #1

I dedicated this weekend to a first round of finding similar reference works and publications since this is also one of the tasks due for the Exposé.

Imogen Heap’s Mi.Mu gloves

One of the artists I stumbled upon during my research that makes use of hand movements and gestures to perform and compose her music is Imogen Heap. Considered a pioneer in pop and electropop music, she is a co-developer of the so-called Mi.Mu gloves, gesture controllers in glove form that Heap uses to control and manipulate recorded music and/or her musical equipment during a (live) performance.

As she explained in an interview with Dezeen, Heap found the conventional way of playing keyboards or computers on stage very restrictive since most of her actions like pressing buttons or moving a fader were hidden from the audience and thus not very expressive, even though they may constitute a musically important act. Her goal was to find a way to play her instruments and technology in a way that better represents the qualities of the sounds produced and allows the audience to understand what is going on on stage.

Inspired by a similar MIT project in 2010, the gloves underwent eight years of R&D, with the development team consisting of NASA and MIT scientist alongside Heap. While Heap has used prototypes for several years now during her live performances, also other artists were occasionally seen to try them out. Ariana Grande for example used the gloves on her 2015 tour. In July 2019, the Mi.Mu gloves became commercially available for the first time promising to be “the world’s most advanced wearable musical instrument, for expressive creation, composition and performance”.

The Mi.Mu gloves contain several sensors including:

  • an accelerometer, a magnetometer, and a gyroscope in the form of an IMU motion tracker, located at the wrist, that gives information regarding the hand’s position, rotation and speed
  • a flex sensor over the knuckles to identify the hand’s posture in order to interpret certain gestures
  • a haptic motor that provides the “glove wielder” with haptic feedback: it vibrates for example if a certain note sequence is played

To send the signals to the computer, the gloves use WLAN and Open Sound Control (OSC) data instead of MIDI data. The gloves themselves are made from e-textiles, a special kind of fabric that acts as a conductor for information. Furthermore, the gloves come with the company’s own Glover software to map your own custom movements and gestures which can be integrated into DAWs such as Ableton Live or Logic Pro X.

Unfortunately, the Mi.Mu gloves still cost about £2,500 (converted about 3,000 €) and are, on top of that, currently sold out due to the worldwide chip shortage. A limited number of gloves is expected to become available in early 2022.

Key take-aways for own project

First of all, Heap’s Mi.Mu gloves serve to confirm the feasibility of my project since the technology involved is quite similar. The gloves also use an IMU sensor which is also my current go-to sensor to track the movements of a guitar player’s hands. Although Heap mostly uses the gloves to manipulate her voice, I found a video that shows her playing the keyboard in between as well. This shows that wearing the sensors on one’s hands does not necessarily interfere with playability of an instrument which is a very important requirement for my project.

Interestingly, the gloves rely on WLAN and OSC instead of MIDI which is definitely a factor that calls for additional research from my side. OSC comes with some advantages over MIDI especially as far as latency and accuracy are concerned which makes it ideal for use in real-time musical performances. Furthermore, data is conveyed over LAN or WLAN which eliminates the need for cables. Moreover, OSC is supported by open-source software such as Super Collider or Pure Data which could make it even more attractive for my project.

Finally, I want to use Imogen Heap and her glove-supported performances as a source of inspiration in order to come up with playing techniques or effect possibilities for my own project.

Sources:

https://www.dezeen.com/2014/03/20/imogen-heap-funding-drive-for-gloves-that-turn-gestures-into-music/

https://www.mimugloves.com/gloves/

https://www.engadget.com/2019-04-26-mi-mu-imogen-heap-musical-gloves-price-launch-date.html?guccounter=1&guce_referrer=aHR0cHM6Ly9lbi53aWtpcGVkaWEub3JnLw&guce_referrer_sig=AQAAABq203VmIuqq3D8e81XRlsg9lu1bLGt7Zf8fnxd6554YvV1nBE0XW87WoYfLl5DWNMybFLUsgSz3rlthBtL1ZvEsXv7Szdyv8hIAVr64tKPltPEApCyqtPQvmqWLaQDUfbX1_LIp7oLR6PbzavY3NeWb0NBv2rfC6A1MyUCkG0LZ

https://www.popularmechanics.com/technology/gadgets/reviews/a10461/power-glove-makes-music-with-the-wave-of-a-hand-16686382/

https://en.wikipedia.org/wiki/Imogen_Heap

https://www.uni-weimar.de/kunst-und-gestaltung/wiki/OSC

https://opensoundcontrol.stanford.edu/

Kids and Interaction (II): UX for kids. Does UX change when it is aimed at kids?

In order to approach the problem from the initial topic, which aims to study interaction for children in educational exhibitions, it is necessary to divide the problem into parts.

Therefore and starting from the beginning, it is time to study and analyse the differences in UX for adults and children. Creating an interface for kids is not simply a matter of using something made for adults and then changing the language for “dummies”. Designing interfaces for children goes much further than that.

One of the most important and most frequently mentioned issues throughout the different articles reviewed is the importance of focusing the design on the right age group. The age steps in children are much stronger than in adults. When we create a prototype aimed at older people, we can determine a target with an age range of 20 years difference. In contrast, in children the difference of 4 years of age already implies big changes related to skills and abilities. That is why in the next analyses we will try to focus the search on a target age range of 6 to 8 years, ages at which children are able to read, but still have a limited vocabulary.

After reading a large number of articles related to the subject, we have extracted the most important points (even though they may sometimes seem obvious) that have been most frequently repeated among authors. Some of the things to keep in mind are:

  • Children need instant feedback with every action. This means not only informing the user that something has been clicked, but also keeping in mind that problems need to be broken down into small pieces.
  • Multiple navigation is complicated to understand, so it is easier for them to receive information in the form of a story. This means that storytelling is key in children’s interfaces.
  • Reading ability varies with age, but it is true that children usually avoid reading. So, if texts are added, they should be very concise, adapted and direct.
  • The adaptability of the interface takes into account several concepts such as font size and colour. In case of interfaces for children, font sizes should always be between 12pt and 14pt and colours should be saturated and vivid. This is a concept that normally in interfaces for adults can be distracting, but it is something that keeps children interested and connected with the content. A similar idea includes the use of sounds and animations.
  • Children tend to have an explorative attitude towards interfaces, “mine-sweeping” the screen.
  • Finally, it is important to bear in mind that children tend to take everything they see literally, so it is necessary to think deeply about the use of icons and images.

With this little research, it is time to look at existing children’s displays that may or may not meet these points.

REFERENCES

Kosa, M. ‘Children-first design: why UX for kids is a responsible matter’, UX Collective, 6 January 2018, <https://uxdesign.cc/ux-for-kids-responsible-matter-802bd12fe28c>

Molnár, D. ‘Product Design For Kids: A UX Guide To The Child’s Mind’, uxstudio, 31 July 2018 <https://uxstudioteam.com/ux-blog/design-for-kids/>.

Nielsen, J. & Scherwin, K. ‘Children’s UX: Usability Issues in Designing for Young People’, Nielsen Norman Group, 13 January 2019 <https://www.nngroup.com/articles/childrens-websites-usability-issues/>.

Osborne, P. ‘UX Design for Kids: Key Design Considerations’, UX Matters, 6 January 2020 <https://www.uxmatters.com/mt/archives/2020/01/ux-design-for-kids-key-design-considerations.php>

GameDaily Connect. (018, June 28). UI/UX Design Principles for Kids Apps | Ashley Samay [Video]. YouTube. https://www.youtube.com/watch?v=ud0CJ-27QQU&ab_channel=GameDailyConnect

KURSÄNDERUNG

Nun hatte auch ich das erstes Gespräch mit meinem Betreuer. Die erste Idee “Foley App” fand auch er sehr interessant und nützlich. Jedoch legte er mir nahe, dass beim Umsetzen dieses Projektes App-Programmier-Skills notwendig wären, da es ihm nicht reichen würde, wenn ich den Inhalt & das Screen Design der App gestalten würde. App-Programmierung zu lernen ist für mich keine Option, da ich nicht die nötigen Ressourcen dafür besitze.

Ich finde es einerseits sehr schade, da ich wirklich großes Potential in der Idee gesehen habe und ich sehr gern etwas erschaffen würde, dass wirklich praktische Verwendung findet. Zumindest in meinen Arbeitsprozessen. Jedoch verstehe ich die Entscheidung meines Betreuers ebenso.

Wir entschieden uns dann für die 2. Idee, die Installation. Ich bin nicht wirklich zufrieden mit der Entscheidung, da diese Idee eine eher obligatorische war, um auf insgesamt 3 Ideen zu kommen. Nicht dass es mich nicht reizt eine solche Installation zu erschaffen, jedoch ist das Interesse im Verhältnis zur Foley App relativ gering.

Nichtsdestotrotz werde ich mich nun in diese Richtung weiter Orientieren, und überlege mir mit Pure Data zu arbeiten.

The Bowed Tube: a Virtual Violin

In the following blog post, a journal article is analysed in the course of the subject Project Work 1 with Dr. Gründler.

The chosen paper is documenting the development process of virtual violin usable for real-life performances. It consists of two components: a spectral model of a violin as well as a control interface that registers the movements of the player. The control interface consists of a violin bow and a tube with strings drawn upon it. The system uses two motion trackers to capture the gestures whose parameters are then sent to the spectral model of the violin. This model is able to predict spectral envelopes of the sound corresponding to certain bowing parameters. Finally, an additive synthesizer uses these envelopes to produce the final violin sound. MAX/MSP serves as the software framework and three external MAX/MSP objects were specifically developed.

I chose this article because I work on a similar project myself that aims to extend the sounds of an electric guitar using sensor data. That is why I find the above-mentioned system pretty genius especially from the technical aspect. However, although the article reads that there is a video that shows how the system works, I would have been interested in the feedback of real violin players regarding the Bowed Tube. In my opinion, it would have been great if the authors had included a kind of survey in their article that asks violin players to test the Bowed Tube and then uses their collected feedback to gain insights on the actual playability and use of the Bowed Tube as well as possible improvements. Finally, I also have to admit that I do not see a lot of use cases for the Bowed Tube. In fact, the article itself is very vague about which real life problem it tries to solve with its Bowed Tube violin. It is definitely a stunning project from a technological and scientific point of view. Maybe I am a too practically orientated person, but I cannot help to ask myself – why not use a real violin?

Sources:

Carillo A. P. & Bonada J. (2010 June 15-18). The Bowed Tube: a Virtual Violin. Proceedings of the 2010 Conference on New Interfaces for Musical Expression (NIME 2010), Sydney, Australia.