Having my master thesis in mind, I started to overthink my topic and the research I conducted throughout the last two semesters.
First, I went back to the beginning and asked myself again how a virtual fitting room could be included on a website to improve the shopping experience online. For this approach, I envisioned a virtual fitting room for swimwear and finally turned down the idea. I then focused on size guiding in swimwear and looked into existing online swimwear stores for women to compare their brand stories and business models. I compared their size guides, fabrication methods, sustainability, collections, designs, and supply. Many of those websites confused me a lot. I had the feeling of not quite understanding the brand’s values and story. I instantly thought about Miller’s quote (“you confuse, you lose”) and was thinking he is damn right, I would never order a bikini from this online store. This was a key moment for me because I finally found a way to combine branding/storytelling and interaction design. I took a step back from founding a sustainable brand with an immersive shopping experience and a step towards telling a story of a sustainable brand virtually. In my further research, I would like to focus on brand storytelling on websites and online stores. In addition, it would be interesting to even create a prototype website for a fictional brand (if I would have to choose now, I would build an online shop for women’s swimwear). The focus should be on connecting visitors of the website with the company’s story and values.
For my master thesis I can imagine to:
– dive deep into the theory of storytelling for a company
– find various methods to tell a brand story virtually
– create a universal framework on how to include a brand’s story into their web design
– designing a website/ an online store for a fictional company as a storytelling example
As mentioned in my last blog entry “Sustainability x Augmented Reality”, AR has the potential to improve a brand’s transparency and loyalty, as well as spread the brand’s message and support its sustainable endeavors.
Through further research, I looked into branding concepts and storytelling. I was interested in how companies bring their story to life and how they create a brand experience. During my research in this field, I found many examples of companies that try to create a stronger connection with their customers with branded interactions and experiences.
The question that stood out for me is how a brand can clarify its brand story for customers on their website/online shop. I was wondering if there is a way AR or technology, in general, can help to create a brand experience that fits the brand values perfectly. A was researching the combination of storytelling and technology in the following.
I got overwhelmed with the big fashion world, so I decided to narrow down “buying fashion online” to “buying sustainable swimwear for women online”. Researching a more specific field made it easier for me to compare existing brands and their stories. In the following, I will give a short introduction of my main findings on brand storytelling I found on my research journey.
Building a story brand and unleashing the power of storytelling
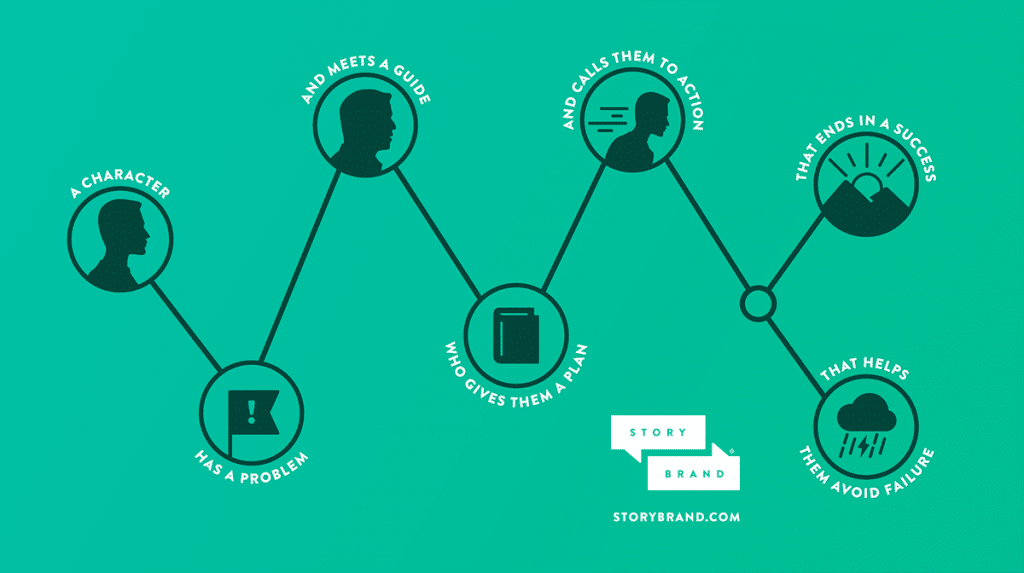
Since I got more and more interested in how to create a clear and well-rounded brand story, I read two books about storytelling in the branding process which gave me interesting insights. The first one by Donald Miller “Building a Story Brand”. The book by Miller is all about clarifying a brand’s message in order to get the customers’ attention. The author is focused on selling products online and turning the buying process into an adventure for the clients. In order to achieve the clearest possible message for a brand and get its audience to understand the brand and want to be part of it, the author identifies seven steps to a successful storytelling. The most important lessons I learned from the book are:
1) Make your customer the hero of the story and help them fulfill just one of their desires Simply listing the product or service a company offers is not enough. The brand has to make it clear by identifying how the offering will fulfill the customer’s needs.
2) Identify people’s problems and pain points as the villain to keep them interested Turning problems people need a solution to into villains that they, as the hero of the story, need to conquer, will work in favor of the brand. For instance, a painter could identify the feelings of embarrassment that a customer might have if their house paint looks shabby, as the villain.
3) Give customers a vision of the transformation they will accomplish by purchasing your product People desire success and a brand can help customers to have a vision of how its product can boost their success by appealing three desires: status, completeness and self-acceptance.
A great quote from the book I will keep in mind: “NEVER PLAY THE HERO IN THE STORY, ALWAYS PLAY THE GUIDE.” and: “IF YOU CONFUSE, YOU LOSE”
Storybrand Outline
“Building a Brand Story” is an interesting and helpful book with many real-life examples. It offered me great support to get closer to the core message of a brand.
The other book “Unleash the Power of Storytelling” is by the author Rob Biesenbach. The chapter I found most interesting “Emotion Fuels Stories” is about giving a brand story an emotional core by winning hearts and changing minds. Biesenbach offers some guiding questions for creating a brand story:
– Is the character real and relatable? The brand story needs to be brought down to the human level
– Is there sufficient conflict? Drama is needed to hold the audience’s attention
– Are the stakes high enough? For a story to work, there has to be something important at stake
– Is there a clear cause and effect?
– Is there an emotional core? If the audience feels something, they are more likely to act
Biesenbach makes a point by saying that in most cases communication involves stories. He also suggests building one’s personal brand story to understand oneself better and assess various opportunities. Also a great book with sample stories.
REFERENCES
Biesenbach, Rob (2018): Unleash the Power of Storytelling. Win Hearts, Change Minds, Get Results.
Miller, Donald (2017): Building a Story Brand. Clarify Your Message So Customers Will Listen.
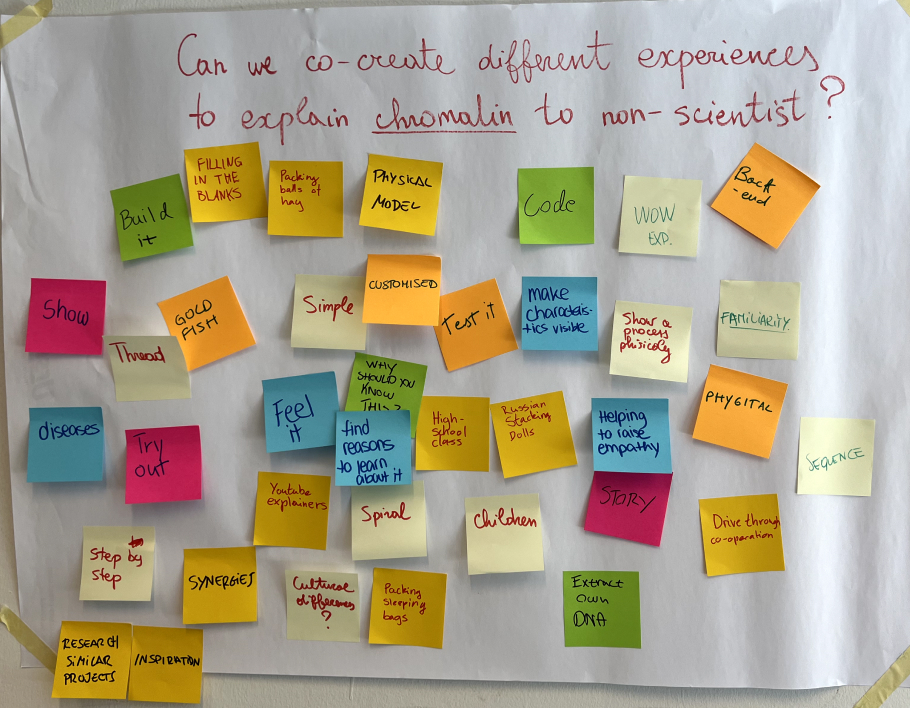
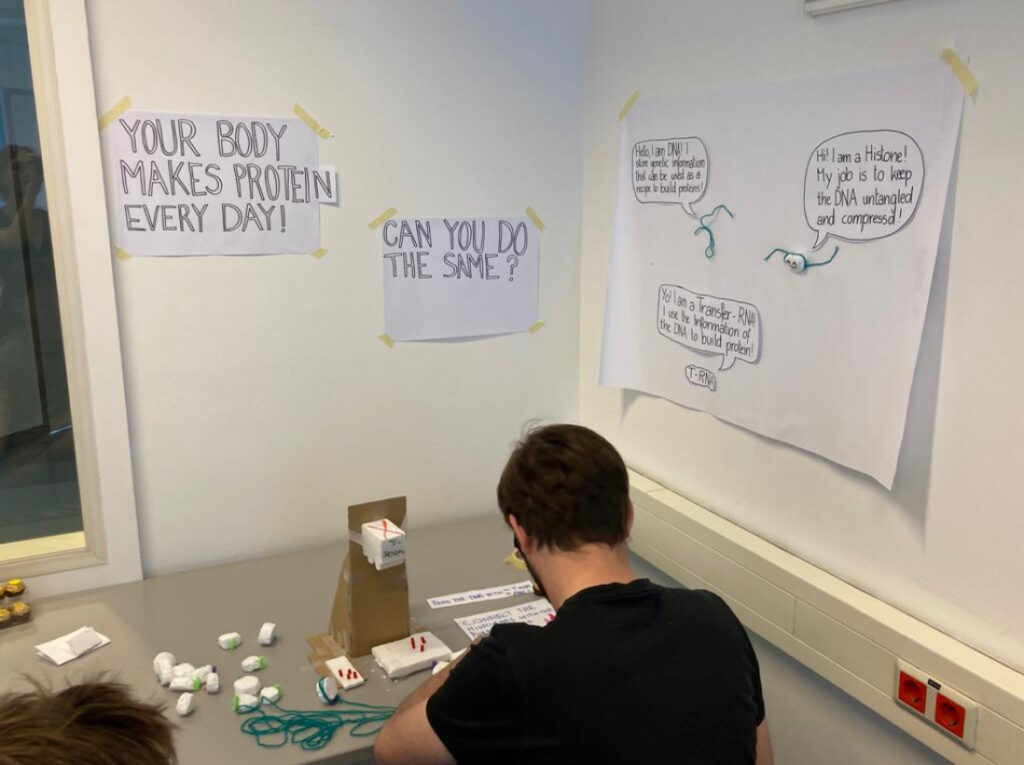
During the international week, I attended the workshop “prototyping phygical experiences to bring the lab closer to the street” by Carla Molins. Overall, the workshop was about how we can use interaction design to communicate scientific topics. Our task was to create a prototype that explains chromatin. Chromatin is a way of the DNA-string to fit untangled and in order into the chromosome.
Day 1 | Research and Ideation
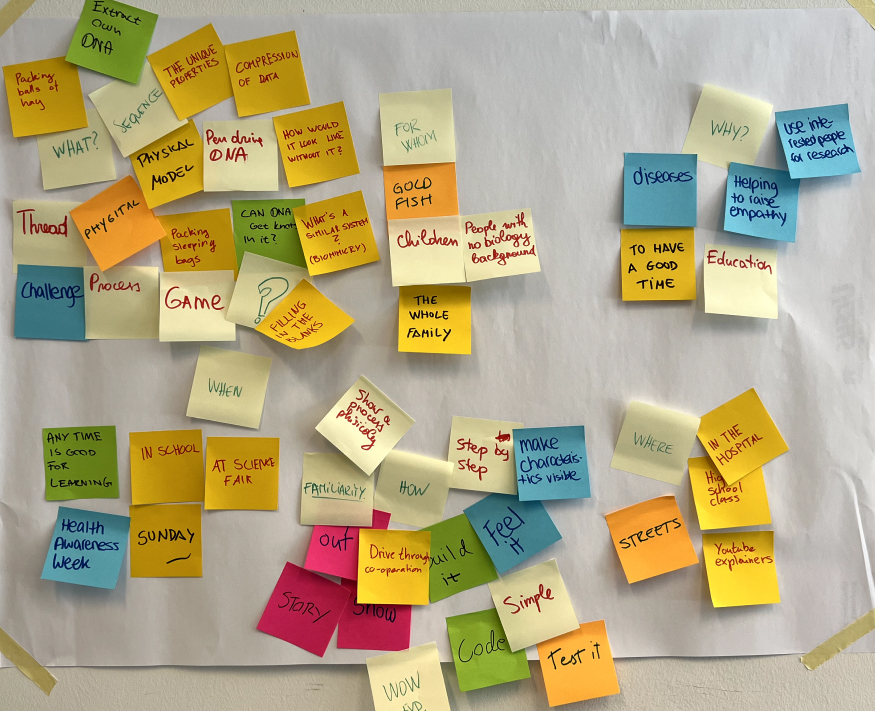
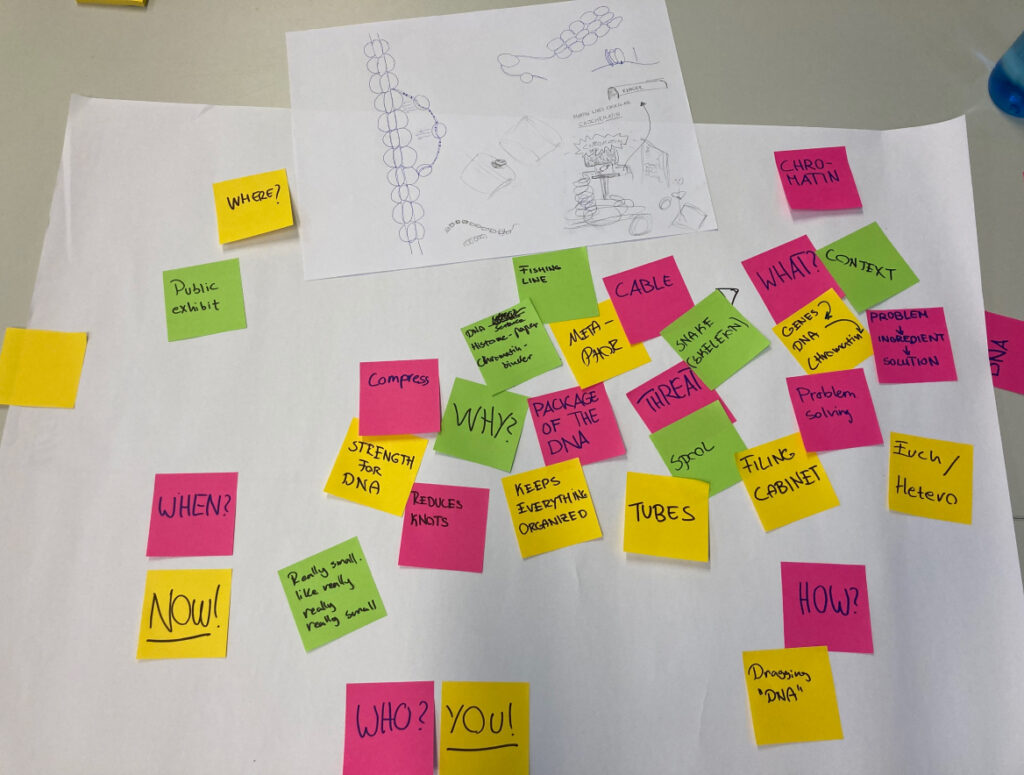
On the first day, we got an explanation of Carla about what chromatin is and about the use of it. After that, we jumped right into the topic and had a brainstorming session together. We ask ourselves the question “Can we co-create different experiences to explain chromatin to non-scientists?” and wrote everything that came to our mind on post-it notes and put them on the wall. Afterwards, we tried to bring some order into it and grouped the words into 6 different categories: “What?”, “Where?”, “When?”, “How?”, “For whom?” and “Why?”. Then, we separated in different groups of two to work on our concept. In our group, consisting of Fridtjof and me, we started with trying to answer the question together again. That was kind of hard to do, because we felt like we did not know that much of chromatin yet to come up with a good concept.
Day 2 | Ideation and Prototyping
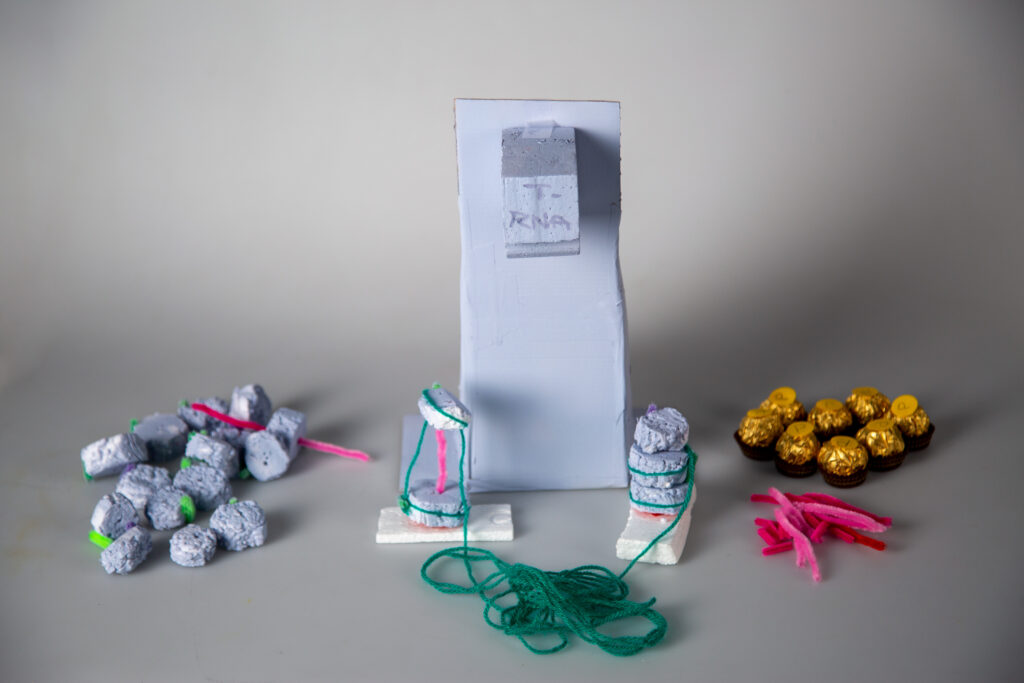
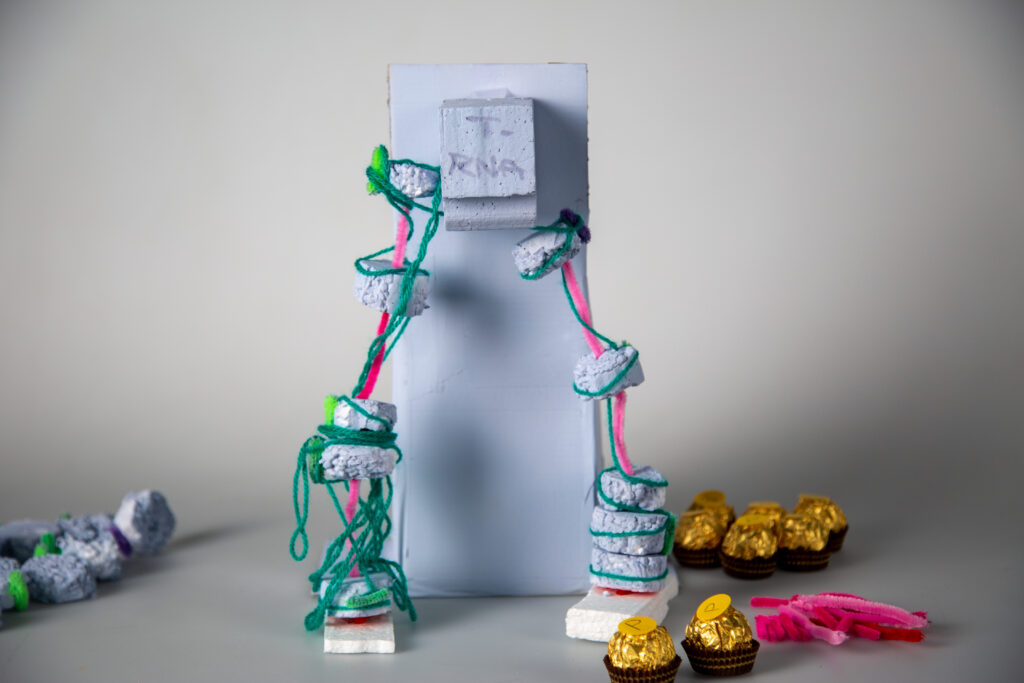
On this day, Carla was unfortunately sick and stayed at home, but we had zoom calls with her during the day to keep her up to date about our process. We started with researching more about the topic to get a deeper understanding of it and to make it easier for us to create a concept. We even called Fridtjofs mother, because she is a biologist, so she could also give us an explanation. Then, we all went in different directions with our prototypes and tried to explain different parts of it. Our concept was about to explain the different kinds of chromatin: Euchromatin and heterochromatin. Euchromatin is a “loose” structure, where the information can be easily accessed in contrast to heterochromatin. We decided to have the user build the structure him/herself to get a better understanding of it. To showcase the euchromatin, we made a “T-RNA Scanner”, which reads the information stored in the euchromatin to build protein, which the user got in form of a chocolate. During the day, we also pitched our concepts to each other and evaluate them together, which was really helpful. Then, we already started building the prototype. For our prototype, we used wool, pipe cleaner and Styrofoam. In addition, we created posters that gave instructions and explanations regarding our prototype. The creation of the concept and prototype was an iterating process, because we already made a few small tests and adapted the prototype/concept regarding the outcome.
Day 3 | Testing and Enhancing
On this day we performed around five test with different participants. The main outcome was that we should think about our posters again, since we had a lot of different posters with no clear hierarchy so the users got a bit confused or did not recognized them at all. So we spend a lot of the time trying to find out what information is important and should be on the posters, what we can exclude from it and what the overall structure should be. After we were happy with our poster, we enhanced our prototype with different supplies, we bought in the hardware store. We also managed to go to the photo studio to get some pictures of our prototype. We also spend a lot of the day testing the projects of the other people.
Conclusion
I overall really enjoyed the workshop and I think it is a really interesting topic, in which I would like to work on in the future as well. Carla was also a really great teacher. She could answer a lot of our questions and really helped us improve the projects. The workshop was really great to get a bit of an insight into the topic of science communication through interaction design. But I also think that the timeframe for the workshop was a bit too little, because I think we did not have a lot of time to do proper research about this topic and really understand what chromatin is, so I think our projects would need some further iterations to really work. But in general, it was really nice to have the opportunity to meet people out of different universities and dive into different fields for a week. It was also very interesting and inspiring to see what other workshops have done during the week.
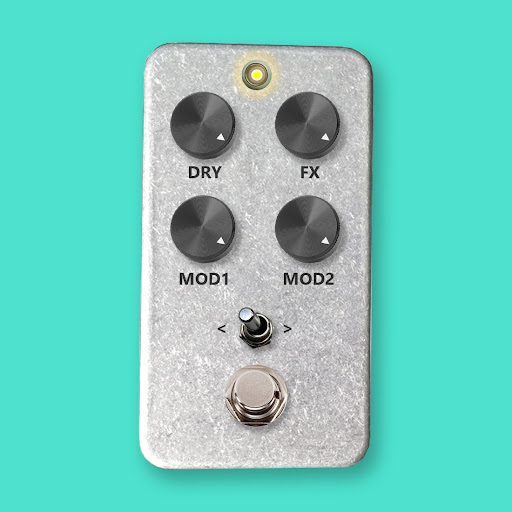
As it is not always possible to set up a network communication with Bela, I plan to make the physical interface completely independent from the OSC control to avoid any usability issues. To achieve this, I will add a toggle switch to the physical interface, which will allow for the selection of the effects. Additionally, I will add an RGB LED to the interface, which will always display the color of the effect in use. For this, I might have to change to the larger Bela, as the mini version I am currently using doesn’t offer any analog outputs. Another benefit of the larger Bela over the Bela Mini is that it includes a line out in addition to the normal audio out, meaning I could have an extra headphone out on the unit.
I also plan to expand the OSC interface, so it can offer more detailed parameter settings. One idea is to include presets, which can be saved and recalled at any time. Additionally, I would integrate a tuner that is only accessible in the OSC interface. As already mentioned I will try to solve the issues with the convolution algorithm, so I can load Impulse Responses, which would also only be available in the OSC interface. Finally, as this is an open-source project, I also plan to set up a Git Repository, where I provide all the material and information necessary to reproduce this project.
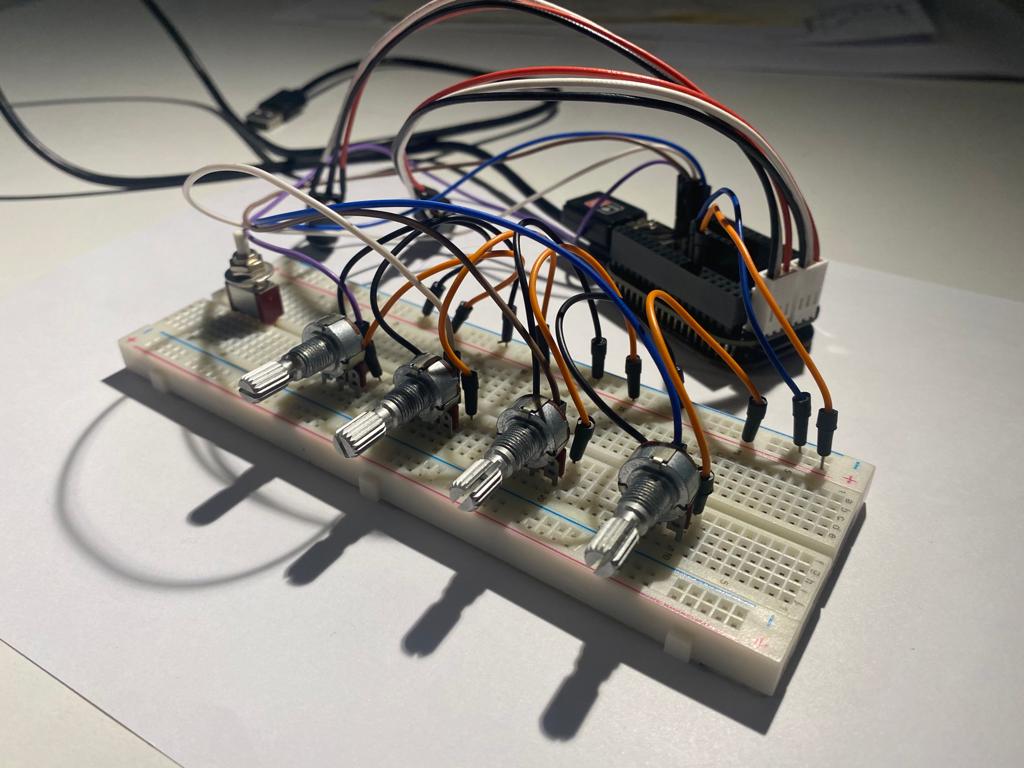
Since I also wish to develop a physical interface in addition to the OSC control, I built a prototype to experiment with the possibilities. I want to keep the interface as simple as possible, so I set up only 4 potentiometers that allow the control of one effect at a time. To read the potentiometers from the analog inputs on Bela, I had to add a piece of code for each input in PD. As Bela handles analog inputs just as audio signals at the sampling rate, I had to set up an [adc~] object for each potentiometer respectively. The first 2 channels are reserved for the audio signal, but from 3 to 10, I was able to access the required analog inputs.
To convert the incoming values into numbers, I used the [snapshot~] object which takes a signal and converts it to a control value whenever it receives a bang in its left inlet. To make it output the value constantly, I connected a [metro] object to it, which bangs it continuously at a specified rate. After receiving a value between 0 and 1 from each potentiometer, I could already control all parameters manually. For those that need a range other than 0 to 1, I set up math calculations to translate the values to the required ones. Next, I set up a structure that routes the corresponding set of values to the selected effect.
To choose which effect is set on the physical interface I added a button to each unit in the OSC interface. These are then connected to their respective [spigot] objects in PD, which only pass the signal when the switch is on, thus routing the control values to the selected effect. Because the analog input values come in at a constant rate, they immediately force their initial value on the selected parameters. This leads to a conflict with the OSC interface as its values are always forced to the analog ones. To solve this problem, I implemented an if statement for all parameter sets, which immediately disconnects the physical interface in case there is a change within the OSC interface of the respective effect.
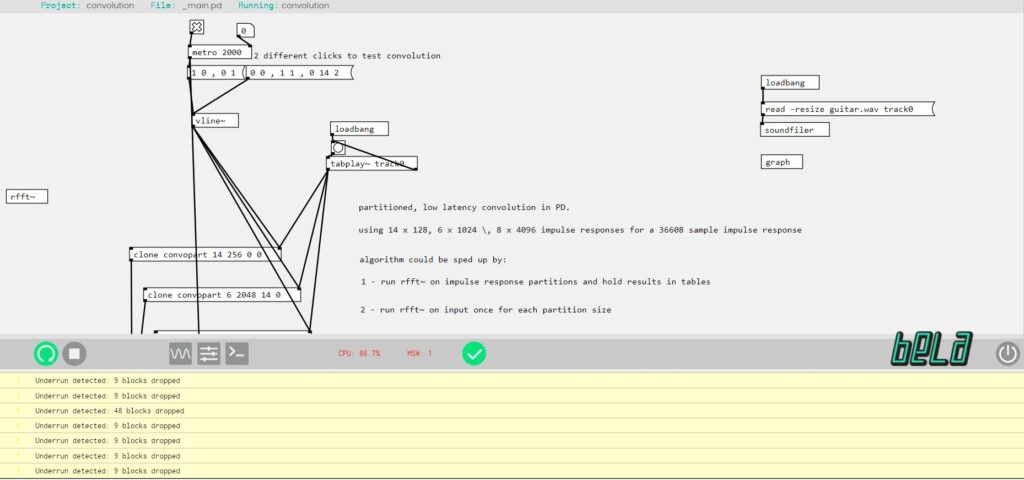
My next ambition was to add a convolution algorithm to the patch, so I can load impulse responses and achieve different kinds of reverbs, amp simulations, and special effects. There are various convolution externals for PD but my limitation, as usual, was the Vanilla library again. I tried uploading the externals to the same folder as the patch, but even so, all of them got rejected in the IDE.
The only vanilla-compatible solution I’ve found so far is a low-latency partitioned convolution algorithm by Tom Erbe. His patch should normally work on Bela, but since it uses the read-skip function to partition the IR sample 28 times, it requires a lot of processing power, exceeding Bela’s capacity and causing CPU overload. Erbe suggests that the convolution process can be sped up by either running [rfft~] on the impulse response partitions and storing the results in tables, or running [rfft~] on the input once for each partition size but unfortunately I haven’t been able to solve this issue yet.
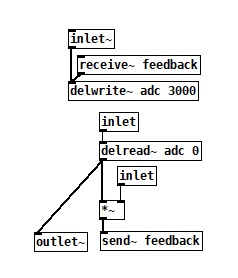
As all my experiments were completed with success so far, I was now able to add more effects to the chain by implementing the same well-tried principles. Based on my initial intention concerning the analog delay chain, I decided to add both a delay and a reverb effect to the patch. The delay is also based on the [delwrite~] and [delread~] objects and follows the principles of any usual digital delay pedal. The input signal gets delayed in the buffer with an amount between 0 and 3000 milliseconds which is then routed to the output. The input is also sent straight to the output where it gets mixed with the delayed signal. To create feedback, the delay signal is once fed back to the input, but as its level is always less than one its volume will decay over time.
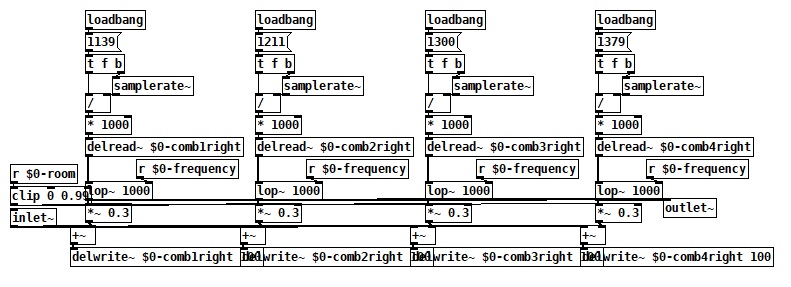
To build the reverb, I first tried to use the [rev1~] object, thinking it was part of the vanilla library. After I uploaded the patch to Bela, it turned out to be unsupported, so I had to find a Vanilla-friendly solution. Following some research, I learned that Katja Vetter made a freeverb abstraction only with Vanilla objects, but I couldn’t find the original patch, only an adapted version by Derek Kwan. As this project was available on GitHub and free to use, I implemented it into my project. Similar to my delay line, this patch also uses a series of comb filters implemented with the [delread~] objects to modulate the signal. In addition, a low-pass filter is applied to the taps, creating the opportunity to attenuate the reverb. Having previously set up all the networking structures for the OSC protocol, all I had to do was add the new parameters to both the TouchOSC interface and the PD patch and everything was up and running.
Once this was working properly, I could move on to my third experiment and add a control interface to the system. Having previously researched and gained practical knowledge about the Open Sound Control (OSC) protocol, it remained the obvious choice for this application as well. Since I already purchased the TouchOSC mobile application earlier, I decided to use it for this experiment, but because it is not a free software I am going to implement another one for the final product. Two notable possibilities are PDParty and MobMuPlat, which are both open-source applications capable of running Pure Data patches and integrating the OSC protocol. The only advantage of MobMuPlat over PDParty is that the latter is only available for iOS, which considering integrability may be a significant issue.
To set up communication between my phone and Bela, I first had to make sure that it can connect to the internet/wi-fi. Since Bela is a Linux computer with USB connectivity, the best solution was to connect a WiFi dongle to it. Not any dongle is suitable for this application, so I had to find one that is Linux compatible. All dongles should work, which include the 4.4.113 Linux kernel in their driver, but two drivers that were tested and proven are the Ralink RT5370 and MT7601U. One option that was relatively easy to purchase and includes the RT5370 driver is the MOD-WIFI-R5370 from OLIMEX.
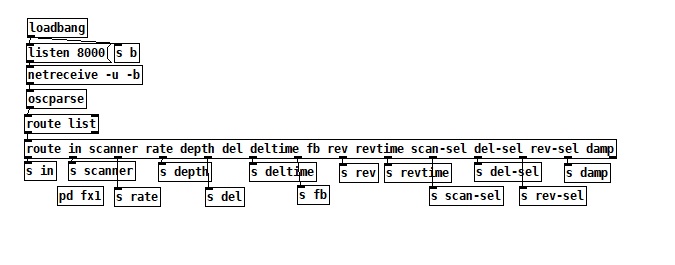
To get it working, I had to connect to Bela by running ssh root@bela.local from a terminal on my computer. After I was connected, I could make sure that the dongle was visible on the board. As the connection was successful by itself, I didn’t have to install any additional driver or edit the interface settings, I just had to set the name and password of my network and reboot. Now that Bela was connected to the same WiFi as my phone, I was able to set up an OSC communication between the two. The first step was to design a control interface in the TouchOSC editor, which had the same parameters as the Pure Data patch. As I needed to control the values for rate, depth, and both wet and dry signals, I created a slider for each and set up their range according to the PD patch. To be able to route these values later in PD, I also had to give each slider a corresponding name.
The second step was to add the [netreceive~] object to the Pure Data patch, which listens for incoming network messages on a given port. These values are then transmitted to the [oscparse~] object which reconstructs them into OSC messages. This is then fed into a [route] object, which checks the first element of a message against each of its arguments and if a match is found, the rest of the message appears on the corresponding outlet. After routing all values to their correct destination I only had to set Bela’s IP address as the host in the TouchOSC app and I was finally ready to try out the scanner patch with adjustable settings.
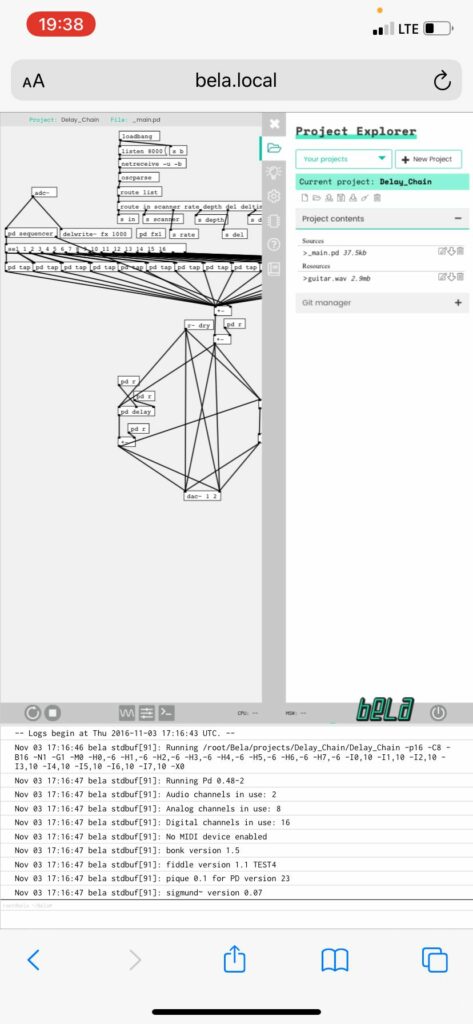
Setting up a connection with Bela is quite simple in the majority of the cases, but there are some situations in which it is not possible. One of these unfortunate circumstances is when the name of the network consists of more words separated by space. Another is when a username has to be specified in addition to the network name and password. Both of these problems stem from how the network credentials are defined in the terminal. One solution I found to this problem was to set up a hotspot connection between my phone and Bela, but even in this case, I needed to connect my phone to a WiFi network for the OSC messages to be forwarded. However, a great advantage of Bela is the easily accessible IDE, not only on a computer, but via any smartphone’s browser, which opens up the possibility of selecting multiple sets of patches stored on the device.
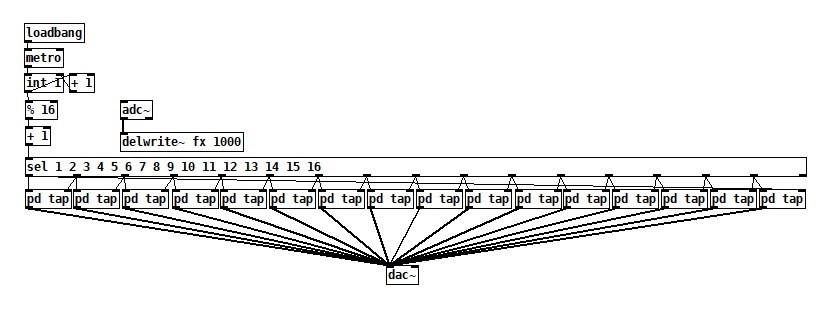
My next experiment was to turn the Bela board into a guitar effect and integrate the scanner into it. Bela has both built-in audio input and output, which can be addressed with the [adc~] and [dac~] objects respectively. By assigning an [adc~] to the input of the [delwrite~] object and a [dac~] to the output of the delay taps, I could run the signal from my guitar through the patch and hear the effect in action on my headphones or in my guitar amp.
To upload and run a PD patch on Bela, all I had to do was access its web-based IDE by addressing bela.local in my web browser and make sure to name the file _main.pd. Since the patch is no longer editable in the IDE, I couldn’t change any of the effect’s parameters, so I set up a patch with default values to test if the sound comes through Bela and if the patch works.
To simulate Hammond’s vibrato scanner unit in Pure Data, I first had to find a way to replicate the delay line. Although there are many externals including all-pass and comb filters that would be suitable for this purpose, I had to keep in mind that BELA supports only Vanilla objects so I had to work with a limited library.
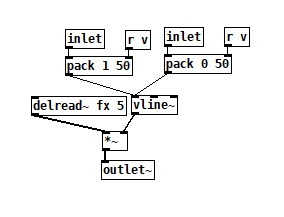
An obvious starting point was to use the [delwrite~] object, which allocates memory to a buffer and writes an audio signal into it. This signal is then read by the [delread~] object of the same name with a variable delay time, which can be defined in milliseconds. As it is possible to use more than one [delread~] object for the same buffer, I was able to set up multiple delay taps for the same signal, where each step is being delayed by 5 milliseconds relative to the previous one. Mixing these with the original signal results in amplification and cancellations at regular intervals, producing a comb filter in the end.
Next, I built a mechanism based on the scanner that could sample these delay taps. To do this, I first created a simple counter that increments by one with a specified velocity and then starts over when the given maximum value is reached. Its value is then passed to a select object, which sends a bang to the corresponding outlet when the value matches its argument. This results in a sequencer actually, which is ultimately what the scanner also is.
To connect the delay line to the sequencer, I placed a [vline~] object at the output of each tap. [Vline~] creates linear ramps whose levels and timing are determined by the messages you send. By creating a ramp-up and ramp-down message for each [vline~] object, I was able to toggle the volume of the taps on and off in a specific order so that each successive bang increases the volume of its assigned tap while turning down the previous one. To make sure that there is always a smooth transition between the taps, I made the duration of the ramps relative to the speed of the sequencer’s clock, achieving a perfect crossfade at any given rate.
To adjust the depth of the fades, I do multiplications on the ramp value that is sent to the [vline~] with a value between 1 and 5. The larger this number, the less accentuated the ramps are, and the smaller the depth is. This also means that the smaller the depth, the more the taps get mixed, which results in a chorus effect subsequently. Additionally, by mixing the dry signal with the scanner, a chorus-vibrato can be achieved, just as in the original Hammond design.