There is a lot of potential that I see for the format of explorative compositions, and I would really like to see where those could lead. I have not had the chance to let a lot of others really explore the composition I made, which I think is a necessity to receive a lot of valuable feedback. Furthermore, I still imagine this to fit very well into an installation-like setting. But as mentioned earlier, I view this composition rather as a proof-of-concept for this format and I could imagine using this in a very different context. The interactivity can immerse one a lot more into a piece, making it perfect for storytelling. No matter if it is a musical piece or even an audio play – certain gestures could be used in a much more integrated way than I did in this piece. While I am looking forward to more experiments with this format, I would also like to create possibilities for other artists to work with this, which lead me to the plan to create a simple-to-use software (or a simplified Pure Data patch) that allows others to map certain logic (like movement envelopes or levels) to certain MIDI channels, without Pure Data knowledge. I am excited to explore what is to come.
Fluid Spaces | #8 | Explorative Compositions
The process of composing was very interesting and entertaining, but at times also tiring, since it usually involved a lot of steps to reach the goal in mind. I tried to make the process as smooth as possible, since I realized that it limits my capabilities to have to interrupt my creative process with coding work, but of course, the swapping back and forth between Ableton and Pure Data was always present. I will try to lay out here how the process of composing looked like.
Artistic Concept
My concept for this piece was a dreamy and atmospheric base layer that is interesting enough to be listening to it alone that gets accompanied by some subtle melodies in the background. The more activity a listener shows, the more percussive and beat-driven elements will slowly wander into the scene, up to a point where one might describe the track as energetic or ‘dancy’. There should always be some element that is directly controlled and easily noticeable by the listener, to not cause confusion or frustration.
Process
The first point of starting the composition was trying to find a good atmospheric base layer. This would also be the idle state of the composition which should be enjoyable by itself and not get boring too quickly. I chose two stereo recordings I made myself: The first one was made in a heavily visited cathedral that consists mainly of many spaced out low voices of visitors with a very long natural reverb. The second one was recorded in a museum about ships (that was itself on a ship), that features sounds of water splashing against the outside of the ship, cracking of metal, water drops on metal and the like. Together, those recordings create a slightly eerie and mystical atmosphere.
Since I am usually very percussion- and drum fixated, I also created the drums next, but already with an interactive goal in mind: I wanted to have the drums emerge from a different sound, depending on the activity of the listener. Next to the drums I created a wind noise by using an LFO on a filter on white noise. With a spectral morphing tool, I could then let the drums use the spectral profile of the wind and blend them together. As soon as I was happy with the drums and the wind, I mapped the activity level variable I wanted to the morphing index and a volume parameter.
I continued like this for most other instruments – I created a software instrument or a sound and instead of putting them into the arrangement, I decided what parameter to map to which variable. Sometimes I had to remap things that did not fit anymore, or program some new logic that I needed, but mostly this process was quite straight forward.
Fluid Spaces | #7 | Product System Overview 3
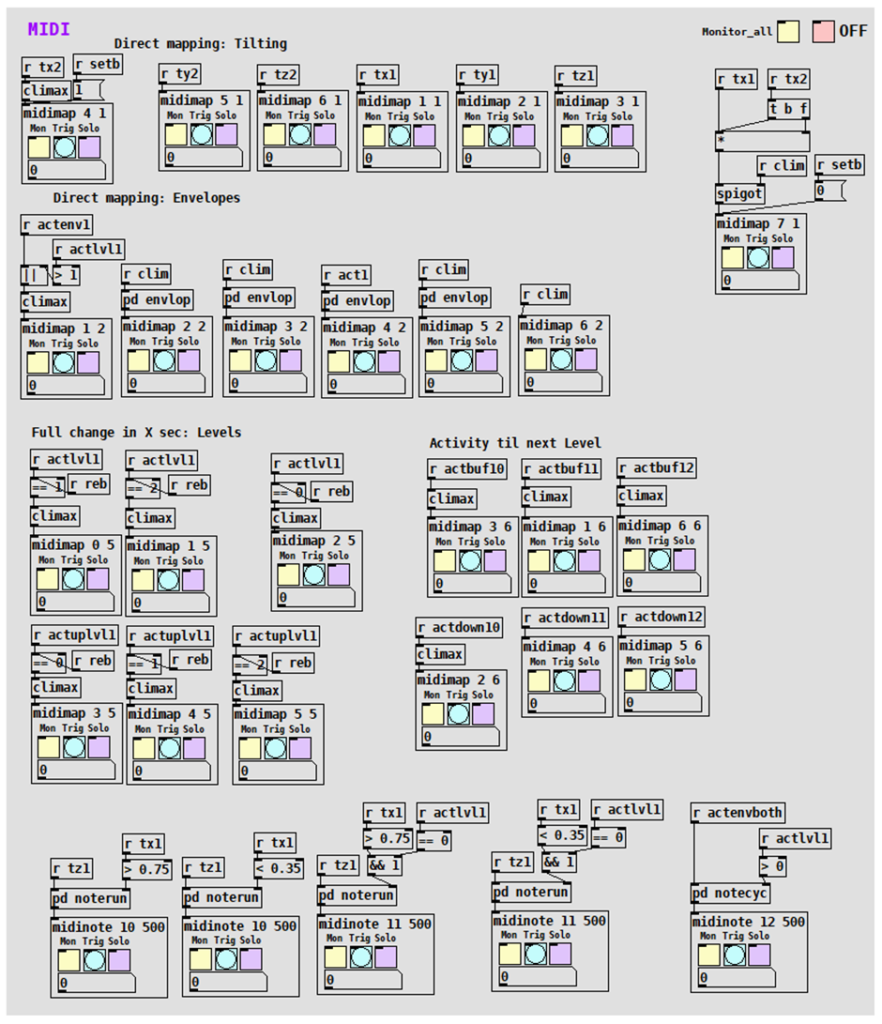
MIDI Output Abstraction with Monitor/Trigger/Solo Function
Similarly, on the output side of the patch, I created abstractions that handle the conversion of values into the midi range and send the value out on the specified controller and channel. Additionally, they also provide an individual monitoring function, a global monitoring function, an individual solo function and a global off function. The ‘trigger’ button that is found on each abstraction interface will send a ramp of MIDI values out on the specified controller and channel. This is specifically useful for mapping controllers in Ableton, without having to artificially re-create the event that is supposed to be mapped to a certain functionality. To do so, I merely solo the controller I want to map and click the trigger button.
For the ‘midinote’ abstraction, which does essentially something very similar and has the same interaction possibilities, the process in the background is a little bit more complex. The input parameters are the channel that the note should be played on and the length of the note in milliseconds. All notes are automatically played with full velocity in this patch. After a note was played, it will be automatically reset after the specified note length.
Those two types of abstractions, together with some other helper abstractions were most likely the most crucial preparation functionality to guarantee a smooth workflow while composing, since mapping and creating new kinds of interaction possibilities (and therefore controllers/channels/notes) was a substantial part of the composition process.
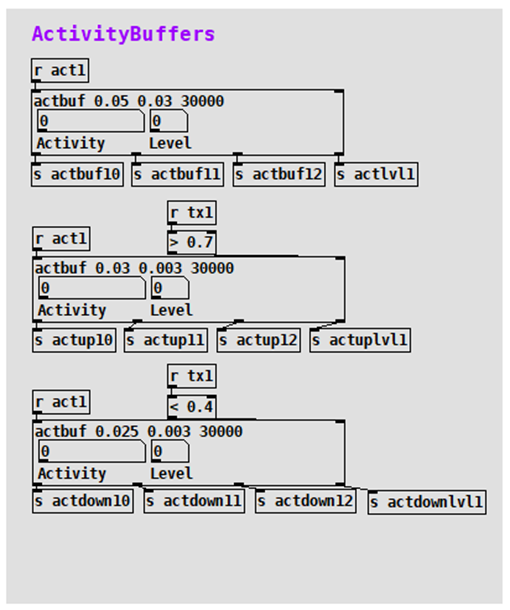
Activity Buffers
The activity buffers are the center piece of the level management that was already covered in the Core Logic section of the last chapter. I merely made them a little more dynamic and improved their capabilities a bit, but in general the functionality stayed almost the same: using the activity of a sensor as input, a ring buffer measures the average activity over a certain time and counts a level up when it reaches a certain threshold. A newly added functionality was an own variable for each activity level, which meant that each variable would stay at a value of 1 if a higher level than the one it triggered itself was reached. The input parameters are a high threshold, a low threshold, and the time in milliseconds that the ring buffer should be running.
Fluid Spaces | #6 | Product System Overview 2
Software
When I started the product phase, I originally expected to spend quite little time in Pure Data and rather a lot in Ableton creating the composition. But I decided to rebuild a lot of the patch for workflow reasons, which I consider an extremely crucial decision now.
I gained a lot of space in the patch, because I could delete all the data cleaning and pre-processing functionality, since I was getting very clean MIDI data with the SOMI-1. There were seven MIDI parameters per sensor directly coming from the receiver now – six of them were the same as in the 2.4SINK systemand the seventh was the Pythagorean triple of the acceleration, giving me the total acceleration that I calculated myself previously (called ‘activity’). It was cleaned of gravity force, making it more accurate.
The approach to creating the new Pure Data patch for an improved workflow was mainly focused on dynamics and abstracting. The features that became very useful in the later process will be described in detail below.
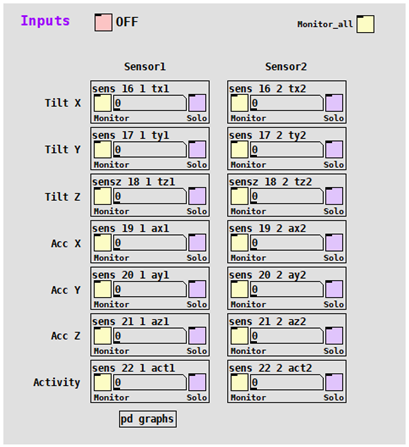
Input Abstraction with Monitor/Solo Function
I created an abstraction that provides some extended functionality while scaling input values to the range 0-1 and renames them. Besides the convenience and cleanliness, it comes with individual ‘monitor’ and ‘solo’ buttons, which turn on the number field inside the graph-on-parent (that is by default turned off to save computing power) and turn off all processed input but the ones soloed, respectively. Additionally, all instances of the abstraction react to one global ‘off’ button, as well as a global ‘monitor all’ button. The three input parameters are the MIDI controller number, the channel number, and the name of the new variable.
Fluid Spaces | #5 | Product System Overview 1
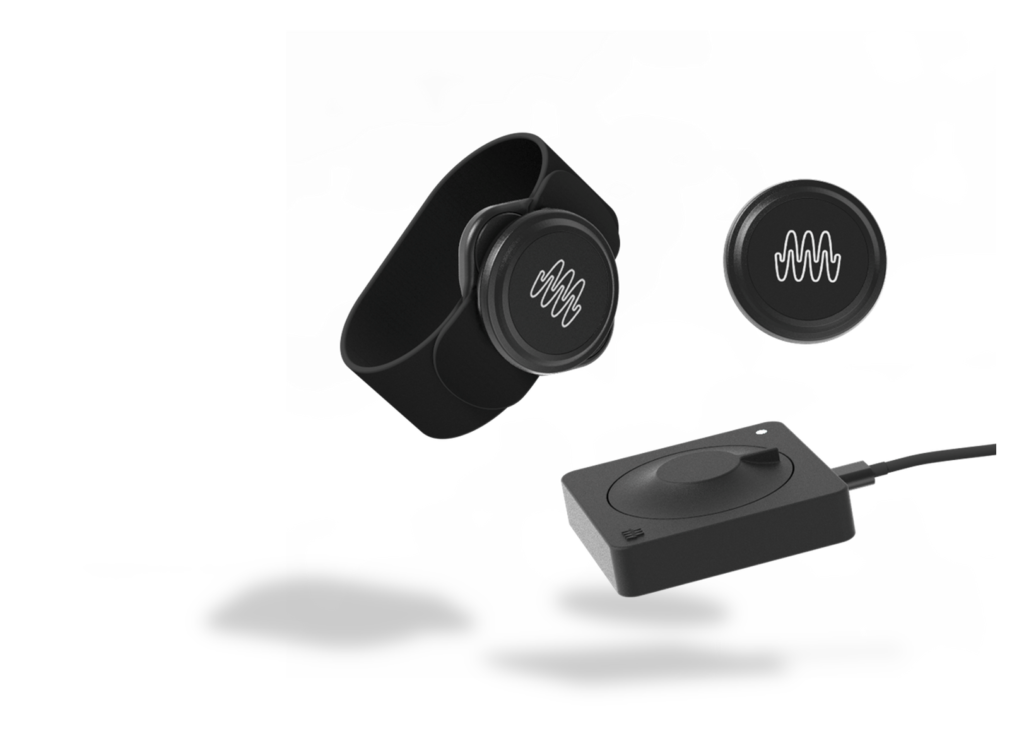
While I worked with the 2.4SINK product line during the experiment phase, I already planned to implement the SOMI-1 product of Instruments of Things in this project. However, it was only scheduled to be released in summer/autumn 2022, creating a certain risk for this project. The release and shipping were indeed a little bit delayed, but in November 2022, around 2-3 months before the final deadline, I finally received the SOMI-1 set and could start working.
Hardware
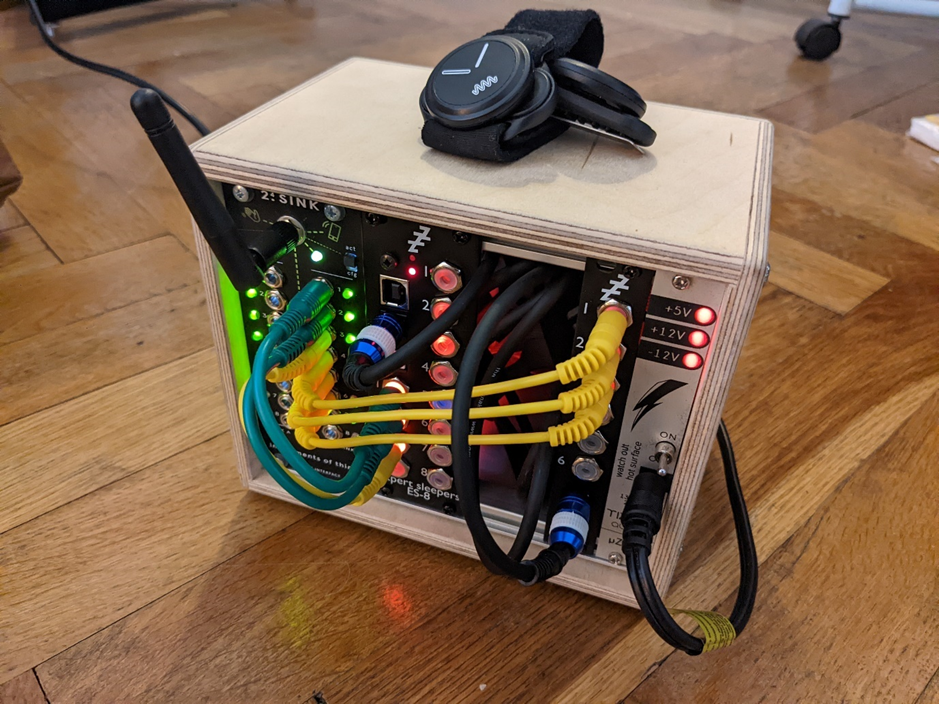
With the SOMI-1, I could drastically cut down on the needed hardware, since it directly connected to my notebook, and I did not need the Doepfer case with the power supply and Expert Sleepers audio interface anymore.
Wristband Sensors & Receiver
The SOMI-1 system consists of two sensor wristbands that look very similar to the 2.4SINK ones, and a receiver hub that is quite small and connects via USB-C to my Windows notebook (although it also has a few other MIDI interfacing possibilities). It comes with a configuration software that however was not necessary in my use case, but still practicable to troubleshoot when having connection issues. The firmware of the sensors and of the receiver could be independently updated using Bluetooth and a smartphone app.
I encountered connection problems that seemed to be related to the running audio device on Windows. Apparently, a newly plugged in MIDI device gets tied to an audio device like a USB-interface but might experience issues when no interface is connected. ASIO4ALL was a remedy in this case but did also not always work reliably. The issue was reported to Instruments of Things.
Fluid Spaces | #4 | Experimental System Overview 2
Software
The software approach in the experiment phase required a little more pre-processing steps than the approach in the final phase but was very similar in all other ways. Firstly, the wristband sensor data was read in and processed in Pure Data. With this data, modulators and control variables were created and adjusted. Those variables were used in Ableton (Session View) to modulate and change the soundscape. Therefore, during the composition, Ableton was where sound were played and synthesized, whereas Pure Data handled the sensor input and converted it into logical modulator variables that controlled the soundscape over short- and long-term. This communication approach stayed the same in the later phase. In the following paragraphs, I will describe the parts that differed from the final software approach.
Data Preparation
The data preparation was probably the biggest difference compared to the new system, since I was basically working with analog data in the experiment phase, making a thorough cleaning necessary to reach the needed accuracy. The wristband data I received in Pure Data was subject to various physical influences like gravity, electronic inaccuracies and interferences and simple losses or transmission problems between the different modules. At the same time quite accurate responses on movements were needed. Furthermore, the rotation data included a jump from 1 to 0 each full rotation (like it would jump from 360 to 0 degrees) which also needed to be translated into a smooth signal without jumps (transformation with help of a sine signal was very helpful here). The signal bounds (0 and 1) of the received values were also rarely fully reached, requiring a solution on how to reliably achieve the same results with different sensors at different times. I developed a principle of using the min/max values of the raw data and stretching that range to 0 to 1. This meant that after switching the system on, each sensor needs to be rotated in all directions for the Pure Data patch to “learn” its bounds. I decided that there is no real advantage in using the acceleration values of the individual axes, but only the total acceleration (using Pythagorean triples).
Mapping & Communication Method
Originally, I had planned to create a VST from my Pure Data patch, meaning that the VST would just run within Ableton and there is no need to open Pure Data itself anymore. This also gave me the idea to create a visualization that provides basic control and monitoring capabilities and lets me easily change thresholds and parameters. I spent some time researching possibilities and found out about the Camomile package, which wraps Pure Data patches into VSTs, with visualization capabilities based on the JUCE library.
However, there were several issues with my communication concept: First off, the inputs of the Expert Sleepers audio interface need to be used, while any other interface’s (or the computer’s sound card’s) outputs must be active, which is currently not possible natively in Ableton for Windows. There would be a workaround using ASIO4ALL, but that was not a preferred solution. Secondly, a VST always implies that the audio signal flows through it, which was not really wanted – there was only a need to modulate parameters in Ableton with my Pure Data patch and not have an audio stream flowing through Pure Data, since that might create even more audio interface issues.
This led to the investigation of different communication methods. There were two more obvious possibilities, the OSC protocol and MIDI. The choice went to MIDI, since the default MIDI resolution of 128 was enough for this purpose and MIDI was much more easily integrated into Ableton.
Core Logic
There were several differences in the way the logic was built in the experiment and product phase, but besides very few, I would rather see the differences as an evolvement and learning process. In the experiment phase, a lot more functionality was ‘hard coded’, like different threshold modules, that I called ‘hard’ and ‘soft’ movements.
An important development for the whole project was the creation of levels based on the listeners’ activity. It outlines a tool that I consider essential for a composition that can match its listeners’ energy, and a crucial means for storytelling. All movement activity is constantly written into a 30-second ring buffer and the percentage of activity within the ring buffer is calculated. If the activity percentage within 30 seconds crosses a threshold (e.g., around 40%), the next level is reached. If the activity level is below a threshold for long enough, the previous level becomes active again.
While using all those mechanisms introduced a certain level of interactive complexity, the mappings posed the risk to get monotonous and boring over time. To remedy that issue, I got the suggestion to use particle systems inside my core logic to create more variation and interesting mapping variables. The particle system ran inside the GEM engine, as part of the GEM Pure Data external. Setting the particles’ three-dimensional spawn area to move depending on the rotation of the three axes of the wristband brought up an interesting system, especially in combination with movement of the orbital point of the particles. Mappable variables were then created by using parameters of statistical nature: The average X, Y and Z position of each particle, the average velocity of all particles and the dispersion from the average position. While those variables worked well in a mapping context, I decided not to use them in the next project phase, because I adjusted my workflow to using variables mainly for direct and perceptible mappings, while implementing random and arbitrary elements within Ableton.
MIDI
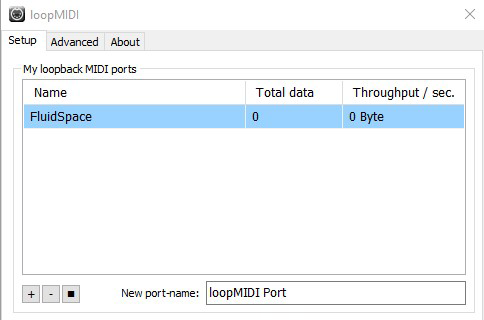
To be able to send MIDI data to Ableton, there is a need to run a virtual MIDI cable. For this project, I was using the freeware “loopMIDI”. This acts as a MIDI device that I can configure in Pure Data’s settings as MIDI output device and in Ableton as MIDI input device.
In Pure Data, I need to prepare data to be in the right format (0 to 127) to be sent via MIDI and then simply use a block that sends it to the MIDI device, specifying value, device, and channel numbers. I am mainly using the “ctlout” and the “noteout” block.
In Ableton, there is a mapping mode that lets one map almost every changeable parameter to a MIDI pendant. As soon as I turn on the mapping mode, I can just select any parameter that I want to map, and it will map it directly to the next MIDI input it receives. It will immediately show up in my mapping table with the option to change the mapping range.
Fluid Spaces | #3 | Experimental System Overview 1
In the experimental project stage, the concept was not as clearly defined, but the hardware specifications were in hindsight already well advanced. There was a need for a system including a gyro sensor and an accelerometer that could wirelessly transmit data with low latency to a Windows platform directly, or via some sort of hub. This sensor system (including power supply) should have a small enough form factor to fit on a wristband. On the Windows platform the received data would get processed in Pure Data, which in turn controls a composition Ableton Live.
Hardware
I decided to work with the 2.4SINK Kit by Instruments of Things, which is a set of wireless wristband sensors and a receiver. The receiver is made for modular Eurorack setups, meaning that wristband movements are translated into control voltages (CV’s) that can be used to modulate synthesizers or effect panels. This was of course not necessarily optimal for this application, since all the wristband data was needed in a digital format anyway. Luckily, the module was already built into a small Doepfer box, together with an Expert Sleepers USB Audio Interface, that facilitated up to 10 CV inputs via USB on my laptop.
Wristband sensors
The sensors looked sturdy, but also thin and subtle. On the backside, each watch had two metal pins that are used to switch the sensor on (if both pins are touched at the same time). Additionally, the pins are used as a mounting contraption to fit them on belt clips or fabric wristbands (“click-mount”). As soon as a sensor got switched on it went into calibration mode, making it important to have the sensor lying still on a flat surface during this process (otherwise the values will drift off constantly).
Receiver
The receiver consists of an antenna, a little toggle button that switches between “configuration” and “active” mode and 16 dynamically configurable outputs. When switched on, the 2.4SINK receiver will create a wireless LAN network, which, if accessed, will provide the opportunity to visit the configuration page of the 2.4SINK Kit. On the configuration page, it is possible to change a few global settings, as well as individual settings for all 16 outputs (while the switch on the receiver is set to “configuration mode”). For each output, it is possible to choose which parameter of which sensor (up to seven sensors can be connected) should modulate the output. For each sensor, six parameters could be chosen:
- Rotation X
- Rotation Y
- Rotation Z
- Acceleration X
- Acceleration Y
- Acceleration Z
Furthermore, it is possible to output LFO signals that are modulated by the sensor’s parameters. However, this is much more interesting for a modular setup and not very suitable for my use case.
USB Interface
The Expert Sleepers USB Interface (ES8 plus ES6 input expansion module) worked just as most other USB audio interfaces do. The CVs were normalized as input signals ranging from -1 or 0 (depending on the type of input: unipolar/bipolar) to 1.
While there were only two sensors available, the 2.4SINK receiver would have still supported to read out all parameters from both sensors (six plus six parameters, while the receiver features 16 outputs), but the true bottleneck in this case was the Expert Sleepers audio interface, which only has 10 inputs, meaning that not even all parameters from both sensors could be read simultaneously.
Fluid Spaces | #2 | Concept Development
Walking Soundscape
The project originally started with the idea of an interactive soundscape that one listens to on their mobile device with headphones while walking. Depending on the walking speed, motions or even geographical or meteorological data, the soundscape would change. After some further drafting and research and this idea lost its appeal for a lack of innovation – since similar applications were found.
The Emotional Space
Sticking to the core idea of a motion-reactive soundscape, I developed a concept for an installation. I wanted to create an experience of a room that audibly and visually reacts to and parallelly influences the motions of its visitors. The concept included the usage of wristbands with gyro sensors and accelerometers, just like the final version of the project. However, it was laid out as a holistic project that strived to create a unique, multimodal experience by designing and curating most of the lighting, the furniture, the architecture, the introduction and debriefing of visitors, the choice of audio technology and of course the sound design.
Inspired by some valuable feedback, the artistic vision (and therefore also the goal) of this concept became more and more fuzzy to me and I struggled to follow the red line within the project. It seemed to lack a message and a clear intention. In an approach to find new motivation, I started to dissect what I had worked out so far and tried to strengthen the project’s aspects that were intriguing to me.
The Fluid Space
The process of revisioning the concept brought me to a new title. While that may not seem like the most urgent part of the project, it did give me new inspiration. I wanted to stick to creating a ‘space’, even if that space does not lie in the physical realm. Furthermore, I had issues with the word ‘emotional’ because it created an expectation about the installation touching the visitors emotionally. Additionally, it seemed to speculate for the room to have emotions, which was not what I intended it to mean. This led me to the ‘fluid’ which captured the dynamic reactiveness that I wanted to convey a little better in my opinion.
Besides changing the title, I also moved the project away from the idea of a holistic installation and tried to direct the focus more on the interaction variants (as in movements) and how they control the soundscape. The goal for the ‘experiment phase’ of this project was a working proof of concept, using one sensor wristband.
Fluid Spaces
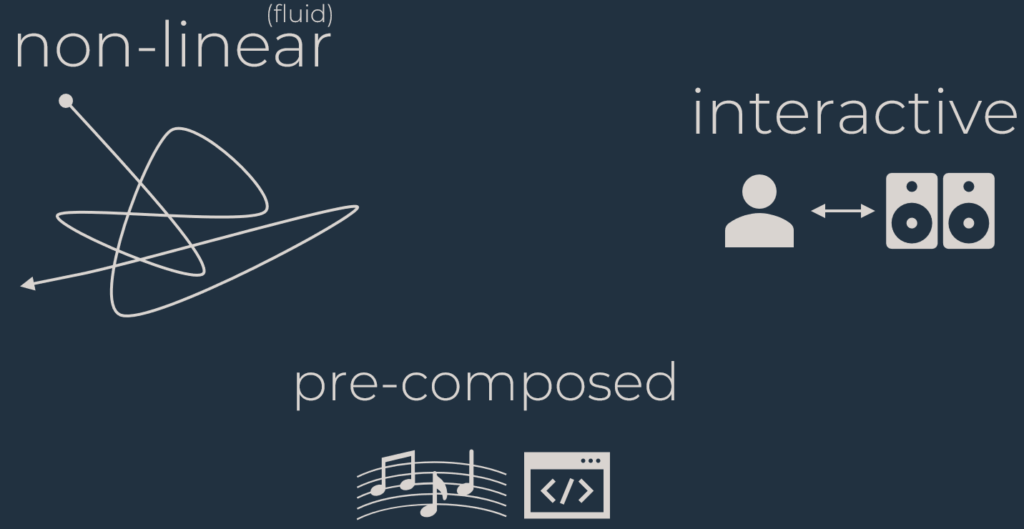
Finally, in the last project phase, the whole concept completely sprung into shape. I already used the term ‘explorative composition’ in the project phase before, but only in this phase called ‘product’ did I declare this term as this project’s core. I entirely focused on composing an explorative piece, which I would describe as an iterative process of producing music, coding interaction possibilities and testing, but not necessarily in that order. The process reminded me of certain aspects of game sound design, which also led me to a definition of what features a composition needs to have for me to call it explorative:
- Nonlinearity (the composition is not experienced in a linear manner, and will therefore sound different in every experience)
- Interactivity (the composition directly reacts to the listener [in this case to their movements] and triggers changes in the soundscape)
- Pre-Composition (a certain structure and intent of the composer should be derivable, narrowing down the specifications for purely generative works)
The point nonlinearity is also mentioned by Karen Collins in her book about game sound (Collins, 2008, p. 4), when describing the most important element of interactivity in games. Having all this in mind, it became clearer to me that I am rather aiming to develop a format than a single experience. While the outcome and thereby the ‘product’ of this project phase was a composition (including a performance to be able to show the composition), I was intrigued by creating explorative compositions as a format and kept this in mind during the coding process. This suggests the embedment of the format into an installation in future, as well as the creation of more compositions. Following this thought, this composition ultimately acts as a proof of concept for the format ‘explorative compositions’.
Collins, K. (2008). Game sound: an introduction to the history, theory, and practice of video game music and sound design. Mit Press.
Fluid Spaces | #1 | Introduction
The following blogposts round up my project that transitioned from ‘The Emotional Space’ to ‘Fluid Spaces’. Its purpose is to document the process from the beginning until the end.
Fluid Spaces is the final title of this three-semester-long project, that was
originally planned as an installation and developed into an interactive
composition. It became not only an interactive, but an explorative composition,
which is the distinct phrase this project can very suitably be described
with. Moreso, I would argue that this project somehow coined
what the term ‘explorative composition’ means to me and at the same
time guided me through its discovery.
The following posts will provide a documentation of the development of
this project, from the first conceptual ideas to its potential future. It will
be structured as a non-chronological project evolvement overview, rather
than a simple process description.
Content Creation via AI
Artificial Intelligence (AI) systems have the potential to significantly change content creation by providing new ways to create, optimize, and distribute content.
One of the most significant impacts of AI on content creation is the ability to automate certain tasks, such as generating headlines, captions, and summaries. This can save content creators a significant amount of time and allow them to focus on other tasks that require human creativity and judgment. AI can also be used to analyze data on audience preferences and behavior to help content creators tailor their content to their audience, improving engagement and driving traffic.
In addition to automating tasks and improving content targeting, AI can also be used to generate content, including text, images, and video. For example, AI-powered tools can generate product descriptions, news articles, or even entire novels. These tools use machine learning algorithms to analyze existing content and generate new content that mimics the style, tone, and structure of the original.
AI can also improve the distribution of content by optimizing its placement and timing across various platforms. By analyzing audience behavior and engagement, AI tools can help content creators determine the best times to post content and the most effective channels to distribute it on.
Overall, AI systems have the potential to streamline content creation, improve its targeting, and create new types of content. While there may be concerns about the impact of AI on human creativity, it is clear that these tools have the potential to be a powerful asset for content creators in a wide range of industries.
Especially with new viewing behaviors, such as on TikTok, where the average video length is 10 to 15 seconds, video production needs to be faster. Generally speaking, the tendency on this platform is to prioritize quantity over quality. Various blogs recommend posting several videos per day to gain a following, particularly if your goal is to make a sustainable living through short-format content.