The Bowed Tube: a Virtual Violin

In the following blog post, a journal article is analysed in the course of the subject Project Work 1 with Dr. Gründler.

The chosen paper is documenting the development process of virtual violin usable for real-life performances. It consists of two components: a spectral model of a violin as well as a control interface that registers the movements of the player. The control interface consists of a violin bow and a tube with strings drawn upon it. The system uses two motion trackers to capture the gestures whose parameters are then sent to the spectral model of the violin. This model is able to predict spectral envelopes of the sound corresponding to certain bowing parameters. Finally, an additive synthesizer uses these envelopes to produce the final violin sound. MAX/MSP serves as the software framework and three external MAX/MSP objects were specifically developed.

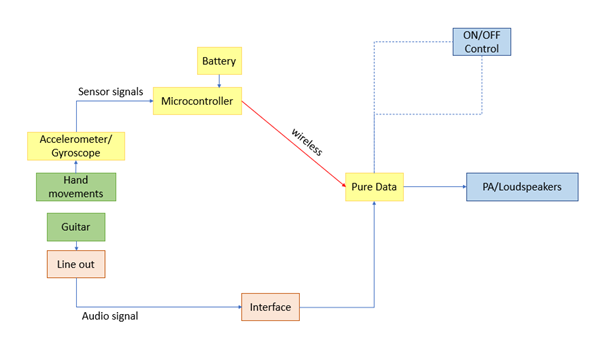
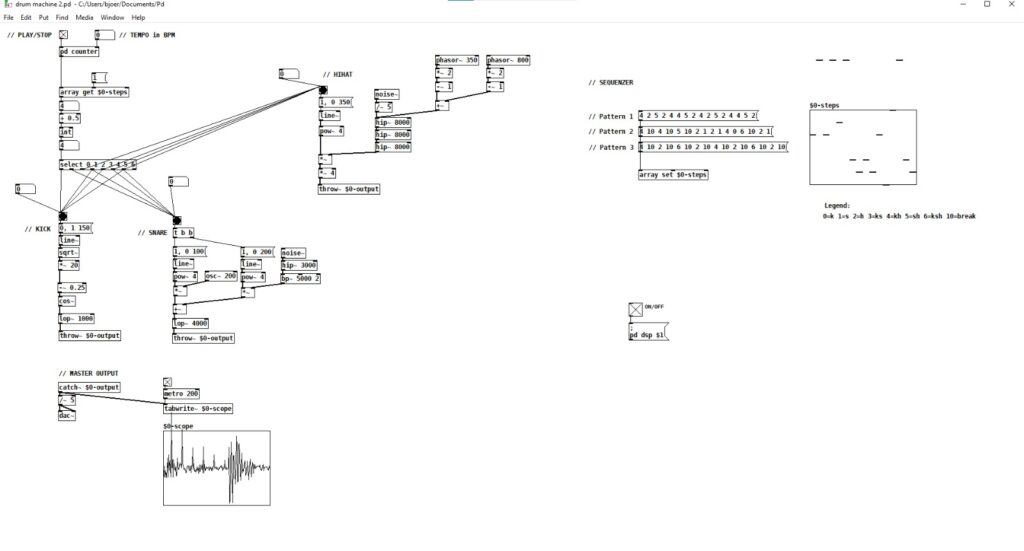
I chose this article because I work on a similar project myself that aims to extend the sounds of an electric guitar using sensor data. That is why I find the above-mentioned system pretty genius especially from the technical aspect. However, although the article reads that there is a video that shows how the system works, I would have been interested in the feedback of real violin players regarding the Bowed Tube. In my opinion, it would have been great if the authors had included a kind of survey in their article that asks violin players to test the Bowed Tube and then uses their collected feedback to gain insights on the actual playability and use of the Bowed Tube as well as possible improvements. Finally, I also have to admit that I do not see a lot of use cases for the Bowed Tube. In fact, the article itself is very vague about which real life problem it tries to solve with its Bowed Tube violin. It is definitely a stunning project from a technological and scientific point of view. Maybe I am a too practically orientated person, but I cannot help to ask myself – why not use a real violin?

Sources:

Carillo A. P. & Bonada J. (2010 June 15-18). The Bowed Tube: a Virtual Violin. Proceedings of the 2010 Conference on New Interfaces for Musical Expression (NIME 2010), Sydney, Australia. 

Suitable effects for Idea #2

As the title suggests, this blog entry will be concerned with suitable effects for the “Extended Guitar Performance” project. Admittedly, one could argue that any effect can be triggered by a guitar player’s hand movements. However, I want to discern certain effects that are especially suitable for this kind of expression control and sound well when modulated by the natural hand gestures of a guitarist.

There is also a decision to be made if the effects should be activated (turned on and off) by certain hand gestures/movements or if the intensity of the effects (like a dry/wet knob) should be modulated by certain hand gestures/movements. Of course, implementing both options is also possible.

Additionally, as my idea involves placing a sensor on each of the guitar player’s hands, there are effects that will be triggered by the movement of the picking hand and others that will be triggered by the movement of the fretting hand.

Automatic Solo-Mode

The first idea for an effect is based on the following observations:

  1. A typical guitar solo takes place higher up the neck (fret-wise) than the rhythm guitar part.
  2. Rhythm guitar tone and lead guitar tone almost always differ a little and often differ a lot.
  3. It is stressful to activate all lead tone effect pedals when your solo comes up in a live situation.
  4. It is stressful to disactivate all lead tone effect pedals when the solo ends and the rhythm guitar part must be continued.

The effect I came up makes use of this observations. The idea is to automatically activate an assortment of effects, typical for a lead guitar tone, if the guitarist reaches for higher frets up the neck and to subsequently disactivate the lead tone effects as soon as the guitarist comes back to lower frets with his/her fretting hand.

This “Solo-Mode” effect is achieved with an accelerometer (for details check blog XY), placed on the back of a guitarist’s hand, that interprets the length of the neck as the X-axis. According to the position of the guitarist’s hand along the neck (and thereby along the sensor’s X-axis), the “Solo Mode” effect is turned on or off. A certain fret which serves as the point of reference when to switch the Solo Mode on or off must be determined.

I really hope that this works the way I picture it XD.

Individual effects that the “Solo Mode” could include are:

  • Overdrive/Distortion/Fuzz/Booster
  • Delay
  • Chorus
  • Reverb
  • Octaver
  • Harmonizer
  • (Different) equalizer settings (compared to rhythm tone)
  • (Higher) volume settings (compared to rhythm tone)

Neck position as altering factor

IF the system works, the fundamental idea of using the fretting hand’s position along the neck to modulate sound could also be extended to other effects. The intensity of an effect could be increased for instance as the fretting hand moves up or down the neck.

Possible examples include:

  • Faster/slower delay times according to neck position
  • “more of” some effect/more intense settings
  • High-pass filter sweep
  • Low-pass filter sweep
  • Bandpass filter sweep

Setup for Idea #2 – Part Two

This blog entry continues with setup considerations concerning the idea #2 “Extended Guitar Performance”.

Custom-made setup

The other way to make things work is to come up with a custom-built setup.

A rough sketch of the signal chain of the system could be as follows:

Own compilation. First draft of signal chain

As can be seen in the picture, there are two signal circuits:

On one hand, there is the audio signal coming out of the guitar that is then send to an (USB) interface. From there on, the signal is fed into a PureData patch, where it is modified according to the incoming data of the sensors and corresponding effects. Subsequently, the modified signal is then outputted to a PA system/loudspeakers.

The other circuit consists of the signals of the sensors that register the guitar player’s hand movements. The data gathered by the sensors is conveyed to a microcontroller, fed by a battery, and wirelessly transmitted to the PureData patch. Here, the sensors’ signals are used to modify the incoming guitar audio signal with effects.

Finally, I may also add some kind of (foot)switch to either engage the audio modulation of the PureData Patch or to bypass it in case one wishes the sensors’ signals to not modulate the guitar audio signal.

The setup is thus made up of hardware as well as software components.

The first hardware components necessary are sensors, able to pick up movements made by a player’s hands. Sensors capable of motion sensing include MEMS accelerometers and gyroscopes. For a layman like me, my first question was: what is the difference between an accelerometer and a gyroscope?

Luckily, I found a website that explained the difference very well:

 AccelerometersGyroscopes
What it isElectromechanical devices that measure acceleration   Cannot distinguish rotation from accelerationA device used for measuring rotational changes or maintaining orientation   Unaffected by acceleration
Usage purposeMeasure linear acceleration based on vibrationMeasure rate of rotation and angular position around a particular axis
ApplicationsCommonly found and more applicable in consumer electronicsCommonly found and more applicable in aircrafts, aerial vehicles

The website also read that some appliances benefit from both sensors. In fact, there is also a third category of such sensors that combines the qualities of accelerometers, gyroscopes as well as magnetometer sensors – the so-called Inertial Measurement Units or IMUs.

At some stage of this project, I must decide which kind of sensor to use. The website recommended:

Type Accelerometer:

  • Grove – 3-Axis Digital Accelerometer
  • ADXL335 Accelerometer

Type: Accelerometer/Gyroscope:

  • Grove – 6-Axis Accelerometer + Gyroscope

Type IMU:

  • Grove – IMU 9DOF v2.0

However, no matter which kind of sensor I choose, a microcontroller is necessary to process the data gathered. Such a microcontroller could be an Arduino board for example. Considering that one sensor should pick up pick movements, the great challenge is to find a sensor as well as a microcontroller that are small enough to fit in a guitar player’s hand without compromising playability. The Arduino Nano measures 1.8 cm x 4.5 cm which probably makes it small enough to either fit into a guitar player’s palm or onto the back of his/her hand. Another great board would be the Arduino Nano 33 BLE – it comes with Bluetooth functionality as well as a 9-axis inertial measurement unit (IMU) which makes it a perfect choice for my project.

The software side of the system comprises the integrated development environment (IDE) of Arduino as well as PureData. In PureData, a patch must be programmed that allows for receiving the incoming data of the sensors and using it to modulate the audio signal of the guitar with various effects and/or filters.

The custom setup is, as expected, a lot cheaper than pre-made products. The Arduino microcontrollers all cost less than 20€ and the Arduino IDE as well as PureData are free open-source software. The sensors I found tend to cost around 10-15€. Nevertheless, the custom setup will require a lot more personal effort from my side, especially on the software part which for me as an entry-level programmer will definitely be a challenge.

Sources:

https://www.seeedstudio.com/blog/2019/12/24/what-is-accelerometer-gyroscope-and-how-to-pick-one/

https://store.arduino.cc/products/arduino-nano

https://store.arduino.cc/products/arduino-nano-33-ble

https://store.arduino.cc/collections/sensors/products/grove-6-axis-accelerometer-gyroscope

Setup for Idea #2 – Part One

This weekend, I decided to focus one my second idea “Extended Guitar Performance”.

The first, practical challenge of this project is to develop a first working setup that is reliable and allows for further practical research regarding suitable movements, playability and performability.

General considerations

The first decision to be made is, of course, the make or buy decision. Both possibilities come with their own advantages and disadvantages. Making a setup from scratch is less expensive, grants higher control over specifications/features and the setup can be better tailored to the individual needs of the project. Additionally, more learning is involved. On the downside, developing such a setup is quite complex and potentially less powerful than a professional setup.

Buying the setup or at least some parts of it comes with the advantage of less complexity and potentially better functionality. However, a ready-made setup is not as flexible and, of course, comes with a much higher price tag.

I will divide this blog series into two parts: the first part will focus on commercially available products and the second on plans for a custom-made solution.

Commercially available products

In order to decide on make or buy, it makes sense to research and evaluate products that are already commercially available. Such products include:

Roland/ Enhancia NEOVA Expressive MIDI Ring Controller

A MIDI ring controller that allows to assign parameters to the four gestures vibrato, tilt, pitch, bend and roll. According to the website, the ring comes with low latency, an 8-hour battery life, and it is DAW-compatible. However, with 399$ it is quite expensive – especially for a study project. Just by analyzing the website, the NEOVA ring seems to be very synth focused and it would be interesting how adept it is at controlling parameters for a guitar or in a guitar-context. Availability is good – you can order it through the company website as well as on Thomann.

https://www.enhancia-music.com/product/neova/

https://www.thomann.de/at/roland_enhancia_neova.htm

Genki Wave MIDI Ring

This MIDI ring is very similar to the NEOVA product, as far as its specifications are concerned. It costs 250$ and thus somewhat cheaper than the NEOVA ring (however, still rather expensive). Additionally, it can be used not only for music but also in the working environment (controlling conferences, calls, etc.). Available only through company website.

https://genkiinstruments.com/

Source Audio Hot Hand 3 Universal Wireless Controller

Priced at 50$, it is the cheapest option by far, however, its suitability for the purposes of the project is questionable. For instance, the Hot Hand ring can only be used to control parameters of hardware effect pedals only and has no DAW integration. Additionally, it is not compatible with all hardware effect pedals. Instead, it is made especially for Source Audio products that feature a special Sensor Output and for third-party pedals that are equipped with an expression input. Another shortcoming is the availability: the online shop does not ship to Austria and local dealers are sparse and may not have the Ring itself but other Source Audio products (this however needs confirmation).

https://www.sourceaudio.net/hot-hand-3.html

Conclusion

The analysis of current products shows that there are possible solutions that can be used for the setup. Especially the first two options, the NEOVA and the Wave ring seem to be suitable for the project at a first glance. Unfortunately, they also come with a relatively high price tag. Here, consultation with my supervisor will be necessary to determine if such costs are appropriate for such a project.

In the second part of this blog series, I will focus on the custom-made setup.

Pure Data workout -Drum Machine

As my project will involve programming with Pure Data, one of my self-imposed tasks for this project is to learn Pure Data. Luckily, we currently have two courses that make us use Pure Data on a regular basis. Since I have no prior experience in Pure Data, I feel even more luckier that one course really started with the basics, permitting me to slowly dive into the subject.

However, I also started programming my own patches outside of the course assignments, trying to further familiarize myself with the program. I would like to share one of the patches I made in this post. It is a kind of drum machine, featuring a kick, a snare and a hi-hat that allows you to play self-made drum patterns through a step-sequencer. The patch is a blend of two YouTube tutorials I found, taking from them the best of both worlds. Although it is based on these tutorials, I think that I learned quite a lot recreating the patches and just playing around with some settings, figuring out what they do and how they do it… The wavetable proved very useful because I could really see how the waveforms changed by adding different objects.

In fact, I strongly believe that while learning the theory of Pure Data is essential, it is also important to do some fun stuff, like this drum machine, in between to keep you motivated.

Screenshot of the Pd patch (frankly not the best quality)

I tried to attach the Pd file but could not upload it due to security reasons. If any of you are interested in the patch, I can send it to you!

However, I also attached the links to the tutorials for those interested in trying it out themselves.

Link 1: https://www.youtube.com/watch?v=wYlOw8YXoBs

Link 2: https://www.youtube.com/watch?v=nxnCkns-zMo

Addendum 6th October or “how it all began…”

This blog entry is an addendum from the 6th October 2021.

It is concerned with the first (veeery) rough concepts that I presented on 7th October at the Institute of Electronic Music and Acoustics (IEM) at the TU Graz. We were tasked to come up with 3 different concepts/ideas and to rank them according to our preferences so that a suitable supervisor could be found for our idea. As I presented the ideas in German, the brief descriptions are also written in that language.

Gitarrenidee – 1. Priorität

Obwohl mein Hauptinstrument (E)-Gitarre ist, greife ich öfter zum MIDI-Keyboard, um Songs zu produzieren und verwende die Gitarre vergleichsweise wenig.

So ist mir die Idee gekommen Songs, ein Album oder einen Soundtrack zu produzieren und dabei nur die Gitarre als Input-Instrument bzw. als einzige Audioquelle zu verwenden.

Ziel ist es zu versuchen, alle anderen Instrumente wie Drums, Klavier, Effekte und auch eventuell Stimme etc. mit Gitarre umzusetzen. Zum Beispiel durch:

  • kreative Spieltechniken
  • Aufnahmetechniken
  • entsprechender Bearbeitung mit Effekten

Ich finde das Thema auch spannend, weil man heute so viel Auswahl und Möglichkeiten hat, Songs zu produzieren und es daher vielleicht interessant ist, sich dahingehend ein bisschen zu limitieren und zu eruieren, was mit der Gitarre alles möglich ist. Auch bietet es mir die Möglichkeit mein Instrument besser oder auf andere Weise kennenzulernen.

Die Idee könnte zusätzlich ausgeweitet werden, indem man auch bauliche Veränderungen an einer E-Gitarre in Betracht zieht, um so noch bessere Ergebnisse zu erzielen.

Audio Branding Idee – 2. Priorität

Konsequentes Audio Branding birgt viele Vorteile für Firmen, spielt aber eine vergleichsweise nebensächliche Rolle zum graphischen Branding und durch schlechte Entwicklung oder Implementierung können Unternehmen oftmals nicht von den Vorzügen von Musik und Sound profitieren.

Ich habe über dieses Thema meine Bachelorarbeit mit dem Titel:

“What does my brand sound like? Success factors for the implementation of sonic branding in a company’s brand strategy”

verfasst.

Nachdem ich somit die theoretische Grundarbeit geleistet habe, würde ich mich gerne dem Thema praktisch widmen und für ein konkretes Unternehmen ein Audio Branding Konzept ausgestalten.

Ziel sollte sein einen passenden Brand Sound zu finden, der Marke und Eigenschaften in sich vereint und als Basis verwendet werden kann, um andere Elemente abzuleiten. Diese anderen Elemente können u.a. sein:

  • Audio Logo
  • Jingle
  • Musik für Imagefilm und/oder Werbung

Ich möchte verschiedene Techniken untersuchen und ausprobieren, um auf den passenden Brand Sound zu kommen und dabei eruieren, welche Techniken, Elemente und Anwendungsbereiche am besten funktionieren.

An dieser Idee würde mich insbesondere der praktische und anwendungsorientierte Bezug reizen.

Musik von Bildern – 3. Priorität

Das Hauptziel dieser Idee ist es, Bilder hörbar zu machen bzw. auf einer anderen Sinnesebene erlebbar zu machen.

Bilder und deren Zusammensetzung werden anhand verschiedener Parameter analysiert; zum Beispiel anhand des elektromagnetischen Spektrums.

Anschließend werden den verschiedenen Frequenzbereichen bzw. Farbtönen spezielle musikalische Frequenzbereiche zugeordnet.

Nun scannt eine Art Detektor/Lesegerät horizontal/vertikal/im Kreis das Bild und ermöglicht so Bilder bzw. die Farben von den Bildern zu hören.

Dies kann im Kontext einer Ausstellung oder Ähnlichem geschehen.

Extended Guitar Performance

In the last meeting with my project’s supervisor, two ideas where proposed and it was concluded that both ideas should be examined further.

Thus, the momentary goal is to do further research in both areas and, in so doing, to establish, which idea is most suitable to act as the main topic of the project and, beyond that, of the Master’s thesis.

Idea #2 is described in the following section:

The essence of the second idea is to equip a guitar with additional sensors, especially accelerometers, that register movements made with the body of the guitar and/or the pick and sends them to a PureData patch for example that uses the incoming parameters to activate and modulate certain effects. Consequently, a guitar performance can be additionally enhanced by the (natural) movements of the player and give a life performance a whole new dimension.

Setup

As already touched upon, accelerometers will be attached to the body of the guitar. Here, especially the neck appears to be a good position since it is a part that can be moved quite easily while playing. Another sensor could be fitted upon the pick to pick up either its natural strumming movements or to pick up specific movements of the player to modulate an effect.

The data gathered by the sensors will then be conveyed to a computer – ideally via wireless means to not restrict playability.

A specifically designed PureData patch will be used to convert the incoming signals into parameters to activate and modulate certain effects.

The effects can either be made from scratch in PureData itself or the PureData patch is integrated into a DAW via VST to trigger commercial effect plugins.

A major challenge will be to come up a suitable solution to detect the movements of the pick. Since it is so small, a correspondingly small sensor will be needed in order to not impair playability. Battery and wireless sender will probably be fitted on the wrist.

A potential solution is a certain ring, a commercial product, that acts as a kind of accelerometer. Of course, further research will be done in this area.

As it is the case with the first idea (Guitar Drum Map), a cooperation with other guitarists is possible and desirable. They could provide valuable insight into their natural playing movements, which effects they would use and, furthermore, can provide feedback on playability and feasibility of the setup.

Plan of Action

  • Research setup possibilities
  • Find a working setup
  • Examine natural movements of guitarist and identify convenient movements that do not limit the guitar playing itself
  • Identify suitable effects that may be triggered by the movements
  • Learn PureData
  • Create a patch to modulate incoming guitar audio signals

Guitar Drum Map

In the last meeting with my project’s supervisor, two ideas where proposed and it was concluded that both ideas should be examined further.

Thus, the momentary goal is to do further research in both areas and, in so doing, to establish, which idea is most suitable to act as the main topic of the project and, beyond that, of the Master’s thesis.

Idea #1 is described in the following section:

Idea #1 – MIDI Drum Map for guitar

Introduction and Problem Statement

The General MIDI (GM) Drum Map sets standard key assignments for the drums and cymbals in a typical kit, as well as assigning keys to a variety of other common percussion instruments. The main advantage of such a standardized map is that MIDI drum parts can be played on instruments from different manufacturers in the same way, with all the correct drums being triggered.

However, the GM MIDI Drum Map is mainly conceived for pianos or MIDI controllers featuring a keyboard. If one were to use a guitar to play MIDI drums, the standard drum map may prove inconvenient and unnatural when approached from a guitar style of playing.

This drawback leads to the first potential project idea, namely, to create a GM MIDI drum map suitable for guitar and, consequently, to provide guitarists with the possibility to adequately play MIDI drums triggered by a guitar which may be more intuitive for them.

Setup

The first challenge is to find or come up with a system that allows notes, played on guitar, to be converted to MIDI in a way that is accurate, reasonably fast and polyphonic. It is important to ensure at least two-voice polyphony since a kick or snare drum and a hi-hat are often triggered simultaneously.

A possible solution could be the GK-3 hexaphonic pick-up by Roland. It picks up the signal from all six strings individually and thus makes polyphony possible. A major disadvantage is that the pick-up needs a special designed cable that fits only Roland guitar synthesizers.

Another solution may be the MIDI Guitar 2 software by Jam Origin which also promises polyphonic guitar-to-MIDI conversion.

Both solutions will be further investigated and tested.

Guitar Drum Map

Once a working setup is found, practical experiments will be performed in order to come up with a drum map suitable for guitarists. These tests will be done by myself and potentially in cooperation with other guitarists that can give valuable feedback on playability and feasibility of the drum map. As a result, the concept of the drum map can be successively refined until an optimal solution is achieved.

In the theoretical part of the Master’s thesis the cooperation with guitarists could be taken one step further by incorporating interviews with guitarists, asking for their opinion and an evaluation of the guitar drum map created. Additionally, interviews could establish if and how guitarists would use the guitar drum map in their music production workflow.

Plan of Action

  • Research setup possibilities
  • Find suitable setup
  • Start experimenting with drum map concepts
  • Find cooperating guitarists