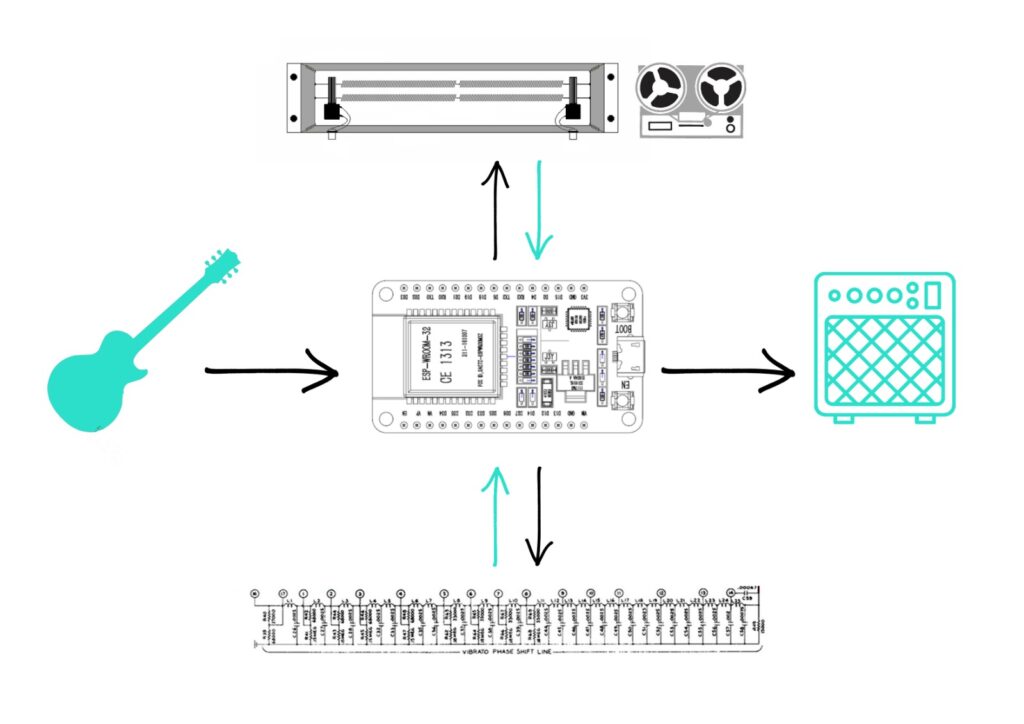
This project aims to improve outdated audio devices by pairing them with contemporary technologies. I propose the development of an analog multi-effect chain unit that combines different types of vintage components and modern microcontrollers. I seek to preserve the warmth and organic character of the analog sound and expand its capabilities with the flexibility and integrability of digital tools. The core element of the effect chain is an analog delay line which, if sampled in various sequences, produces different modulation effects. By design, the unit can be expanded with additional analog modules such as spring reverbs and tape delays that are chained in an interchangeable order and controlled by the same central microcontroller. The user interface is divided between a minimalist control panel located on the unit and a mobile app that allows for in-depth parameter adjustment.
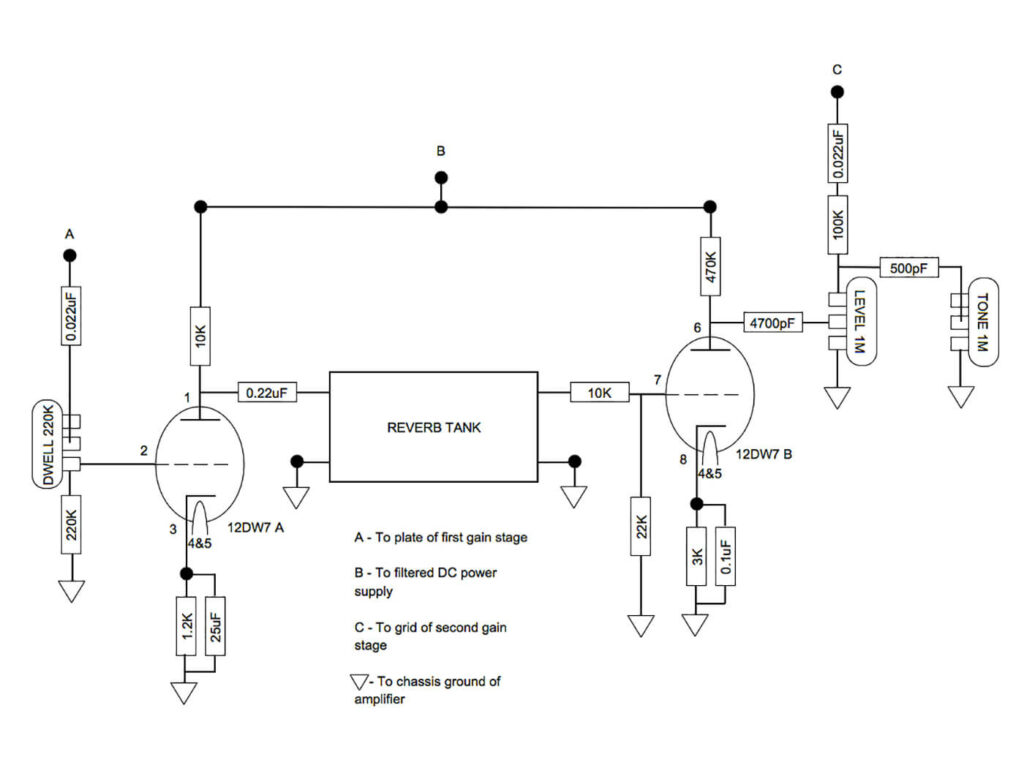
As I already mentioned in an earlier blog post, I aim to expand the unit with either a Spring Reverb or a Tape Delay by the end of the third project semester. For the reverb, my main idea is to build an add-on tube-driven spring reverb module based on the classic Ampeg and Swart-style circuits. The advantage of these circuits is the relatively small number of parts required. Besides an enclosure, a handful of components, and a valve socket, the only costly item is the reverb tank itself, which I already possess.
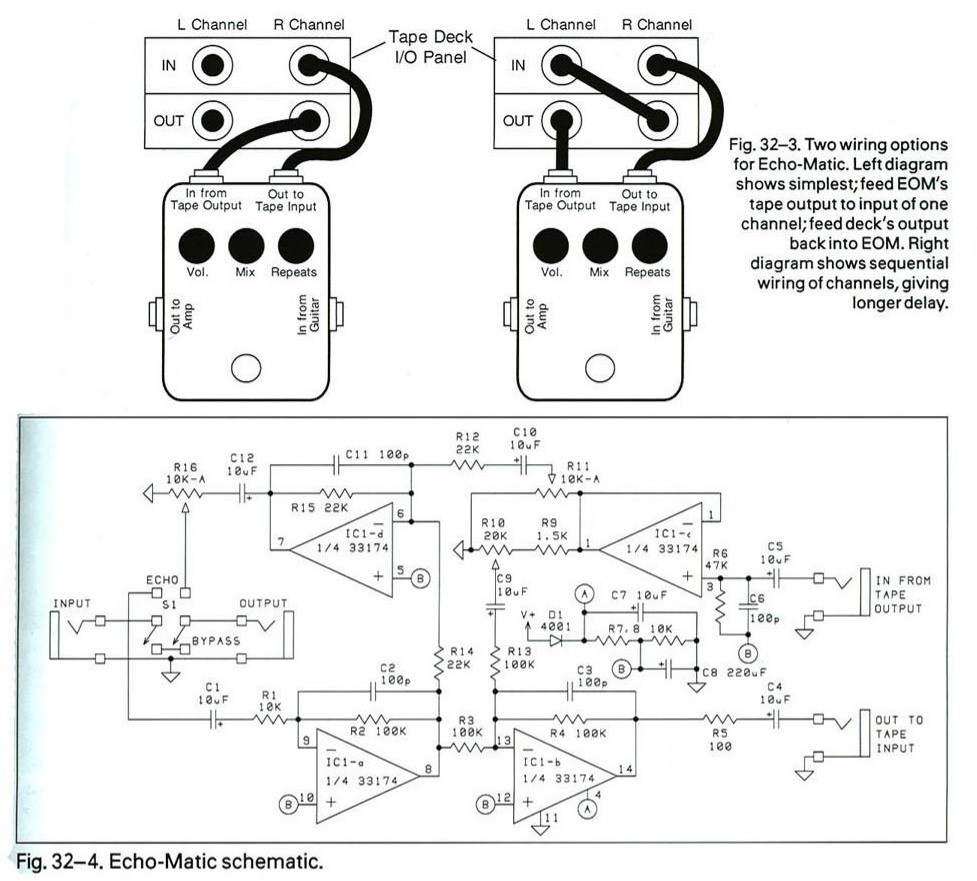
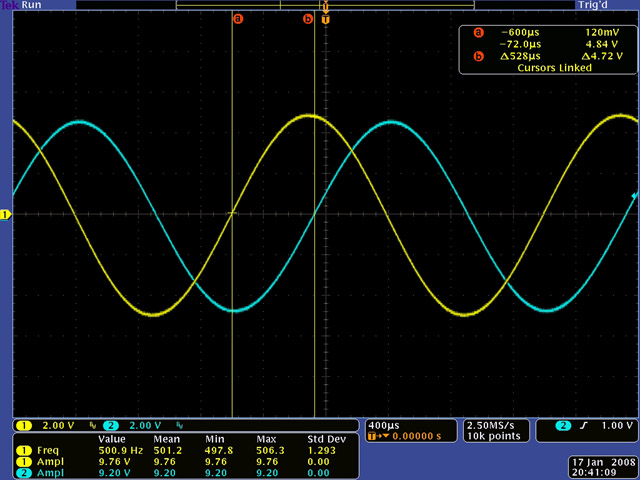
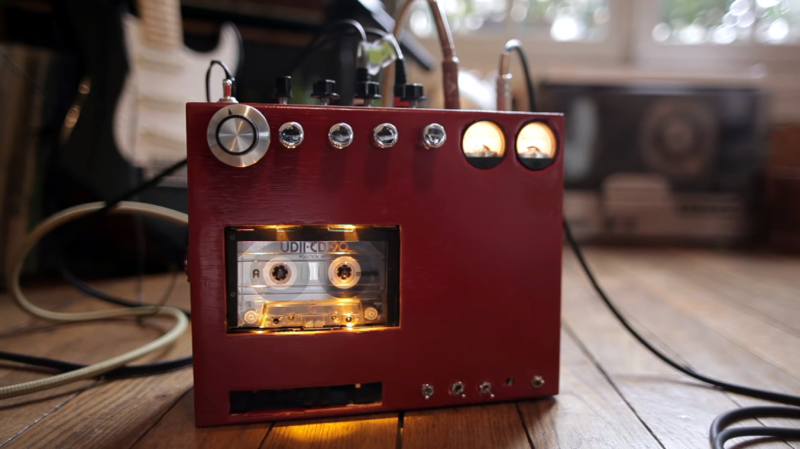
My main reference for the tape delay effect is a DIY project by Matsound, that combines a Marantz PMD430 portable cassette player with the Echo-Matict, a simple circuit that can turn any 3-head cassette recorder into a tape delay. The 3 head design allows for the separate use of record and play head, meaning that it is possible to record and playback from the tape simultaneously. The Echo-matic circuit splits the incoming signal and routes it both to the output and to the tape machine with a mix blend control. The delay effect is produced by mixing the dry input signal with the one going through the cassette tape. Initially, the delay time is fixed by the distance between the record and play heads, but by adding a voltage control to the motor its speed can be altered, and thus the delay time can be adjusted.
Sources:
Cary, J., 2021. Echo-Matic (DIY Tape Delay). [Blog] Proto-Schlock, Available at: <http://proto-schlock.blogspot.com/2015/04/echo-matic-diy-tape-delay.html> [Accessed 12 December 2021].
Effects, S., 2022. DIY Tape Delay? The Echo-Matic!. [online] The Gear Page. Available at: <https://www.thegearpage.net/board/index.php?threads/diy-tape-delay-the-echo-matic.1822557/> [Accessed 12 December 2021].
Hawkes, R., 2019. DIY CASSETTE TAPE GUITAR DELAY. [Blog] Hackday, Available at: <https://hackaday.com/tag/cassette-tape/page/2/> [Accessed 12 December 2021].
freestompboxes.org, 2017. Stompboxology Echo-Matic DIY Tape Delay. Available at: <https://www.freestompboxes.org/viewtopic.php?f=28&t=28316> [Accessed 12 December 2021].
Price, H., 2019. HOW TO BUILD YOUR OWN SPRING REVERB UNIT. [online] Guitar.com | All Things Guitar. Available at: <https://guitar.com/guides/diy-workshop/build-tube-spring-reverb-unit-amplifier/> [Accessed 19 December 2021].
Accutronicsreverb.com. n.d. The History of Spring Reverberation. [online] Available at: <http://www.accutronicsreverb.com/main/?skin=sub03_01.html> [Accessed 19 December 2021].
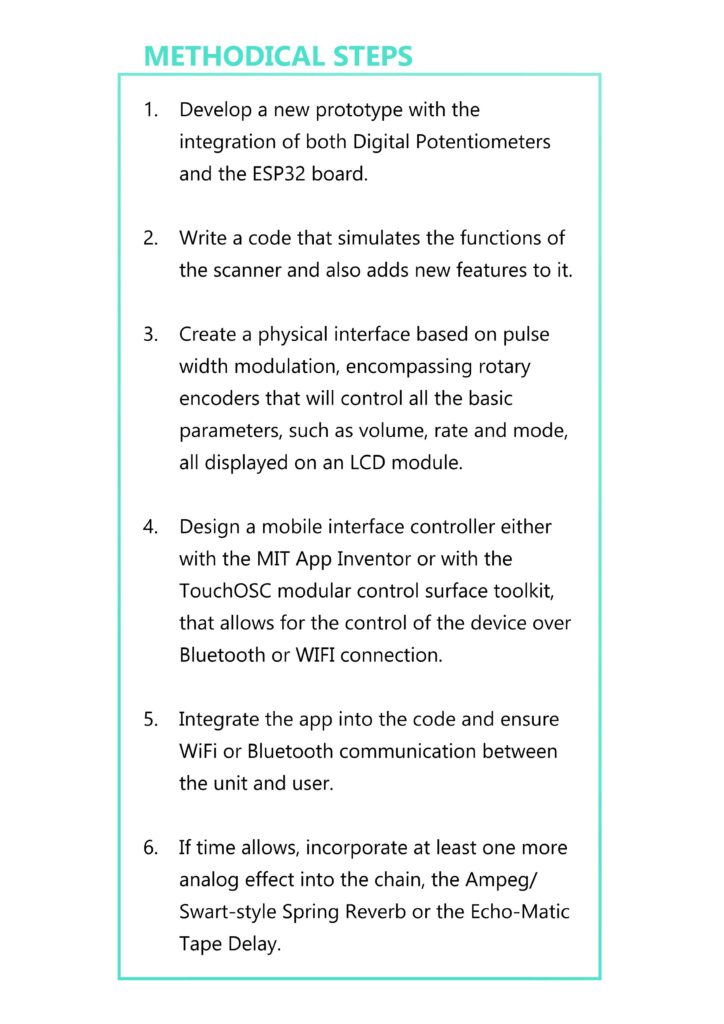
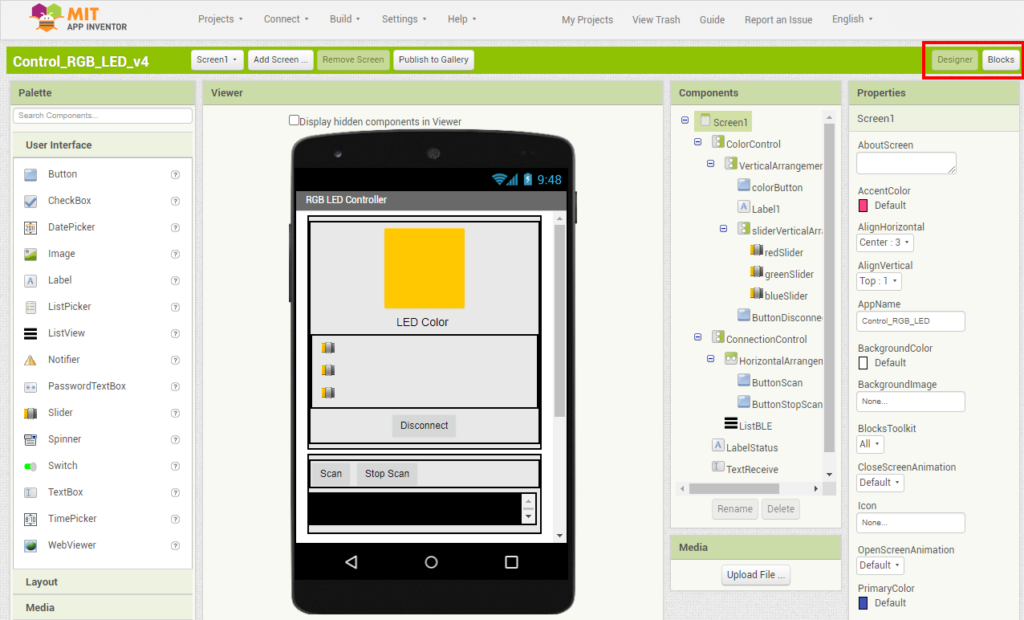
To take full advantage of the ESP32’s features, I will set up a mobile phone interface that enables complete control over my multi-effect chain’s components via either WIFI or Bluetooth. The first notable solution for creating the app is the MIT App Inventor, a visual programming environment designed to build fully functional apps for Android and iOS smartphones or tablets.
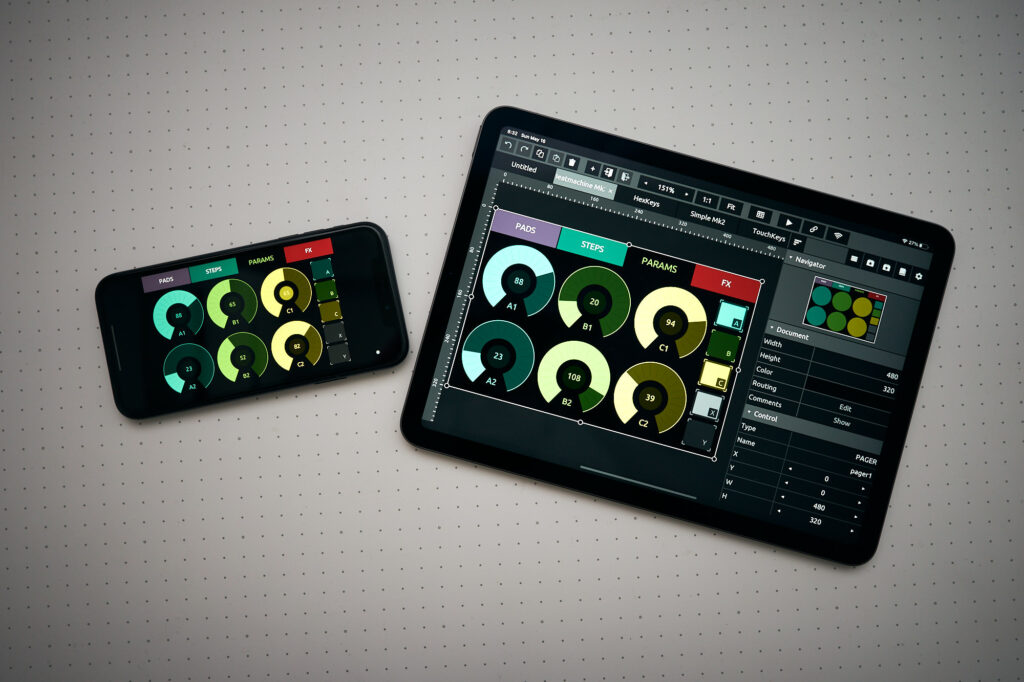
A more complex option for my purposes is TouchOSC, a modular control surface toolkit used to design and construct custom controllers compatible with a wide range of operating systems and devices. TouchOSC can communicate with other software and hardware using the MIDI and Open Sound Control protocols in a variety of ways, also via different types of wired and wireless connections simultaneously.
The development of this remote control application will not only reduce the size of the physical interface on the device but will also expand its capabilities significantly. On the unit, the controls will include only the basic parameters, such as volume, rate, and mode, all controlled by rotary encoders and displayed on an LCD module.
In the app, however, the possibilities are greatly expandable, allowing for operations such as selecting which individual taps of the delay line will be scanned, setting presets, and changing the order of the components in the chain. Compared to the original Hammond unit that had a fixed rate and only 3 presets for both Vibrato and Chorus, this design will offer much more flexibility in shaping the width and rate of the phase shift that is applied to the audio signal.
Sources:
Appinventor.mit.edu. n.d. About Us. [online] Available at: <https://appinventor.mit.edu/about-us> [Accessed 27 December 2021].
Antonio, J., 2020. ESP32. WiFi. WebServer. LED on/off. Static IP. Soft Access Point. [online] MIT App Inventor Community. Available at: <https://community.appinventor.mit.edu/t/esp32-wifi-webserver-led-on-off-static-ip-soft-access-point/9323> [Accessed 27 December 2021].
Hexler.net. 2021. Introduction · TouchOSC | hexler.net. [online] Available at: <https://hexler.net/touchosc/manual/introduction> [Accessed 27 December 2021].
Forum.aemodular.com. 2022. OSC to CV with an ESP32 (TouchOSC) | AE Modular. [online] Available at: <https://forum.aemodular.com/thread/1887/osc-cv-esp32-touchosc> [Accessed 10 January 2022].
Teja, R., 2021. In-depth ESP32 PWM Tutorial | How to use PWM in ESP32?. [online] Electronics Hub. Available at: <https://www.electronicshub.org/esp32-pwm-tutorial/> [Accessed 11 January 2022].
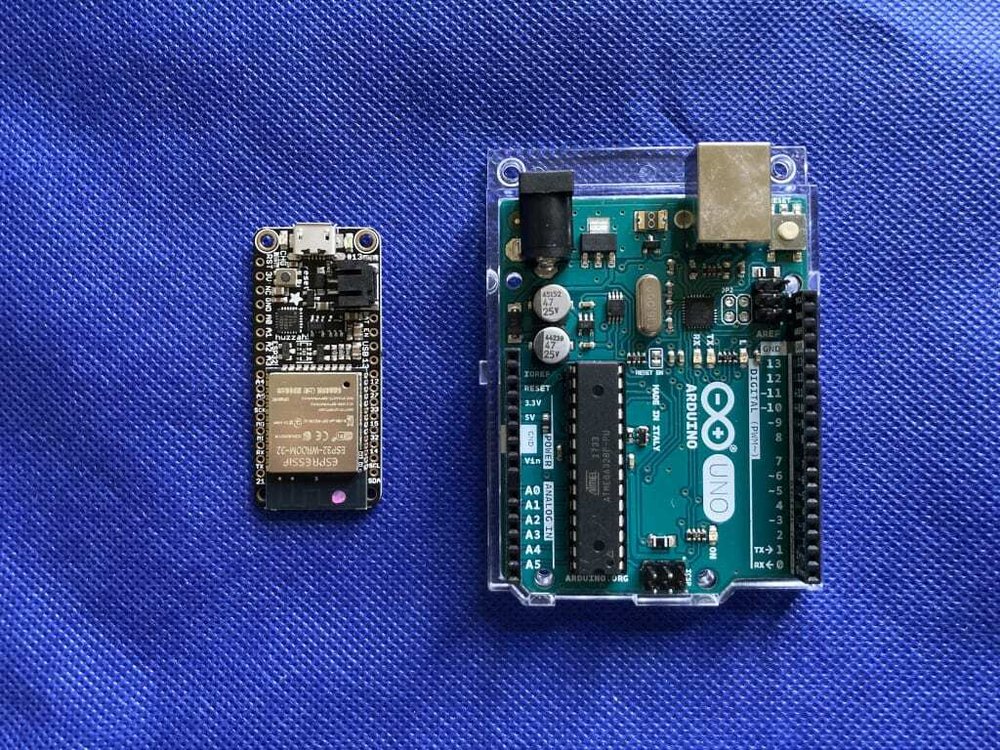
Regarding the microcontroller, I intend to opt for a better alternative than the Arduino. A significant upgrade would be the ESP32, manufactured by Espressif Systems, which is a low-cost, low-power system-on-chip with built-in Wi-Fi and Bluetooth. As it is supported by the Arduino IDE, it is also ideal for beginners and intermediate users, making it a suitable element of my project. Unlike the Arduino boards that were designed for educational purposes, the ESP32 was designed for DIY projects where the results can be turned into a commercial product.
In contrast to most Arduino boards, such as the UNO that have 8-bit chips, all ESP boards are based on 32-bit microprocessors. By comparing the features of the ESP32 to more advanced Arduino boards, such as the Zero, further considerable differences appear. While the Arduino has 256kB of flash memory, the Esp32 starts at 4 MB with some modules going as high as 8 or 16 MB of memory. Additionally, the Arduino Zero houses only 20 digital I/O pins, with 6 analog input pins and 1 analog output pin while the Esp32 ranges from 38 to 77 I/O pins depending on the module. Subsequently, the Zero enables internet connectivity only when paired with an Ethernet shield, while the ESP32 has built-in Wi-Fi capabilities, so no add-ons are required.
I think the ESP32 is a far better option than any Arduino board (especially the UNO) and will therefore be the brains of my second prototype that I will develop during the exploration phase of this project. .
Sources:
Ghosh, A., 2020. ESP32 vs Arduino : How ESP32 is Different from Arduino. [online] The Customize Windows. Available at: <https://thecustomizewindows.com/2020/05/esp32-vs-arduino-how-esp32-is-different-from-arduino/> [Accessed 2 December 2021].
2. Tan, C., 2021. Esp32 vs Arduino: The Differences. [online] all3dp.com. Available at: <https://all3dp.com/2/esp32-vs-arduino-differences/> [Accessed 2 December 2021].
3. Teja, R., 2021. Getting Started with ESP32 | Introduction to ESP32. [Blog] Electronics Hub, Available at: <https://www.electronicshub.org/getting-started-with-esp32/> [Accessed 2 December 2021].
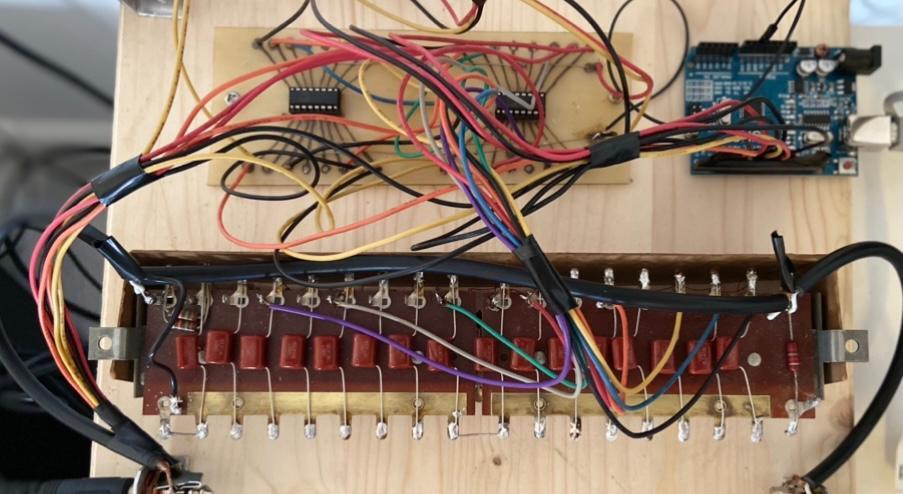
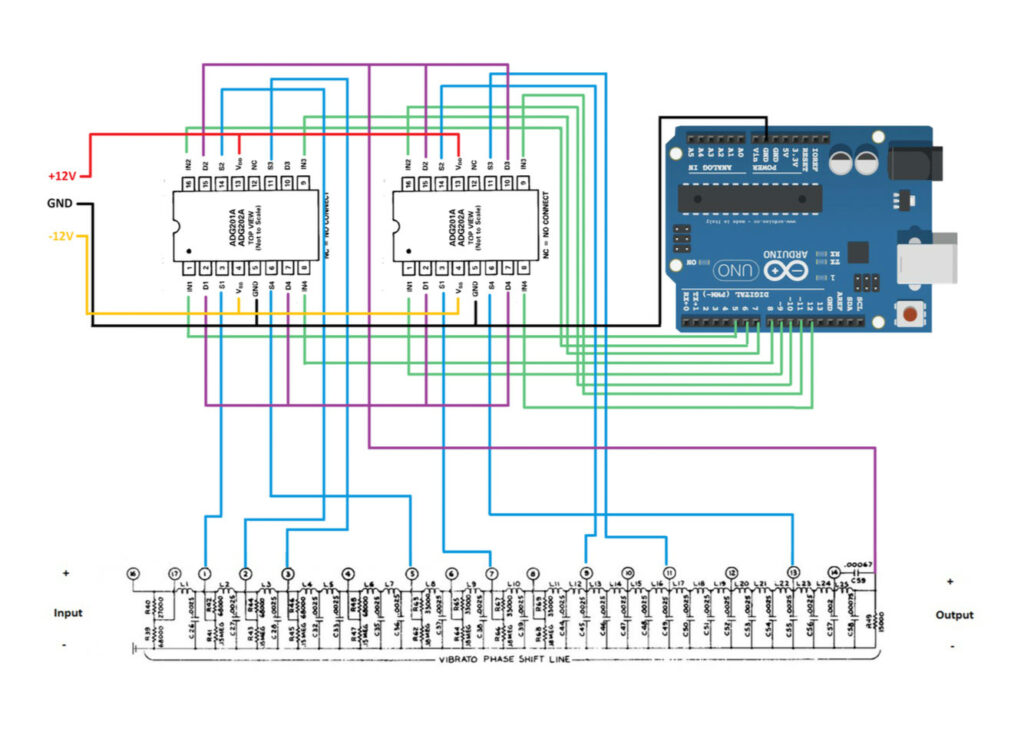
Inspired by the Scanner Vibrato & Reverb effect by Analog Outfitters, I decided to build one for myself. As the components in the Vibrato Scanner unit are rare to come by, I only managed to purchase the delay line taken out of a Hammond H-100 organ. To substitute the scanner, I began experimenting with various IC analog switches controlled by an Arduino Uno microcontroller.
The switches are set up to do the same job as the scanner and rapidly sample back and forth along the line. As it turns out, even if the switches are programmed to crossfade between each step, they can only turn on and off which causes clicking every time the signal is cut.
To solve this issue, I consider replacing the IC switches with devices that can perform cross-fading. Possible solutions are the so-called digitally controlled variable resistors, which are essentially IC potentiometers capable of fading the signal in and out only in a couple of nanoseconds. By implementing these in my prototype, I could eradicate the clicking and deliver a smooth shift similar to the one produced by the scanner.
For now, I leave you with a short video demonstrating the current state of my prototype.
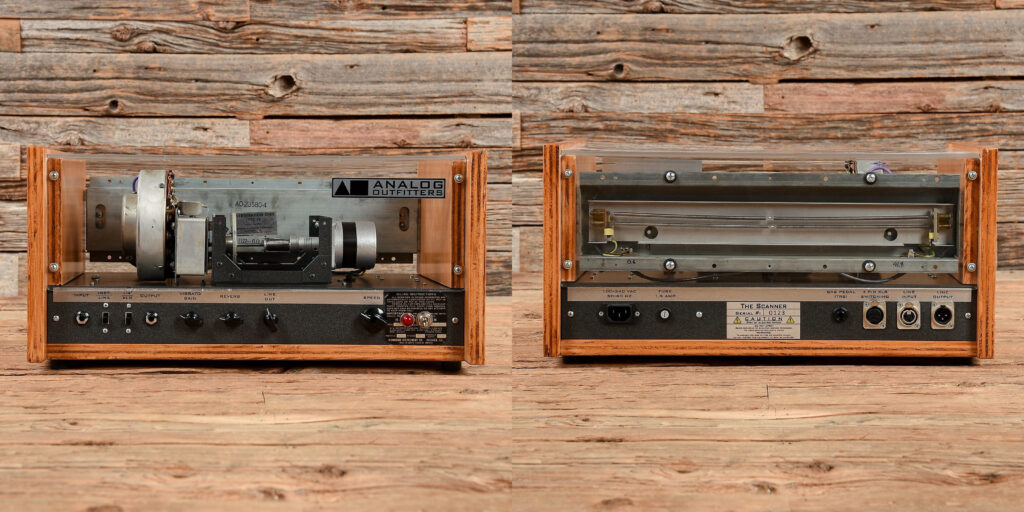
Analog Outfitters’s Scanner is a stand-alone vibrato and reverb effect, built around a refurbished Hammond vibrato scanner and spring reverb tank and serves as the main reference for my project work. As an upgrade to the original design that had a fixed rate, Analog Outfitters has added a brushless DC motor that allows for the variation of speed either via a knob on the front panel or by attaching an expression pedal.
The interface includes controls for vibrato gain, reverb mix, line out level, vibrato speed, and vibrato level, while the reverb and vibrato effects can be turned on and off individually via an included footswitch. In contrast to Hammond’s original design, Analog Outfitters’s unit doesn’t integrate settings for chorus, but thanks to the variable speed of its motor, it can achieve anything from low-speed gentle modulations to high-speed psychedelic vibrato effects.
If interested, check out this video to experience the unique analog sound of this device.
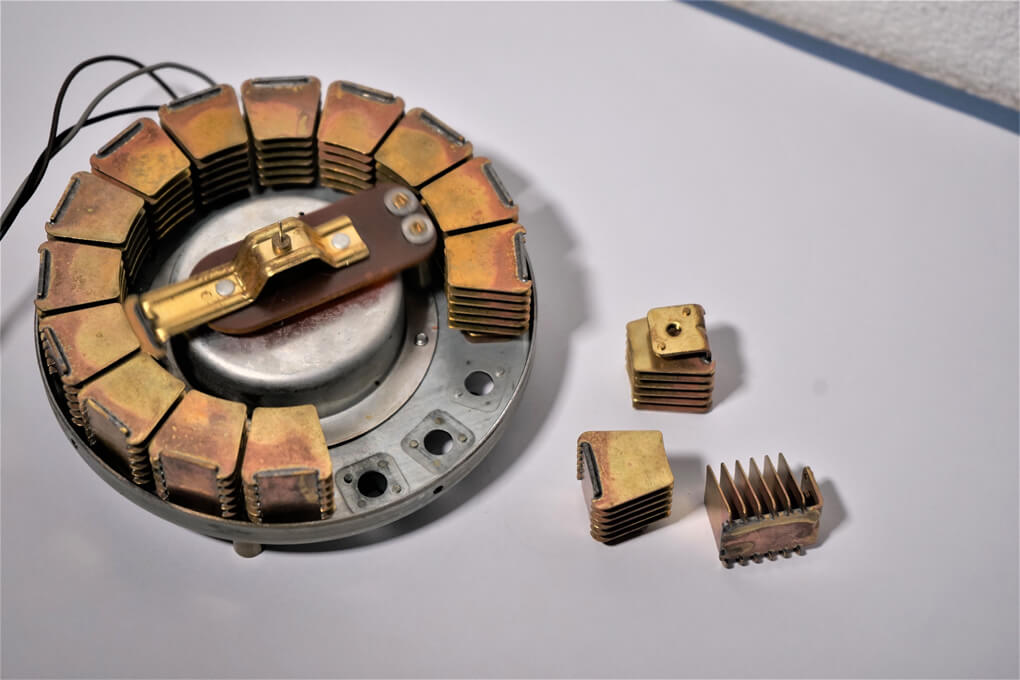
The Vibrato Scanner is an electromechanical device that produced vibrato and chorus effects in old Hammond organs. Unlike newer technologies that modulate the signal at their source, the Scanner system modified the sound right on its way from the keyboard to the amplifier.
The hardware consists of two main elements: a phase shift line enclosing a series of passive all-pass filter stages and a scanner that is a single-pole 16-throw air-dielectric capacitor switch, connecting taps on the delay line to the output.
Each filter stage of the delay line is shifted in phase relative to the previous one, resulting in an increasing time delay between every successive step of the line (about 50μs per filter stage). Nine of these steps are connected to the sixteen inputs of the scanner, allowing it to sample back and forth along the line. For example, labeling each output of the delay line with a number from 1 to 9 would result in the following 16 digit sequence: [1, 2, 3, 4, 5, 6, 7, 8, 9, 8, 7, 6, 5, 4, 3, 2].
As the scanner gradually transitions between the taps, it alternates the phase shift applied to the sound, causing slight variations to the pitch and resulting in a vibrato effect. The depth of the vibrato effect relies on the width of the frequency shift fed into the scanner, which means that scanning about one-third of the delay line would produce a lighter vibrato effect while scanning the whole line would significantly increase its depth. The chorus effect is achieved by simply mixing the dry input signal with multiple outputs on the delay line.
In effect, scanning back and forth along the delay line is like moving toward and away from a sound source. This causes a change in frequency due to Doppler shift.
(Vorkoetter, 2009)
Originally, the delay line is part of the Hammond Vibrato Scanner unit and it incorporates a series of second-order audio filter stages where each stage is shifted in phase relative to the previous one. This results in an increasing time delay between every successive step of the line (about 50μs per filter stage). This is then fed into a scanner, that is a single-pole 16-throw air-dielectric capacitor switch connecting nine selected taps from the line to the output. As the scanner gradually transitions between these taps, it alternates the phase shift applied to the sound, causing slight variations to the pitch that result in a vibrato effect.
A notable limitation of this original design is the fixed gear ratio tied to the Generator Run Motor, which spins the rotor continuously at about 7Hz. The depth of the vibrato depends on the width of the frequency shift fed into the scanner, which means that scanning about one-third of the delay line would produce a lighter vibrato effect while scanning the whole line would significantly increase its depth. In addition to the vibrato, a chorus effect can also be achieved by mixing the dry input signal with multiple outputs on the delay line, or a chorus-vibrato by mixing the dry signal with the output of the vibrato.
The iconic chorus and vibrato effect is the result of Hammond’s extensive search for expression and emotional intensity. The Scanner Vibrato unit achieved to deliver a unique sonic character by adding depth and movement to the sound of the Hammond Organ. As the popularity of modulation effects were increasingly growing within pop music, so was the Hammond Vibrato unit. Since the 1960s, its unique sound has made its way into a wide range of genres, from blues and rock to hip hop and downtempo. Some notable artists include Booker T. & The MG’s, Yes, Beastie Boys and Portishead.
Sources:
Vorkoetter, S., 2009. Overhauling and Improving the Hammond M-100 Series Vibrato System. [Blog] http://www.stefanv.com, Available at: <http://www.stefanv.com/electronics/hammond_vibrato_mod.html> [Accessed 7 January 2022]. http://www.stefanv.com/electronics/hammond_vibrato_mod.html
Benton Electronics. n.d. Service Manual – The Hammond Vibrato – Benton Electronics. [online] Available at: <https://bentonelectronics.com/service-manual-the-hammond-vibrato/> [Accessed 7 January 2022].
After a couple of meetings with my supervisor and many hours of research and deliberation, my project idea has finally begun to take shape. My initial plan was to build a Mellotron from used cassette player parts, in which all effects would also be created with magnetic tapes. I soon realized that there is a lot of work done in this domain, leaving me little space for innovation, so I had to reconsider the direction of my project.
My new proposal is the creation of a guitar effect chain that combines different types of obsolete time-based audio effect technologies with the capabilities of modern microcontrollers. The foundation of this idea came to me first, after discovering the Scanner Vibrato & Reverb guitar effect by Analog Outfitters, a hardware entirely made of refurbished Hammond organ parts. Since then I have managed to acquire one of the core elements of this device, the so-called phase shift line, and build an experimental vibrato effect prototype by combining it with an Arduino Uno microcontroller.
Fortunately, my previous research on magnetic tape was not in vain, as it shaped the development of my new project idea Since the initial project would also include audio effects based on magnetic tape technology, I came across several solutions that make it possible to convert portable cassette decks into delay effects. The combination of a cassette tape delay with the aforementioned phase shift line, led to the idea of a multi-effect and thus the concept of an analog delay chain was born. These two components could provide modulation effects such as vibrato, chorus, and various types of delays, but by introducing a spring reverb tank, even more color could be added to the chain.
In order to expand the capabilities of this delay chain, I would add a microcontroller that is responsible for all control processes. This could even enable manipulation via Bluetooth or WLAN and therefore compress the size of the physical interface on the device. Thus, it would be enough to include only a few rotary encoders to control basic operations, such as volume or rate and an LCD module to display these values. But in more detail on these issues in my upcoming blog entries.
In this blog entry I will focus on a paper published at the 20th International Conference on New Interfaces for Musical Expression in 2020 . The article is called “ParaSampling: A Musical Instrument with Handheld Tapehead Interfaces for Impromptu Recording and Playing on a Magnetic Tape”. I have chosen this paper, because it relates to my individual project research and might also serve as a source of inspiration.
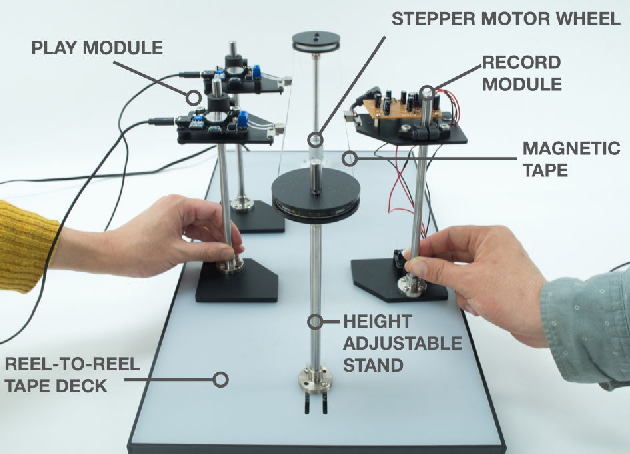
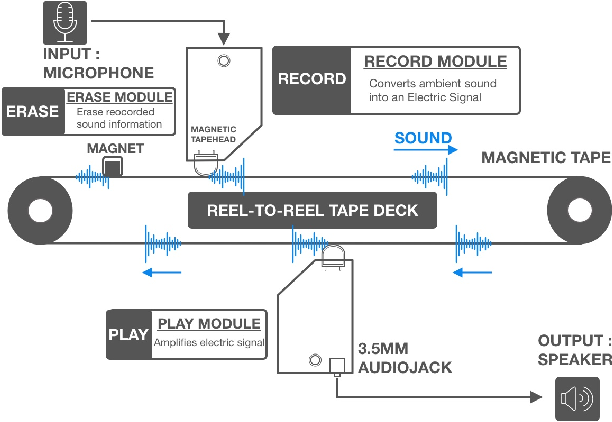
ParaSampling is an interactive musical instrument based on magnetic tape technology that allows for the physical performance of various musical expressions through improvisational recording and reproduction techniques. The device consists of a reel-to-reel tape deck rotating a tape loop, as well as 3 handheld modules, each specialized for one of the following functions: record, play, and erase. The playback module is a tape head running through an amplifier, while the erase module is simply a permanent magnet attached to a stand. The record module is based on a wire recorder kit published in a Japanese magazine called “Otona no Kagaku” and incorporates a circuit that allows for the recording of voice or ambient sounds onto the tape via an embedded microphone. The tape loop is 95.3cm long and has a duration of about 20 seconds if played at normal speed (4.76cm/second), but by altering the velocity of the stepping motor, pitch and time can be also adjusted.
In this study, we propose a novel instrument for sampling sounds and creating music via tangible and spatial interactions. (Joung Min and Yasuaki, 2020)
I find the idea of the handheld tape-head-modules very advantageous, as they allow for so much flexibility and open up many opportunities that mechanically would have been a lot more difficult to achieve. For example “by physically changing the positions of the devices, one can perform various musical expressions by varying the tempo of the sound.” (Joung Min and Yasuaki, 2020). Additionally, there is a possibility to slide the record or play heads along the tape while recording or listening back, which could also result in some really interesting effects. Besides all that, having a play, record and erase head, ParaSampling is also capable of all the basic operations such as delay or looping, but contrary to ordinary tape machines, its delay time is not limited by a fixed distance between the record and playback heads.
I think this project is also very educational because it literally lets users think outside the box. Usually there is a tendency to design products more compact and with hidden parts, but this leads to the fact that no one really understands what things are made of and how they actually operate. That was the case with tape as well, especially after the arrival of the compact cassette.
It is good to see that the age of Musique Concrète is not over yet and people still find ways to bring tape back to life again.
References:
Han, Joung Min, & Kakehi, Yasuaki. (2020). ParaSampling: A Musical Instrument with Handheld Tapehead Interfaces for Impromptu Recording and Playing on a Magnetic Tape. Proceedings of the International Conference on New Interfaces for Musical Expression, 543–544. https://doi.org/10.5281/zenodo.4813178
As a sound designer and electronics hobbyist, I enjoy developing experimental prototypes that combine different technologies such as microcontrollers, repurposed analog components, piezoelectric sensors and impulse responses, in order to create working prototypes that can later be turned into functional audio products.
The day I had to propose 3 ideas for my independent project, it was obvious to me that I would create some kind of experimental audio device.
My three proposals were:
A Noise Box that combines experimental acoustic elements with Arduino modules, such as sensors and electric motors while also adding audio effects like reverb, delay, and some modulation effects, as well as a simple waveform generator and lo-fi Arduino based audio sampler.
Sound effects that are based on mechanical rotation. Examples are Hammond’s Vibrato Scanner and DeArmond’s Tremolo Control.
A musical instrument that is made out of used electronics. The proposed idea was to build a Mellotron from used cassette player parts, in which all effects should also be created with magnetic tapes.
After the first meeting with my supervisor, I have decided to go with the third proposal.
The motivation behind this project idea is to experiment with the reuse / repurpose of outdated audio devices and electric instruments.
As a result of rapid innovation, technologies that were once standards in sound recording and reproduction, became quickly outdated. But what happens to all these appliances? E-waste is now the fastest-growing waste stream in the world, estimated at 53.6 million tonnes in 2020.
In order to address this issue, I will investigate existing and possible solutions that allow the repurpose of discarded technologies, into musical instruments and audio effects.