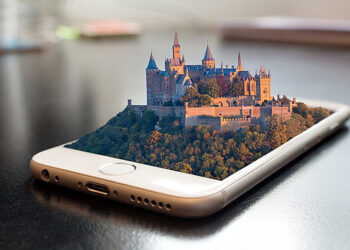
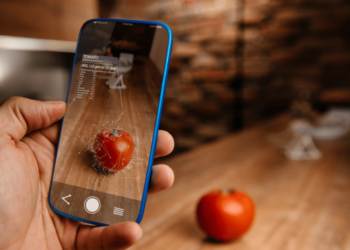
Webbasierte Augmented Reality gestaltet virtuelle Erlebnisse zugänglicher und niederschwelliger. Notwendig ist dafür nur ein Smartphone mit Handykamera.
Es gab bereits einige Versuche, um Printprodukte mittels Augmented Reality interaktiv zu gestalten. Es blieb dabei aber meist bei einzelnen Tests, da sich User dafür eine App downloaden mussten. Die dadurch entstehende Schwelle schreckte viele ab und es blieb beim klassischen Magazin.
Allerdings gibt es seit einiger Zeit die Möglichkeit, via QR Code auf webbasierte AR Anwendungen zuzugreifen. User müssen also keine App mehr downloaden, sondern können die Inhalte direkt über ihren Browser konsumieren.
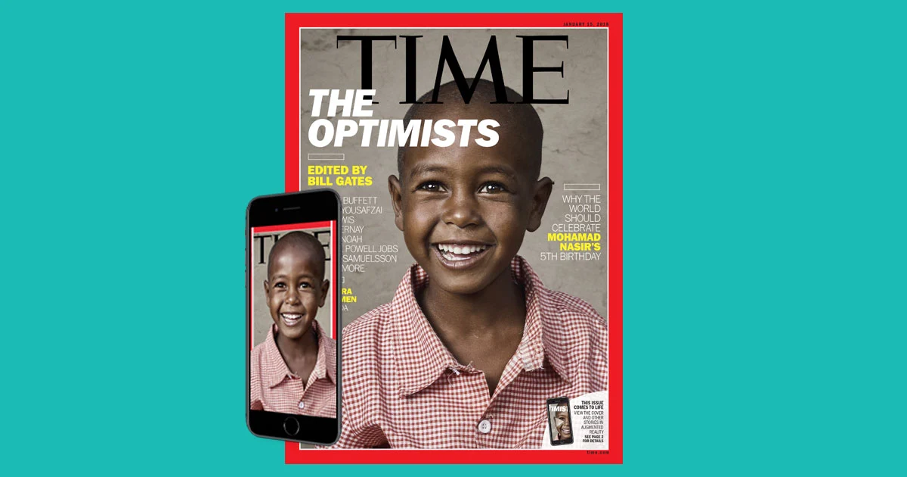
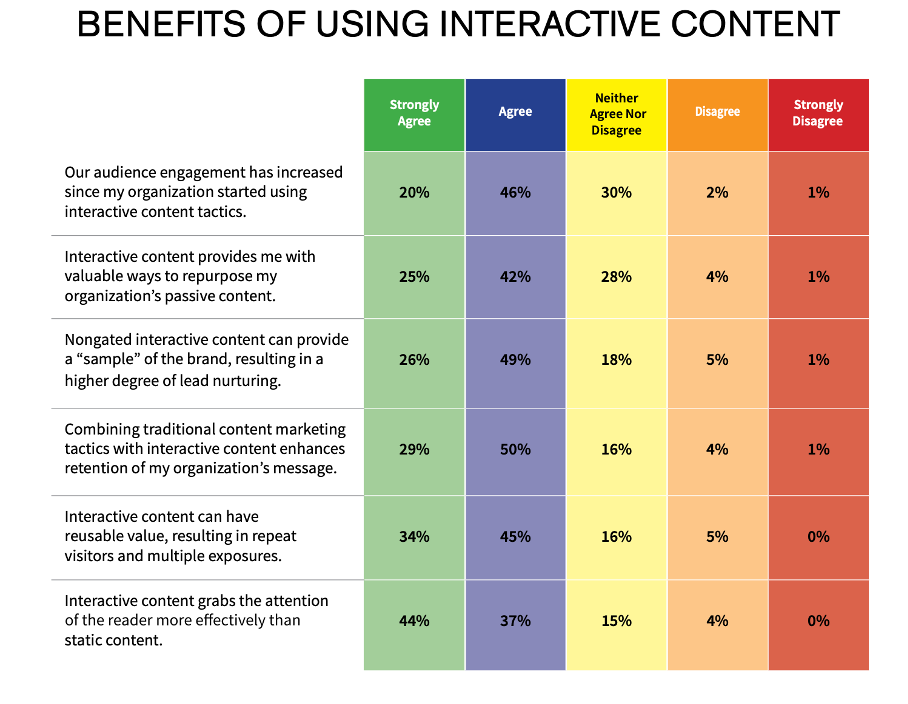
Eine Studie des Content Marketing Institute zeigt, dass Botschaften mit interaktiven Inhalten deutlich höheren Anklang finden. User beschäftigen sich intensiver damit, deshalb behalten sie die Inhalte auch stärker im Gedächtnis.
Augmented Reality wird oft mit Apps wie Pokemon GO in Verbindung gebracht, hat aber eigentlich viel mehr zu bieten als ein fesselndes Spielerlebnis. Von interaktiven Produktetiketten bis hin zu Filmplakaten, die sprechen können – mittels AR stehen einem plötzlich viele zusätzliche Gestaltungsmöglichkeiten zur Verfügung. Einige Beispiele für die gelungene Verknüpfung von herkömmlichen Produkten mit Augmented Reality sind die folgenden:
1. Interaktive Produktetiketten: “Mission Tiger” von Frosted Flakes
Kellog’s hat kürzlich eine Kampagne gestartet, um das Bewusstsein für seine Arbeit zur Unterstützung des Schulsports zu schärfen. Mit Gesichtsfiltern, Minispielen und einer speziellen Botschaft von Tony dem Tiger trug das WebAR-Erlebnis dazu bei, das Bewusstsein für die Initiative des Unternehmens zu schärfen und Spenden zu sammeln.
2. Exklusive Markeninhalte: Sam Smiths Album-Veröffentlichung
Die Fans des Künstlers Sam Smith erhielten exklusiven Zugang zu einem besonderen Erlebnis, das auf seine neueste Single-Veröffentlichung abgestimmt war, um den Download des Albums und die Verbreitung in sozialen Netzwerken zu fördern.
3. Printmaterialien: Einführung des Toyota Supra
Im Rahmen einer kürzlich durchgeführten Werbekampagne für den neuen Supra gab Toyota seinen Kunden die Möglichkeit, den neuen Sportwagen in ihrer Garage zu sehen, eine kurze Probefahrt zu machen und verschiedene Lackierungen zu testen – mit Hilfe von WebAR-gestützten Zeitschriftenanzeigen und Postern.
4. Persönliche Botschaften: Rede des Präsidenten zum Unabhängigkeitstag
Mit Hilfe von holografischer Technologie, die über WebAR verteilt wurde, überbrachte der israelische Präsident seinen Bürgern während des Höhepunkts der COVID-19-Pandemie eine besondere Botschaft zum Unabhängigkeitstag und blieb damit seiner Tradition treu, die Bürger an diesem besonderen Tag persönlich zu treffen.
5. WebAR-Visitenkarten
Der Werkzeughersteller Stanley Black & Decker hat seine Visitenkarten mit Hilfe von WebAR auf die nächste Stufe gehoben, indem er ein maßstabsgetreues Maßband und Click-Through-Links zur Unternehmenswebsite und zu sozialen Kanälen hinzugefügt hat.
This blog entry will be a growing collection of questions that educators, designers and practitioners in general need to consider when designing/developing educational AR products.
Questions, questions and more questions
Who is the target group? What’s their educational level?
What is the learning environment? —> Classroom? Distance learning? Workplace? Indoors? Outdoors? …
What contents are to be conveyed?
Which part of the content to learn should be enhanced by AR?
What goal(s) should be achieved by using AR technology?
In what proportion will real and augmented content be combined?
How is the content prepared didactically?
Which AR device(s) will be used?
Which AR technology fits best? —> Trigger-based, View-based?
What are the advantages of AR in the learning context compared to traditional approaches? —> Which added value has AR in this case?
How can multiple senses be addressed?
How can cognitive overload be avoided?
How can teachers easily and quickly add/adapt content?
Hello again! In the following blog entry I will be writing about the advantages and limitations of using AR technology in the educational sector, which many studies already have been conducted to establish.
Advantages & Benefits
Many studies indicate that the use of AR in the educational field brings many benefits. According to a meta-review by Garzón, Pavón and Baldiris (2019), which analyzed 61 scientific publications, a total of 100% mentioned some kind of advantage when using AR systems in education. The following factors are the main advantages mentioned in their paper:
Learning gain: When using AR systems, students can improve their academic performance or even obtain better scores than students using traditional approaches. This improvement was reported not only by data, but also for different teachers and the students themselves
Motivation: The use of AR can increase the motivation of students as well as their level of fun while learning, compared to other pedagogical tools
Sensory engagement: When AR activates multiple senses, knowledge retention can improve.
Abstract concepts: AR can ideal to explain unobservable phenomena (i.e. the movement of the sun)
Autonomy: AR technology can not only help retain knowledge, but also gives students the possibility of retaining it for longer periods of time compared to other pedagogical methodologies
Memory retention: The combination of real and virtual worlds can increase the autonomy of students taking into account their natural abilities and motivation for using technological devices
Collaboration: AR can create possibilities for collaborative learning around virtual content which can facilitate learning, since it allows learners to interact with their partners, as well as with the educational content
Accessibility (not further described in the study)
Creativity(not further described in the study)
In a blog (not scientific!) by Sinha (2021) I found some more advantages of AR in education, that were not listed in the aforementioned study:
Easy access to learning materials anytime, anywhere: AR could replace textbooks, physical forms, posters, and printed brochures. This mode of mobile learning could also reduce the cost of learning materials and make it easy for everyone to access
Safer practice:In cases like practicing a heart surgery or operating a space shuttle can be done with AR without putting other people in danger or risking millions of dollars in damage if something goes wrong
Disadvantages & Limitations
According to the aforementioned meta review by Garzón, Pavón and Baldiris (2019) 15% of the reviewed publications reported some disadvantages or problems when using AR in educational settings. The following factors are the main disadvantages mentioned in their paper:
Complexity: Complexity can be an issure especially when designing for children. AR being a novel technology, which involves multiple senses, can become a very complex tool especially for those who do not have technological abilities
Technical difficulties:Technical problems like latency of wireless networks or limited bandwidth can become a problem as well as lack of teachers’ experience with tech
Multitasking: AR applications can demand too much attention, which can be a distraction factor. This can cause students to ignore instructions or important stages of the experience
Resistance from teachers: Some teachers may prefer having total control over content, despite recognizing the benefits of using AR applications
In a blog (not scientific!) by Omelchenko (2021) and another blog by Aleksandrova (2021) I found some more advantages of AR in education, that were not listed in the aforementioned study:
Need of proper hardware: The use of AR requires at least a mobile device like a smartphone or tablet (which has to be up-to-date in order to install AR apps), which not all students may have
Content portability issues:An AR app needs to work equally well on all platforms and devices
Conclusion
Many studies indicate that AR has the potential to make learning processes faster, more fun and more effective. But some also point out that there are also several problems that can occur when AR is used in educational setting. Some studies also state that the context in which this technology is more effective than other educational media is still not clear and needs further research (Hantono, Nugroho & Santosa, 2018). Some future work could focus on support for teachers in adding and updating content as well as the comparison of AR to traditional teaching methods based on empirical data. It would also be important to do further research on special needs of specific user groups and accessibility features (Garzón, Pavón & Baldiris, 2019).
Garzón, J., Pavón, J., & Baldiris, S. (2019). Systematic review and meta-analysis of augmented reality in educational settings. Virtual Reality, 23, 447-459.
Hantono, B., Nugroho, L.E., & Santosa, P.I. (2018). Meta-Review of Augmented Reality in Education. 2018 10th International Conference on Information Technology and Electrical Engineering (ICITEE), 312-315.
Hello again! For this blog entry I had a look at several educational AR apps (there are a loooot of them) in order to get a picture of when AR has added value for educational purposes and when it doesn’t. So I picked out a few examples and categorized them in good and bad ones and summed up why I did (not) like them. It’s also to mention that I only looked at digital apps that use visual augmentation. But first I want to give a short overview on the wide range of educational fields and educational levels existing AR products on the market cover (this list provided by Garzón, Pavón and Baldiris [2019] might not be complete):
Education levels: Early childhood education, Primary education, Lower secondary education, Upper secondary education, Post-secondary non-tertiary education, Short-cycle tertiary education, Bachelor’s or equivalent level, Non-schoolers (work related trainings) – It’s to mention that educational AR products for Master’s or equivalent level and Doctoral or equivalent level might exist, but weren’t conducted in the study
The good
Augmented Creativity
Augmented Creativity includes a total of six prototypes that can be used with mobile devides: Coloring Book, Music Arrangement, Physical-Interaction Game, City-Wide Gaming, Authoring Interactive Narratives and Robot Programming – I had a look at the first two of them.
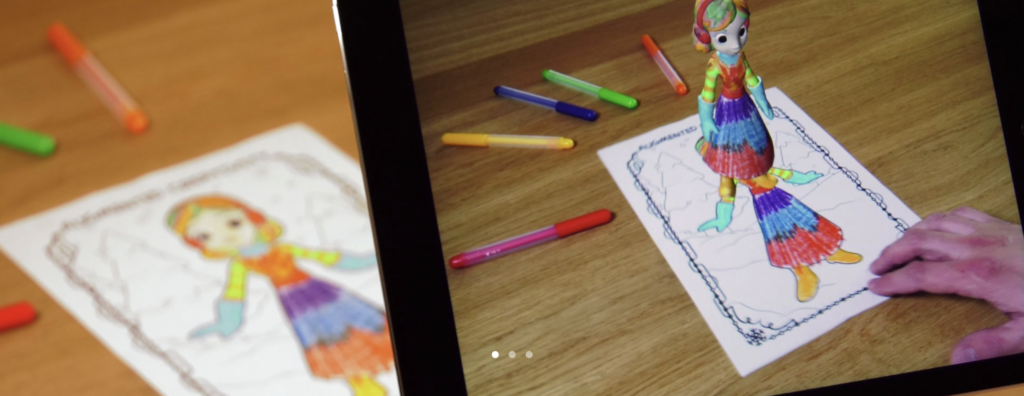
The Coloring Book is an application available that brings colored drawings to life: It comes with several templates that can be printed out and colored. When the drawing is scanned with the app on a smartphone or tablet (iOS and Android), it detects and tracks the drawing and displays an augmented, animated 3D version of the character, which is textured according to the child’s coloring (See Fig. 1).
Advantages the authors mention:
Creative Goal: Fosters imagination, allows character individualization, helps to express feelings about character
Educational Goal: Improves coloring skills, 3D perception, and challenges imagination
Potential Impact: User-painted characters and levels, scripting virtual worlds through coloring
Why I like it:
The augmentation doesn’t intervene the act of drawing and coloring by hand (which I think is an important way of creative expression in early ages), but adds additional value by digitalizing it afterwards
Stimulates several senses
Works really well and looks super cute (smooth animations; exact coloring; live updates)
Fig. 1: Augmented Creativity – Coloring Book
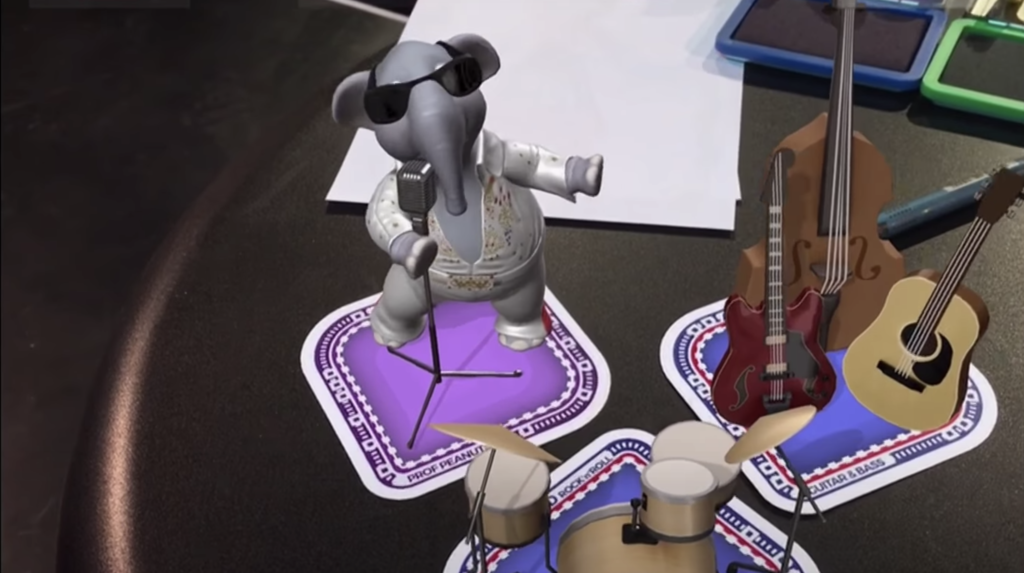
The Music Arrangement is a set of flashcards where each card represents a musical element like instruments and music styles. The user can then choose instruments and styles independently and rearrange the song as imagined. By placing a card on a physical board, the app detects the marker on it and displays an augmented version of the instrument and plays the corresponding audio, as depicted in Fig. 2. AR even allows the user to change the position and the volume of the instruments while the song is playing, allowing them to direct the virtual band.
Advantages the authors mention:
Creative Goal: Experiment with different instruments and styles to rearrange a song
Educational Goal: Teaches concepts of arrangements, styles, and the disposition of the band components
Potential Impact: Collaborative music arrangement experience, learn about the disposition of an orchestra
Why I like it:
Combines physical and digital interaction
It stimulates several senses
Works really well and looks super nice
Fig. 2: Augmented Creativity – Music Arrangement
Quiver Education
Quiver Education is similar to the Coloring Book mentioned above, but with a greater focus on educational content: The user can choose from a range of coloring packs, print them and color them by hand. When the coloring is scanned with the app on a smartphone or tablet (iOS and Android), a colored, animated 3D model is displayed and additional information and interaction options are provided (see Fig. 3). The content is designed around topics as diverse as biology, geometry, the solar system and more.
Why I like it:
The augmentation doesn’t intervene the process of coloring by hand
Stimulates several senses
A wide range of topics
~ I’m still a little sceptical if it’s necessary to color a scene first in order to learn about it (i.e. a volcano)
Fig. 3: Quiver
Merge EDU
Merge EDU engages students in STEM fields with 3D objects and simulations they can touch, hold and interact with. The special thing about Merge is that the user has to hold a special cube in their hands where the augmentation is placed on, so the user feels like actually holding the object in their hands and can then interact with it (See Fig. 4). Merge is available for iOS and Android and can be used with mobile devices – It also offers glasses where a user can put their phone in to have their hands free to interact with the cube.
Advantages the authors mention:
3D tactile learning
Flexibility: Can be used at home and at school
Curriculum aligned
Multisensory Instruction
Spatial Development
Accelerate Understanding
Focused Engagement
Why I like it:
The potential of the cube: It could potentially replace physical teaching aids
Big library of topics to explore
Users can upload and share their own creations
Fig. 4: Merge EDU
Human Anatomy Atlas
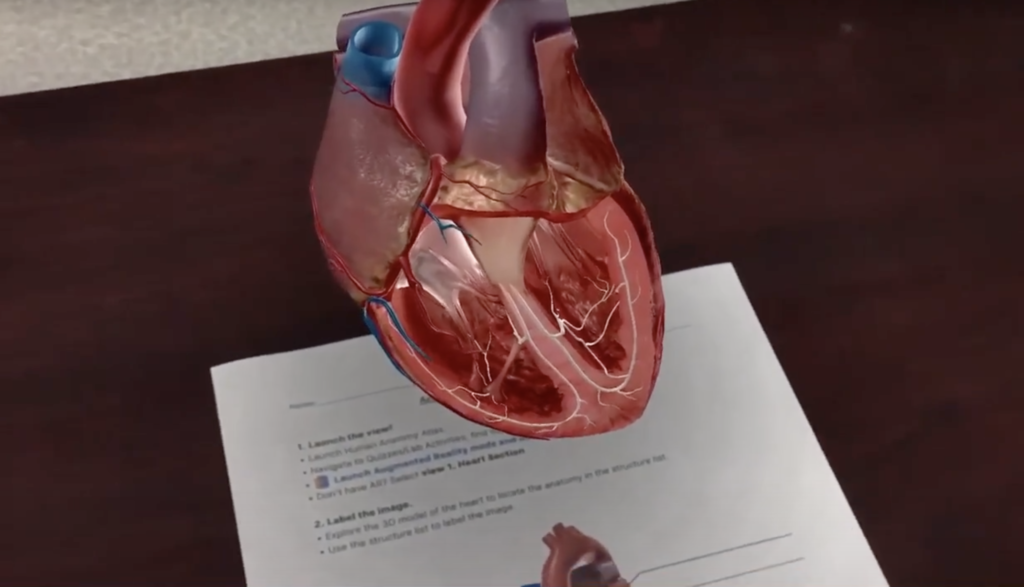
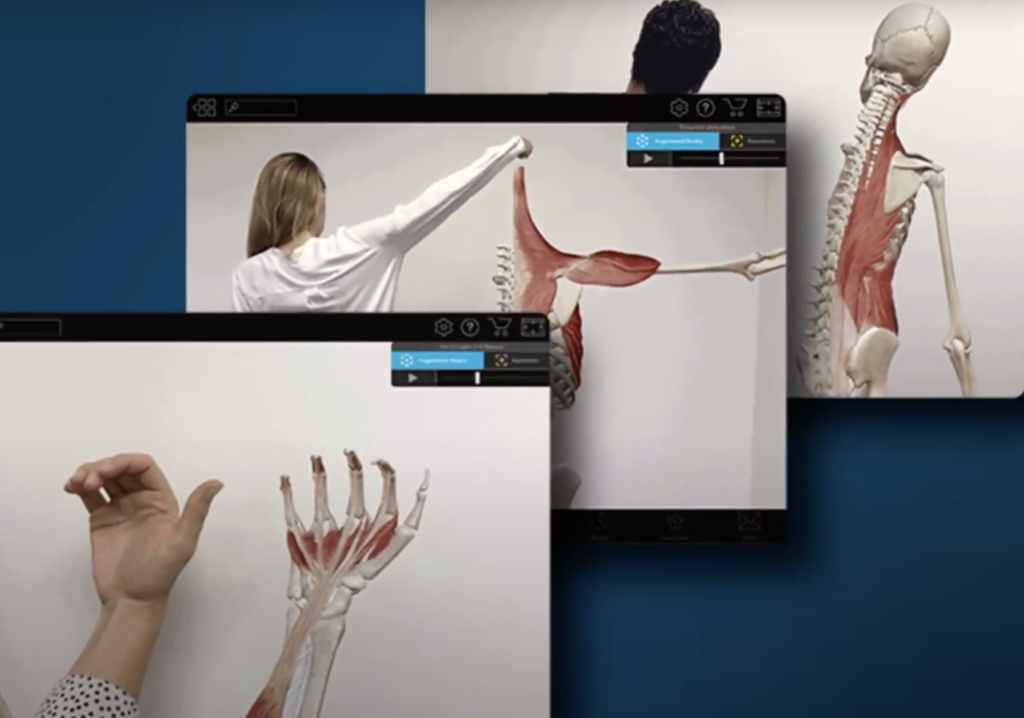
With the Human Anatomy Atlas medical students can turn any room into an anatomy lab: They can view and dissect a virtual model of a human organ or complete human body by scanning a printed picture (see Fig. 5) or simply placing a model on a flat surface (see Fig. 6). It’s also possible to study human muscles in motion by scanning a person as shown in Fig. 7.
Why I like it:
Students can study from anywhere and don’t have to go to an actual lab
Doing a dissection virtually might be helpdul to prepare for doing a dissection in real life (As far as I know from several people who are currently studying medicine, preparation for dissections is mostly done with the help of books, pictures, videos and physical models, but not with interactive digital models)
Fig. 5: Human Anatomy Atlas – Image marker
Fig. 6: Human Anatomy Atlas – Placing an object in space
Fig. 7: Human Anatomy Atlas – Live tracking of muscles
The bad
Sketch AR
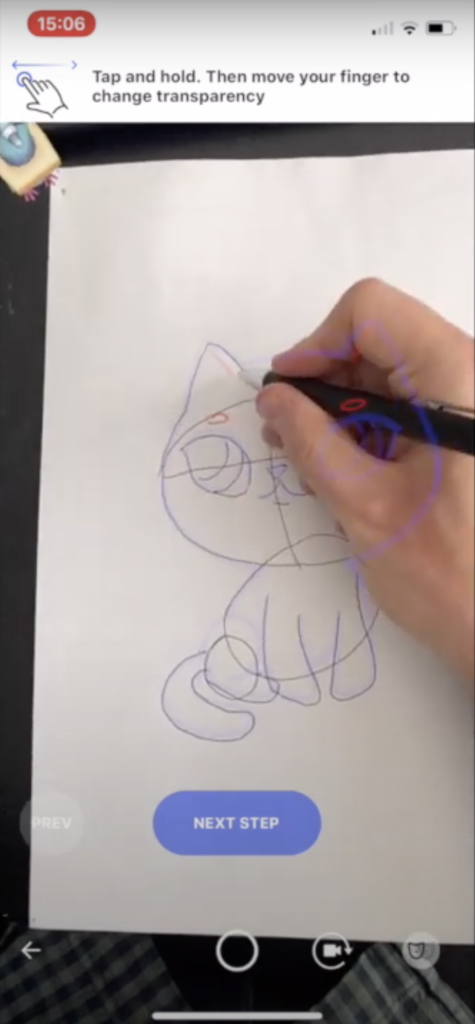
With Sketch AR users can learn how to draw by using their smartphone camera: They can choose a sketch from a library and display it on a sheet of paper in front of them. The user can then follow the virtual lines on the paper step-by-step (See Fig. 8). The app also offers more features like minigames and AI portraits, but I only had a look at the AR feature. In general the app is designed really well and is also personalizable, but all in all I did not see the added value that AR has in this case.
Why I don’t like it:
Drawing might be difficult when looking at the paper though a small screen
While drawing I personally like to fixate the paper with one hand, which is not possible, because you have to hold your mobile device
I don’t see the advantes of AR compared to common image tracing (by printing it out and using it as a template)
An app that does pretty much the same is “Tracing Projector”, where I also don’t see the added value.
Fig. 8: SketchAR
On a general note
There are a lot of apps on the market – especially in children’s education – that try to replace a physical game with a digital one (i.e. playing with dominos), which is in my opinion not what AR should be used for. AR is supposed to enhance the user’s physical world and not replace it. I believe that it’s important to experience the world with as many senses as possible – especially in early ages – and haptic experiences should not be limited to holding and controlling a smartphone. Furthermore there are a lot of apps where the user can just randomly place 3D objects in the real world, but can’t do anything with them, which might be fun and playful though, but doesn’t have many educational values in my opinion.
Garzón, J., Pavón, J., & Baldiris, S. (2019). Systematic review and meta-analysis of augmented reality in educational settings. Virtual Reality, 23, 447-459.
Zünd, F., Ryffel, M., Magnenat, S., Marra, A., Nitti, M., Kapadia, M., Noris, G., Mitchell, K., Gross, M.H., & Sumner, R.W. (2015). Augmented creativity: bridging the real and virtual worlds to enhance creative play. SIGGRAPH Asia 2015 Mobile Graphics and Interactive Applications.
Neue Technologien wie RealTime-graphics und MoCap-Technologien führen seit den 2010er Jahren zu einem immer stärker anwachsenden Auftreten von virtuellen Streamern – Vtubern. In Anlehnung an die traditionelle Influencer-Industrie sind virtuelle Menschen zu Prominenten geworden. Da sich das Ökosystem für Vtuber – zumindest im Europäischen Raum – noch in der Anfangsphase befindet, gibt es noch keine standardisierte Allzweck-Anleitung. Daraus kann man schließen, dass jede Umsetzung unterschiedliche auf unterschiedlichen Plattformen und in verschiedenen Formaten erfolgt. Je nach Nutzer – ob Einzelperson oder Agentur – variieren die Kosten, die Qualität und der Entwurfsprozess erheblich. Um einen virtuellen Charakter zum Leben erwecken zu können, müssen sich Content Creator also mit diversen Fragestellungen rund um Design, Hardware, Software und beschäftigen.
Basics
Das Set
Essenzieller Bestandteil im Inventar eines Vtubers ist eine Webcam oder Kamera mit hoher Auflösung, um Gesichtsbewegungen und Mimik zu erkennen. Ein Mikrofon, eine gute Gesichtsbeleuchtung und ein adequater PC oder Laptop gehören ebenfalls zu den Must-Haves des Jobs. Als Grundvoraussetzung sollten die Kamera eine Auflösung von mindestens 720p und 30 FPS haben. Viele Vtuber verwenden jedoch bereits iPhones anstelle einer Webcam oder kombinieren diese miteinander, um Gesichtsausdrücke besser erkennen zu können.
Für den Ton können entweder spezielle USB-Mikrofone oder ein Gaming-Headsets mit eingebautem Mikrofon verwenden werden. Im Idealfall werden vollwertige XLR-Mikrofone genutzt, da diese besser funktionieren und eine fantastische Audioqualität bieten.
Viel Licht ist wichtig, damit Kamera und Software leichter erkennen können, ob der Vtuber gerade lacht, die Stirn runzelt oder den Mund bewegt. Dazu reicht bei Tag ein heller Standort am Fenster, bei schlechteren Lichtverhältnissen sollten Lampen so arrangiert werden, dass sie das Set ausreichend beleuchten. Marken wie Elgato und Razer bieten spezielle Streaming-Lichter an, die mit den Webcams gekoppelt werden können.
Es macht durchaus Sinn, vor Beginn eines Streams die Internetverbindung zu überprüfen, da es ansonsten während der Live-Auftritte zu ungewollten Pannen kommen kann. Nach Empfehlung von Streamingplattformen wie Twitch sollten mindestens 6 Mbps für 1080p in hoher Qualität bei 60 FPS zur Verfügung stehen. Wenn diese Anforderungen nicht erreicht werden können, leidet die Streamingqualität darunter, jedoch sind 3Mbps in einer 720p-Auflösung bei 30 FPS im notfalls noch im Bereich des Vertretbaren.
Bei Streams mit hoher Bildrate, wie beispielsweise Ego-Shooter-Games, wird eine Uploadgeschwindigkeit von 10-15Mbit/s und ein Bildschirm mit hoher Bildwiederholungsfrequenz benötigt. Bei niedrigeren Internetgeschwindigkeiten und keiner Möglichkeit zur Aufrüstung, ist Live-Streaming in einer ansehnlichen Qualität nicht möglich.
Standcomputer oder Laptop
Prinzipiell gilt, mehr ist besser, besonders wenn es um RAM und Prozessoren geht. Die Grafikleistung ist nur dann von größerer Relevanz, wenn Spiele gestreamt werden. Jedoch sind hierbei GPU-Empfehlungen der einzelnen Spieltitel zu beachten. Ob PC oder Laptop hängt von der Leistungsfähigkeit ab. Ein hochwertiges Gerät steigert den qualitätiven Output des Streams, jedoch gibt es auch preiswertere Alternativen. Die Mindestanforderungen für einen Live-Stream:
Prozessor: Intel i5-4670 oder AMD FX-8350
Arbeitsspeicher: 8 GB DDR3
Grafikkarte: Nividia Geforce 960 oder AMD Radeon R9 280
Betriebssystem: Windwos 7
Bei vorgefertigten Systemen oder wenn der PC selbst gebaut wird, ist auf folgende Anforderungen zu achten:
Prozessor: Intel i5-9600k oder AMD Ryzen 5 3600
Arbeitsspeicher: 16GB DDR4
Grafikkarte: Nivada Geforce GTX 1080 Ti oder AMD Radeon 5700 XT
Betriebssystem: Windows 10
Einige Streamer gehen noch einen Schritt weiter und verwenden zwei Computer oder Laptops, um die Arbeitslast zu bewältigen – einen, um ein Spiel auszuführen und den anderen, um die eigentlichen Streaming-Anforderungen zu erfüllen.
Als guten Ausgangspunkt für angehende Vtuber ohne Vorkenntnisse im Design-Bereich und mit geringem Budget eignet sich VRoid-Studio oder Live2D . Ein großer Vorteil dieser Tools ist, dass sie bereits “vorgeriggte” Basismodelle anbieten, welche sich hervorragend für erste Probeversuche eignen und jederzeit durch Details individuell angepasst werden können. Die Software ist zudem kostenlos. Auch Websites wie TurboSuid, Sketchfab und CGTrader bieten kostengünstigere 3D-Modelle zum Download an.
Hat man als Content Creator viel Zeit und kreatives Talent, ist es möglich mit Software-Programmen wie Blender, Maya oder Zbrush einen völlig individuellen Charakter zu entwerfen. Auch von Unreal Engine gibt es Anwendungen wie Meta Human Creator, um digitale Menschen mit hoher Wiedergabetreue zu erstellen. Es gibt auch Optionen für die Arbeit mit Apps wie ReadyPlayerMe oder Wolf3D. Allerdings sind hierfür gute 3D-Kenntnisse erforderlich.
Das fertige Modell muss dann noch “geriggt” werden, sprich mit einem digitalen Skelett versehen werden, um menschliche Bewegungen so realistisch wie möglich imitieren zu können. Dies kann entweder direkt in Blender oder für 2D-Modelle auch beispielsweise in Live2D Cubism erledigt werden. Für die VRM-Konvertierung benötigt man eine 3D-Animationssoftware wie Unreal, Unity 3D oder iClone, jedoch finden sich Tutorials auf Youtube, wie beispielsweise das folgende für eine Formatierung in Unity:
Eine weitere Alternative zu den kostenlosen 2D- und 3D-Modellen, ist die Möglichkeit den Avatar bei einem Künstler in Auftrag zu geben. Es ist einfacher und geht schneller, als sich selbst mit der Charakterentwicklung und 2D- oder 3D-Umsetzung beschäftigen zu müssen. Allerdings ist diese Option keinesfalls billig. Auf Websiten wie Fiverr und Etsy geht die Preisspanne von 50$ für einfache Avatare, bis hin zu Beträgen im sechsstelligen Bereich für hochwertige und detailgetreue Modelle.
Der Großteil der Vtuber-Einsteiger nutzt Anwendungen von Steam wie FaceRig, Animaze, Wakaru, 3Tene und Vtube Studio, da diese für alles was man so an einfachem Mocap (=Motion Capture, Bewegungsverfolgung) braucht, bieten können. Es gibt aber auch einige beliebte virtuelle Streamer wie Code Miko, die Technologien aus der Videospiel- und Filmindustrie verwenden, wie z. B. 30.000-Dollar-Motion-Capture-Anzüge von Xsens.
Eine weitere beliebte Motion-Tracking Software ist Luppet. Als eine der größten Anwendungen, die von Vtubern verwendet wird, bietet es ein sehr sauberes, genaues Tracking und ist in mehreren Sprachen verfügbar. Allerdings ist es nicht auf Steam erhältlich, sondern nur auf einer japanischsprachigen Website und kostet um die 50$.
Inzwischen ist es außerdem möglich, mithilfe von iPhones mit Infrarot-Tiefenkamera für Face ID (seit der Veröffentlichung des iPhone X, 2017) ein genaueres Gesichts-MoCap zu erhalten als mit herkömmlichen Webcams.
Die Ausrüstung für die Gesichtserfassung wird jedoch immer leichter und einfacher der breiten Masse zugänglich gemacht. Einige Umsetzungen erfordern zwar immer noch Marker im Gesicht und das Tragen eines Helms mit einer auftragsbezogenen Kamera, aber der Markt scheint sich in die andere Richtung zu bewegen – er unterstützt normale Streamer-Setups, die 2D-Webcams verwenden.
Wakaru und Hitogata sind gute Software-Beispiele dafür. Diese beiden kostenlosen Programme bieten eine frei verfügbare Gesichtsverfolgungsfunktion, die leicht in einen 3D-Charakter integriert werden kann. Aufgrund des offenen Algorithmus ist die Verfolgungsqualität nicht die beste auf dem Markt, aber die Bequemlichkeit überwiegt die Nachteile, zumindest für VTuber-Anfänger. Qualitativ höherwertigere, kostenpflichtigere Webcam-Lösungen sind Hyprface SDK und Facerig. Hyprface ist besonders nützlich, um vorgefertigte 3D-Charaktermodelle zu integrieren.
Um die Position der Hände zu verfolgen, benötigen virtuelle Streamer ein optisches Handverfolgungsmodul, auch Leap Motion, genannt. Dieses kann Bewegungen viel genauer erfassen als iPhones oder Webcams und wird oft in Verbindung mit weiterer Ausrüstung verwendet, um Modelle noch realistischer animieren zu können.
Schlussendlich wird der Avatar zum ersten Mal dem Publikum auf Streaming-Plattformen wie Twitch oder Youtube vorgestellt. Unabhängig vom narrativen Inhalt und dem eventuellen Skript, gibt es zunächst noch einige Import-Hinweise zu beachten:
Es gibt zwei Möglichkeiten, das Modell in einem Stream zu übertragen, abhängig von der Anwendung, die für das Mocap des Avatars verwendet wird. Auf der Plattform Steam kann immer nur eine Anwendung ausgeführt werden. Sollte der Content Creator also keinen weiteren Inhalt teilen, kann er einfach die Quelle “Game Capture” auf OBS und Streamlabs verwenden um sein Modell auf einen Hintergrund seiner Wahl zu überlagern. Zusätzlich is bei dieser Methode zu beachten, dass die Transparenz in der verwendeten MoCap-Software immer aktiviert ist und beim Streamen auch zugelassen wird.
Alternativ dazu gibt es auch Vtuber, die während ihrer Streams andere Inhalte teilen, wei beispielsweise Spiele spielen oder gemeinsam mit ihrem Publikum auf Youtube-Videos reagieren. In diesem Fall gibt es Programme wie SUVA für Windows, mit denen virtuelle Streamer ihre Avatare in Unity importieren können und diese dann in Streaming-Anwendungen wie OBS einblenden. Dadurch bleibt das Steam-Konto frei.
In jedem Fall ist es wichtig sich vor seinem Debüt ausgiebig mit allen verfügbaren Programmen und Technologien auseinander zu setzen, um für sich selbst die bestmöglichste Variante zu finden. Um auch in Zukunft mehr Vtuber in die Community zu holen, währe die Umsetzung folgender Punkte ein Anfang:
Mehr Tools zur Erstellung von Avataren für Nicht-Experten, die verschiedene Kunststile unterstützen
Eine All-In-One-Mocap-Lösung für das gesamte Gesicht, den Körper und die Finger, die nur eine Webcam benötigen und damit Kosten und Ineffizienz verringern
Engere Zusammenarbeit zwischen Software- und Hardwareanbietern, um den Integrationsprozess zu vereinfachen und den Prozess zu vereinheitlichen, weiterzuentwickeln und zu konzentrieren
Eine einfache Benutzeroberfläche für Nicht-Entwickler, damit die Nutzung von Software und Hardware einer breiteren Masse zugänglich wird
Demnächst
Bedeutung, Entstehung und aktueller Bezug
V-Tuber Agenturen und ihre Protagonisten
Software und Programme – Was gibt es und wie verwende ich sie?
Entwicklung eines Characters – 2D und 3D Modell
(Erwartungshaltungen von Usern, Protagonisten und Agenturen)
Museums and exhibitions aim to bring their collections to live. Since the ongoing development of augmented and virtual reality technologies it seems obvious to integrate them in the classical exhibitions. Through the usage of AR and VR technologies, museums can add a virtual layer to their exhibitions and create immersive experiences. Some areas of application could, for example be, allowing users to explore Egyptian burial chambers, meet historical characters or find out more about an artist by virtually visiting their hometown.
As part of a study, the Research Centre of Excellence in Cyprus (RISE) has interviewed 15 global museums about their experience in including AR and VR technologies in their exhibitions. Around 50% of them stated, that they made use of these technologies in order to create an augmented spaces for visitors to experience the exhibition, for example in form of a virtual time travel. They integrated VR and AR experiences in their exhibitions as an extension to the classic exhibitions, instead of outclassing them.
Another possibility to create a virtual exhibition can be done by scan exhibitions and arrange them in a virtual space. In this way, exhibitions can be accessible from all around the world. It could also enable a larger audience, for example disabled people, to visit exhibitions they could not visit in the real life.
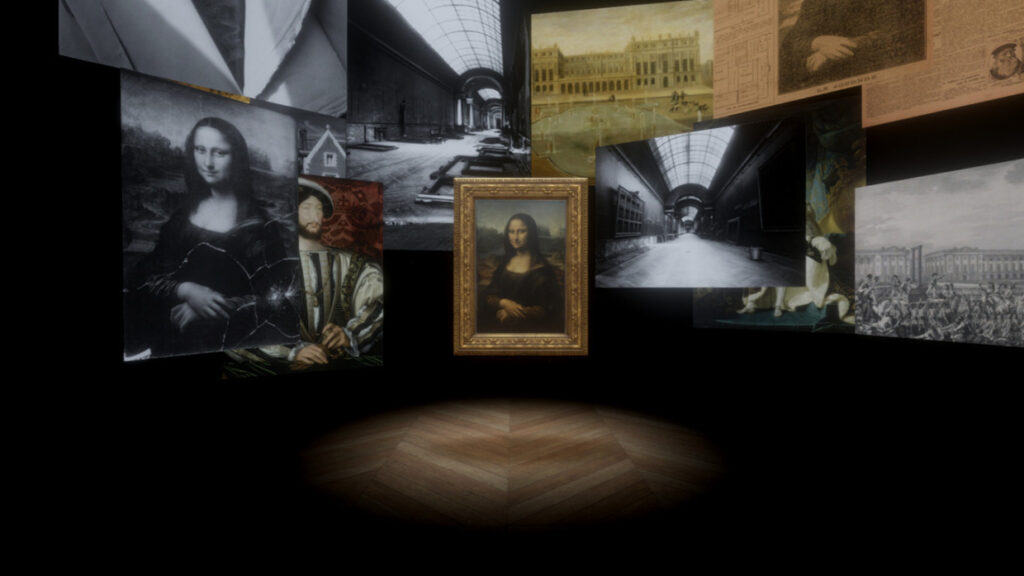
The Virtual Reality experience “Mona Lisa: Beyond Glass” was part of the Leonardo da Vinci blockbuster exhibition taken place at the Louvre in Paris, in October 2019. Through the use of animated images, interactive design and sound, it allowed the users to explore it’s details, the wood panel texture and how it has changed over the time.
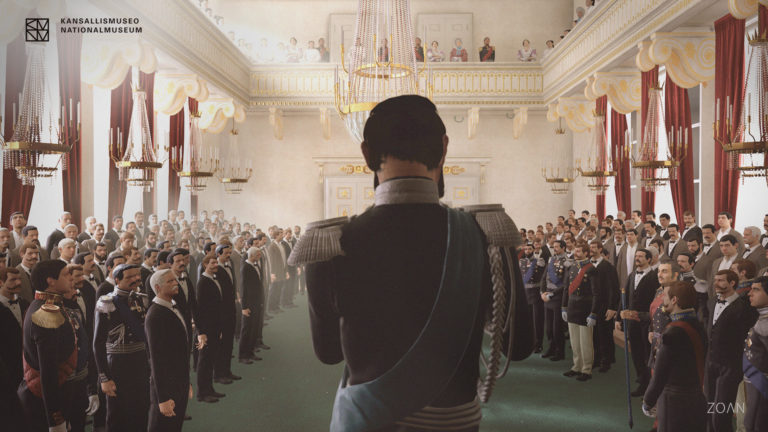
The National Museum of Finland enabled their visiters a virtual time travel back to the year 1863, by letting the users walking inside the painting “The Opening of he Diet 1863 by Alexander II” by R. W. Ekman. In this VR experience the visitors could speak with the emperor and representatives of the different social classes or visit historical places.
References
Walczak, K.; Cellary, W.: Virtual Museum Exbibitions
Walczak, K.; Cellary, W.; u.A.: Building Virtual and Augmented Reality museum exhibitions
In the last post, I gave an overview about the technical aspects of Augmented Reality Storytelling and the three main components of it. In this post, I want to focus more on the story. I want to give an insight into Interactive Storytelling, which can be used with Augmented Reality to create an immersive experience for the user.
Interactive Storytelling
Interactive Stories are stories that can and need to be influenced by the user. Throughout the story, the user needs to make decisions in order to continue. These decisions influence the further course of the story. The user is no longer a passive observer of a linear story, but can be an active part of it.
A interactive story is usually divided in different parts. At the end of a storyline, the user is asked to make a decision, based on different options, which are provided. After making the decision, the user is forwarded to another storyline.
The term is sometimes used synonymously for digital and transmedia storytelling (storytelling through the use of digital media), but this is not always the case. Interactive Storytelling can also be applied in, for example, books. At some point of the story, the reader has to make a decision and has several different choices to choose from. Depending on what decision he/she makes, he/she has to scroll to a certain page where the story continues.
Use of Interactive Storytelling
Interactive Storytelling often finds its usage in marketing. There are several campagnas, which make use of Interactive Storytelling to promote their products. But Interactive Storytelling can also be used to disseminate social and difficult to communicate topics. An example of that is a campaign from “Wiener Linien”, where they created an interactive campaign to educate about civil courage. Another example if from the “International Red Cross”, which made a spot to generate and show awareness of work in crisis areas.
Common Structures
There are several different options to structure an interactive story. These are some of the most common structures:
Branching Narrative
A relatively classic narrative structure in which viewers can make more and more far-reaching decisions about the course of action. The narrative branches into different endings depending on the choices you make. Depending on how many branches the narrative contains, this type of structure can get very complex very quickly.
Fishbone Narrative
This is a traditional linear structure that allows viewers to explore the sub-stories of their story, but keep bringing them back to the main theme of their story. This structure still gives a lot of control over the route viewers take through your project.
Parallel Narrative
With this structure, on the one hand, viewers are offered choices in the story, and on the other hand, they are repeatedly returned to the main theme of the narrative for decisive moments.
Threaded Narrative
The perfect structure to tell a story from multiple angles. Topics can be linked to one another or remain completely separate. Rather, the story consists of a number of different themes that develop largely independently of one another.
Concentric Narrative
In this structure, there are different storylines, which orbits around a shared central point The viewers are provided with different entry points, where they get to choose one. No matter which entry point the viewer choose, in the end they will always return to the core area.
References
Herbst, D.: Storytelling
Markouzis D.; Fesakis, G.: Interactive Storytelling and Mobile Augmented Reality Applications for Learning and Entertainment – A rapid prototyping perspective
Adlmaier-Herbst, D. G.; Musiolik, T. H.: Digital Storytelling als intensives Erlebnis – Wie digitale Medien erlebnisreiche Geschichten in der Unternehmenskommunikation ermöglichen
Augmented Reality opens new possibilities of storytelling. With Augmented Reality, you are not just watching a story been told. You are immersed in the experience and become part of the story.
“We witness stories our entire lives. All the storytelling mediums we know and love are ones where an author recounts a tale and we bare witness to that tale. What gets me so excited about these immersive mediums is it feels like we’re crossing the threshold from stories we witnessed to stories we live as our own.” – CEO of the VR tech and entertainment company, Within
You experience the story as a character of it, you can interact with other characters and they interact with you and you have the ability to influence the story. You walk away with the memory of your own story and not of just media you have consumed.
Three main components of Augmented Reality Stories
In most of AR scenes, you need to focus of the three main aspects.
1. Assets
Assets are all the elements of a AR story, like 3D or 2D models, audio files or videos. They help you tell your story. 3D models, especially when they are combined with audio, can create an immersive experience by taking the user into the world of the story. 2D aspects can also be an important part, for example by providing information via text.
Something you need to also keep in mind is on which device the user will be experiencing your AR story. Not every user is using the latest device, so you need to pay attention on the size of your assets.
2. Interactions
While creating an AR story, you have to consider, how you want the user to be able to interact with the story. These could be through really simple interactions, like the user can for example rotate assets, take a closer look at some of them or look at the scene from a distance. Or more complex ones, for example interacting with characters, speak to them and in order to that influence the story.
3. Environment
Augmented Reality takes place in the real world. So you need to consider where it takes place and how it does influence the role of the user. Does it take place in a room, like the surface of a table, where the user is in the middle of the story, or does the story take place outside, where the assets are far away and the user gets the role of an observer.
Example: Between Worlds by Skip Brittenham
A great example of storytelling with Augmented Reality is Skip Brittenhams book “Between worlds”. Through the use of the Augmented Reality technologies, the fantasy world becomes alive in interactive 3D.
Hello again! In this 3rd blog entry I will give an overview of the technology behind AR that makes the magic happen. Let’s go.
Technology
To superimpose digital media on physical spaces in the right dimensions and at the right location 3 major technologies are needed: 1) SLAM, 2) Depth tracking and 3) Image processing & projection
SLAM (simultaneous location and mapping) renders virtual images over real-world spaces/objects in the right dimensions. It works with the help of localizing sensors (i.e. gyroscope or accelerometer) that map the entire physical space or object. Today, common APIs and SDKs for AR come with built-in SLAM capabilities.
Depth tracking is used to calculate the distance of the object or surface from the AR device’s camera sensor. It works the same a camera would work to focus on the desired object and blur out the rest of its surroundings.
Then the AR program will process the image as per requirements and projects it on the user’s screen (For further information on the “user’s screen” see section “AR Devices” below). The image is collected from the user’s device lens and processed in the backend by the AR application.
To sum up: SLAM and depth tracking make it possible to render the image in the right dimensions and at the right location. Cameras and sensors are needed to collect the user’s interaction data and send it for processing. The result of processing (= digital content) is then projected onto a surface to view. Some AR devices even have mirrors to assist human eyes to view virtual images by performing a proper image alignment.
Object detection
There are two primary types used to detect objects, which both have several subsets: 1) Trigger-based Augmentation and 2) View-based Augmentation
Trigger-based Augmentation
There are specific triggers like markers, symbols, icons, GPS locations, etc. that can be detected by the AR device. When pointed at such a trigger, the AR app processes the 3D image and projects it on the user’s device. The following subsets make trigger-based augmentation possible: a) Marker-based augmentation, b) Location-based augmentation and c) Dynamic augmentation.
a) Marker-based augmentation
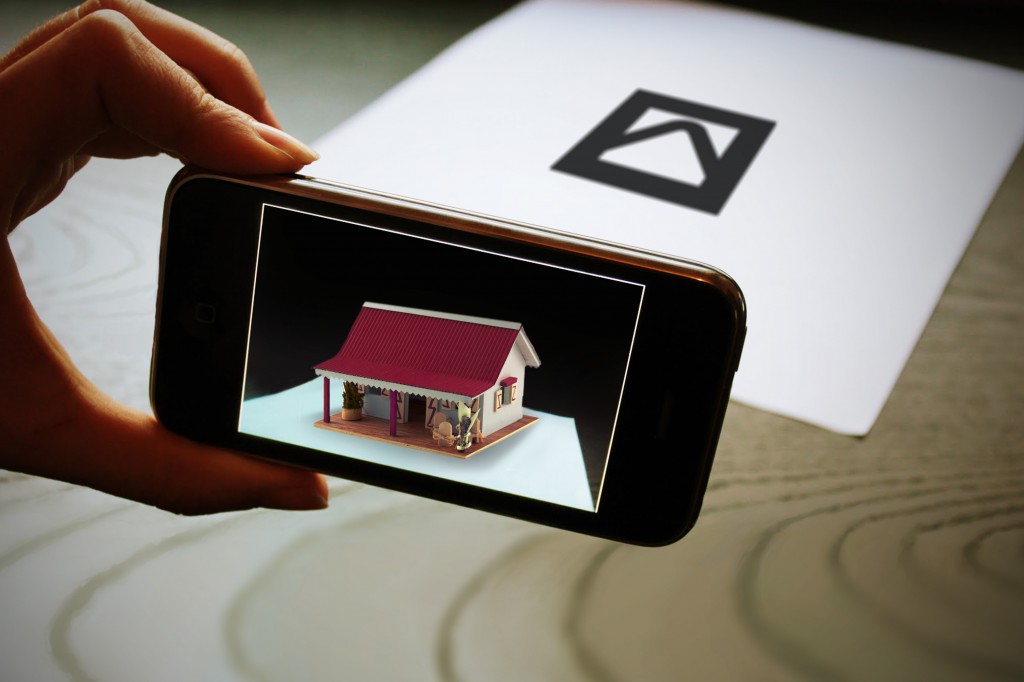
Marker-based augmentation (a.k.a. image recognition) works by scanning and recognizing special AR markers. Therefore it requires a special visual object (anything like a printed QR code or a special sign) and a camera to scan it. In some cases, the AR device also calculates the position and orientation of a marker to align the projected content properly.
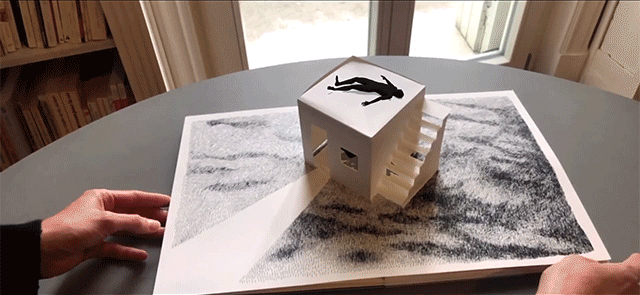
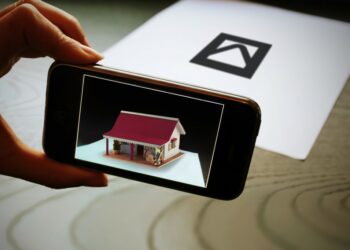
Example for marker-based augmentation with a special sign as trigger
b) Location-based augmentation
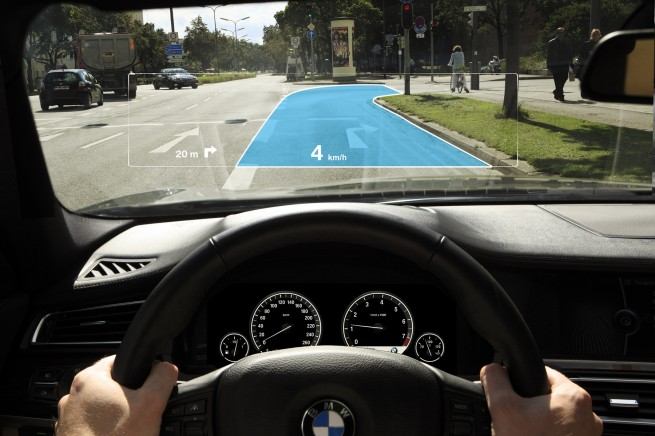
Lacotion-based (a.k.a. markerless or position-based augmentation) provides data based on the user’s real-time location. The AR app picks up the location of the device and combines it with dynamic information fetched from cloud servers or from the app’s backend. I.e. maps and navigation with AR features or vehicle parking assistants work based on location-based augmentation.
BMW’s heads-up display as an example of location-based augmentation
c) Dynamic augmentation
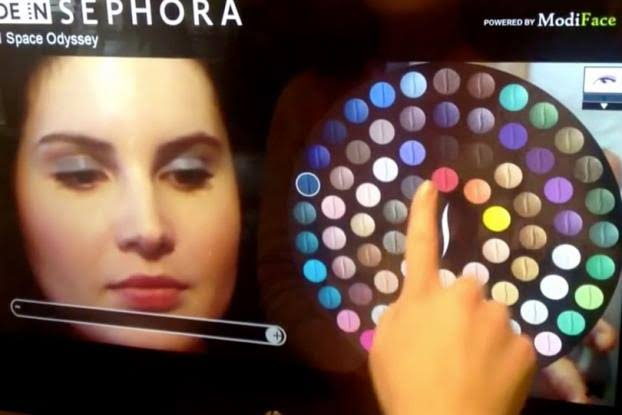
Dynamic augmentation is the most responsive form of augmented reality. It leverages motion tracking sensors in the AR device to detect images from the real-world and super-imposes them with digital media.
Sephora’s AR mirror as an example of dynamic augmentation. The app works like a real-world mirror reflecting the user’s face on the screen.
View-based Augmentation
In view-based methods, the AR app detects dynamic surfaces (like buildings, desktop surfaces, natural surroundings, etc.) and connects the dynamic view to its backend to match reference points and projects related information on the screen. View-based augmentation works in two ways: a) Superimposition-based augmentation and b) Generic digital augmentation.
a) Superimposition-based augmentation
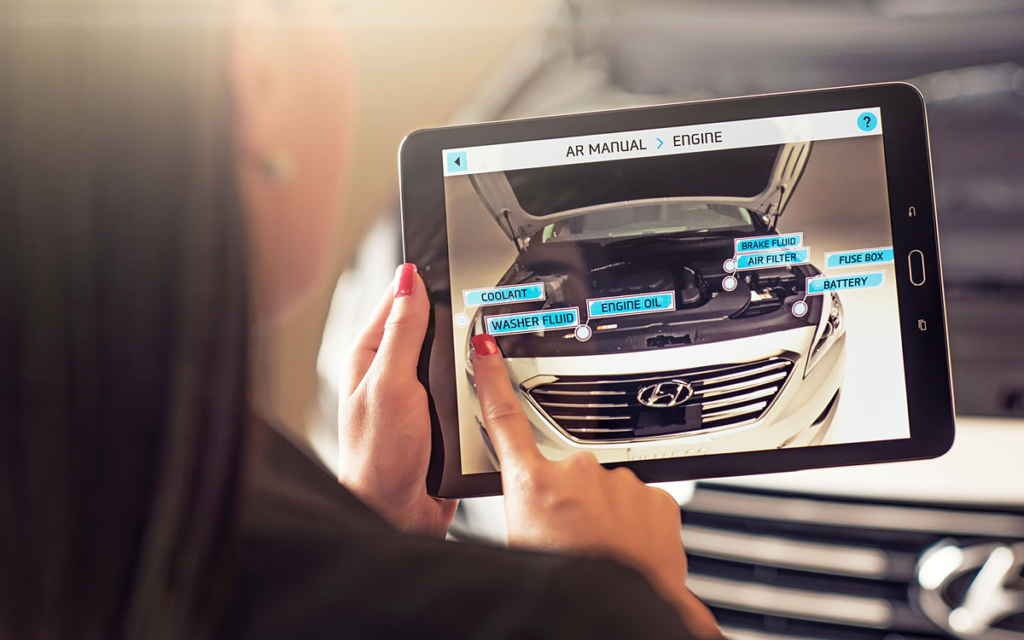
Superimposition-based augmentation replaces the original view with an augmented (fully or partially). It works by detecting static objects that are already fed into the AR application’s database. The app uses optical sensors to detect the object and relays digital information above them.
Hyundai’s AR-based owner’s manual allows users to point their AR device at the engine and see each component’s name + instructions for basic maintenance processes.
b) Generic digital augmentation
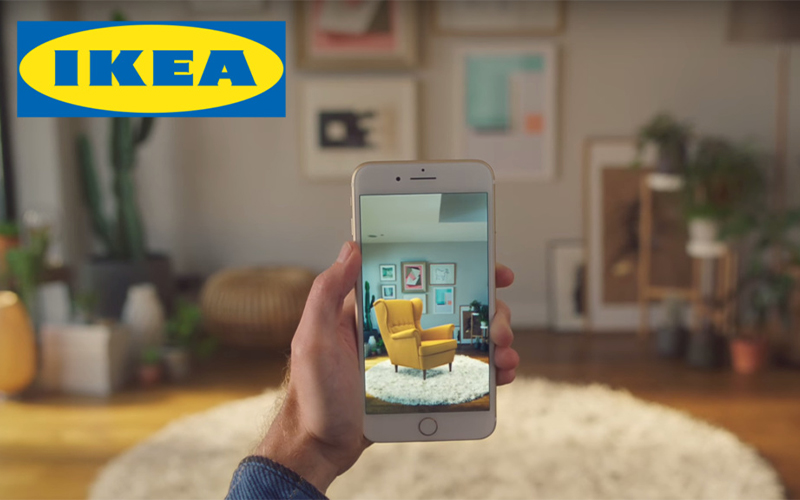
Generic digital augmentation is what gives developers and artists the liberty to create anything that they wish the immersive experience of AR. It allows rendering of 3D objects that can be imposed on actual spaces.
The IKEA catalog app allows users to place virtual items of their furniture catalog in their rooms based on generic digital augmentation.
It’s important to note that there is no one-size-fits-all AR technology. The right augmented reality software technology has to be chosen based on the purpose of the project and the user’s requirements.
AR Devices
As already mentioned in my previous blog entry, AR can be displayed on various devices. From smartphones and tablets to gadgets like Google Glass or handheld devices, and these technologies continue to evolve. For processing and projection, AR devices and hardware have requirements such as several sensors, cameras, accelerometer, gyroscope, digital compass, GPS, CPU, GPU, displays and so on. Devices suitable for Augmented reality can be divided into the following categories: 1) Mobile devices (smartphones and tablets); 2) Special AR devices, designed primarily and solely for augmented reality experiences; 3) AR glasses (or smart glasses) like Google Glasses or Meta 2 Glasses; 4) AR contact lenses (or smart lenses) and 5) Virtual retinal displays (VRD), that create images by projecting laser light into the human eye.
Hello again! My second blog entry will be about the the differences between four concepts: Extended Reality (XR), Augmented Reality (AR), Virtual Reality (VR) and Mixed Reality (MR).
XR, AR, VR, MR,… What??
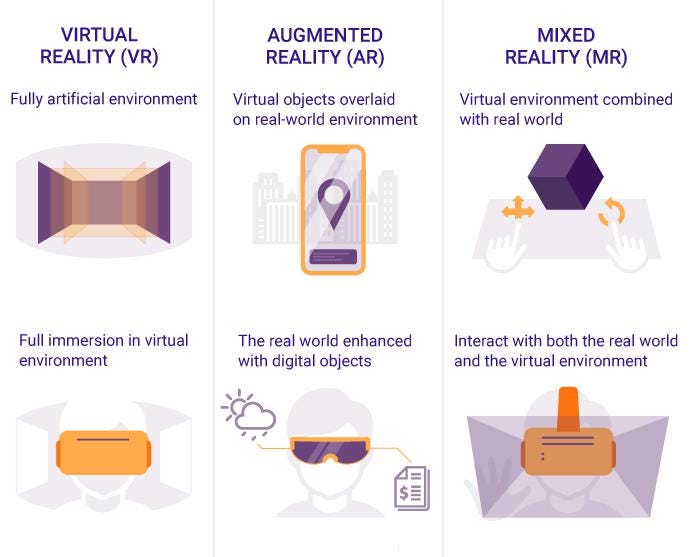
Extended Reality (XR): XR is a “catch-all”-term for technologies that enhance or replace our view of the real world. This can be done through overlaying or immersing computer text and graphics into real-world and virtual environments, or even a combination of both. XR encompasses AR, VR and MR.
Augmented Reality (AR): AR enhances our view of the real world by overlaying the real-world environment with digital content across multiple sensory modalities. It detects objects in the real-world environment and overlaps those with computer-generated data such as graphics, sounds, images, and texts. In other words: AR comines the real world with the digital world. Users can experience AR very easily through an smartphone application, but also through special AR wearables (i.e. headsets, glasses), displays, projectors or even contact lenses.
Virtual Reality (VR): While AR enhances the user’s real environment, VR completely replaces it with a virtual one. By using full-coverage headsets the user’s real-world surroundings are completely shut out while using. Advanced VR experiences even allow users to move in a digital environment and hear sounds. Moreover, special hand controllers can be used to enhance VR experiences.
Mixed Reality (MR): MR is the newest of these immersive technologies and combines aspects of AR and VR. When experiencing MR, virtual content is not only overlaid on the real environment (as in AR) but is anchored to and interacts with that environment. Instead of relying only on remote control devices, smart glasses, or smartphones, users can also use their gestures, glancing or blinking, and much more to interact with the real and the digital world at the same time.
Long Story short:
Extended Reality (XR) is an umbrella term for technologies that enhance or replace our view of the real world
Augmented Reality (AR) overlays virtual objects on the real-world environment
Virtual Reality (VR) immerses users in a fully artificial digital environment
Mixed Reality (MR) not just overlays but anchors virtual objects to the real world
For a better understanding, I found this nice infographic:
Comparison of VR, AR and MR
Okay, got it. But why AR?
As far as I know at this point, all three techniques – AR, MR & VR – can be useful for educational purposes. The choice of the technology might depend on several factors like the field of education, the equipment or the target group. Still, I chose to focus on AR for several reasons: 1) I like the idea of learning new things by enhancing the user’s environmental view instead of replacing it like it is with VR (my subjective opinion); 2) AR is easily accessible via smartphones or tablets, while VR and MR need more advanced technology (i.e. headsets). There might come up more advantages (and maybe some limitations and disadvantages too) the further I dive into the topic, let’s see. But that’s it for now! 🙂