ALTE KÜNSTE

Recherchen ergaben, dass eine gewisse Foley-App noch nicht existiert, was mich weiter dazu motivierte in diese Richtung zu steuern. Da wir jedoch 2 weitere Ideen abfeuern mussten, begab ich mich in einen weiteren Brainstorm der mich zurück in die Vergangenheit beförderte.

Die 2. Idee war eine interaktive Installation zu entwerfen wie wir sie im Bachelorstudium in “Responsive Environments” umgesetzt haben (Video). Man konnte via Kinect durch Bewegen seiner Hände, mit Processing erstellte und auf die Wand projizierte, Visuals beeinflussen.

Das Thema war “Stranger Things”. Deshalb baute ich die Titelmelodie mit Logic nach, welche im Loop abspielte, deren Sounds man ebenfalls beeinflusste. Der Cutoff und Decay des prominentesten Synthesizers im Track wurden mit der X und Y Achse verlinkt und waren somit steuerbar.

Die 3. Idee war eine eher obligatorische, die nicht weiter erwähnenswert ist…

Swarm 1

“Schwarm, umgangssprachliche Bezeichnung für einen großen, einheitlich formierten, dreidimensionalen mobilen Verband …” 

Jedem Studenten wurde die Aufgabe gestellt, sich innerhalb von drei Tagen ein Projekt zu überlegen, welches er/sie über den Master hinweg realisieren möchte. Dass Zeit relativ ist, wusste nicht nur schon Einstein. Drei Tage feiern erscheint einem dann doch etwas ergiebiger als drei Tage für ein gutes Konzept. So saß ich grübelnd auf meiner Couch und bewaffnet mit einem Tee in der Linken und einem Kugelschreiber in der Rechten fing das Rad in mir an sich zu drehen.

Als zentrale Frage versuchte ich als erstes herauszufinden, was mich überhaupt interessiert. Einige A4 Seiten später driftete die Tätigkeit in einen dämmernden Zustand über und mich überkam der Schlaf. Plötzlich fand ich mich in einer absolut anderen Umgebung wieder. Mein Schlaf lockte mich zurück in den Sommer, wo ich fasziniert durch die Unterwasserwelt der kroatischen Küste schnorchelte. Eingebettet in warmen Wasser schwebte ich den fremdartigen Felsformationen entlang um eine Schule kleiner Fische zu verfolgen. Wieder zurück an Land fand ich mich zwar nicht in der Sonne wieder, doch beschäftigte mich in meinem Bett eine andere Frage:

“Wie funktioniert eigentlich ein Schwarm?”

Grundsätzlich folgt ein Schwarm drei Regeln:

  • Bleibt zusammen. Das bedeutet, das einzelne Tier sieht sich immer nach Artgenossen um und schwimmt zu ihnen.
  • Bewege dich in dieselbe Richtung. Das verhindert, dass ein chaotisches Durcheinander entsteht.
  • Halte einen konstanten Abstand. Diese Regel erhöht die Ordnung.

Sofort fragte ich mich selbst, ob und wie sich mit dieser Erkenntnis ein Projekt umsetzen lässt, welches auch noch einen Sounddesign-bezogenen Mehrwert besitzt. Nach kurzem überlegen, kam mir ein Programm in den Sinn, welches ich schon zu einem früheren Zeitpunkt getestet hatte. Sound-particles* ist ein mittlerweile sehr beliebtes “CGI-like” Programm, mit dem man 3D-Objekte in einem Raum erstellen und und diesen verschiedene Sounds zuweisen kann. Dies funktioniert jedoch nur sehr statisch und wird, meines derzeitigen Wissens auch fast ausschließlich in Filmen verwendet. Mir war es jedoch wichtig, dem Projekt einen dynamischen und interaktiven Charakter zu geben und so bildete sich aus der wagen Erleuchtung langsam eine Idee. Und zwar ein abgedunkelter Raum, in welcher Besucher mit einem unsichtbaren, aber hörbaren Schwarm in Kontakt treten können.

*https://soundparticles.com/

https://www.daserste.de/information/wissen-kultur/w-wie-wissen/schwarmintelligenz-100.html

https://www.spektrum.de/lexikon/biologie/schwarm/60107#:~:text=Schwarm%2C%20umgangssprachliche%20Bezeichnung%20f%C3%BCr%20einen,Staren%2C%20Sardinen%2C%20M%C3%BCcken%20usw

Bild:

https://pixabay.com/de/photos/fische-schwarm-unterwasser-1656504/

Setup for Idea #2 – Part Two

This blog entry continues with setup considerations concerning the idea #2 “Extended Guitar Performance”.

Custom-made setup

The other way to make things work is to come up with a custom-built setup.

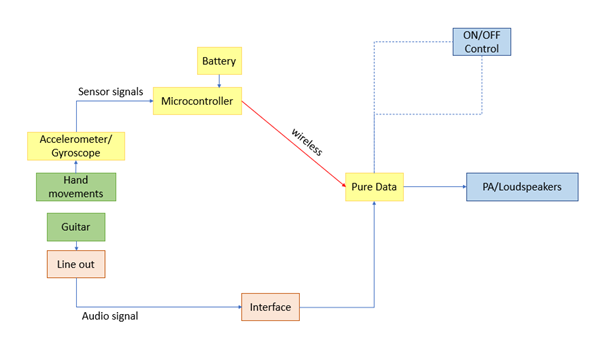
A rough sketch of the signal chain of the system could be as follows:

Own compilation. First draft of signal chain

As can be seen in the picture, there are two signal circuits:

On one hand, there is the audio signal coming out of the guitar that is then send to an (USB) interface. From there on, the signal is fed into a PureData patch, where it is modified according to the incoming data of the sensors and corresponding effects. Subsequently, the modified signal is then outputted to a PA system/loudspeakers.

The other circuit consists of the signals of the sensors that register the guitar player’s hand movements. The data gathered by the sensors is conveyed to a microcontroller, fed by a battery, and wirelessly transmitted to the PureData patch. Here, the sensors’ signals are used to modify the incoming guitar audio signal with effects.

Finally, I may also add some kind of (foot)switch to either engage the audio modulation of the PureData Patch or to bypass it in case one wishes the sensors’ signals to not modulate the guitar audio signal.

The setup is thus made up of hardware as well as software components.

The first hardware components necessary are sensors, able to pick up movements made by a player’s hands. Sensors capable of motion sensing include MEMS accelerometers and gyroscopes. For a layman like me, my first question was: what is the difference between an accelerometer and a gyroscope?

Luckily, I found a website that explained the difference very well:

 AccelerometersGyroscopes
What it isElectromechanical devices that measure acceleration   Cannot distinguish rotation from accelerationA device used for measuring rotational changes or maintaining orientation   Unaffected by acceleration
Usage purposeMeasure linear acceleration based on vibrationMeasure rate of rotation and angular position around a particular axis
ApplicationsCommonly found and more applicable in consumer electronicsCommonly found and more applicable in aircrafts, aerial vehicles

The website also read that some appliances benefit from both sensors. In fact, there is also a third category of such sensors that combines the qualities of accelerometers, gyroscopes as well as magnetometer sensors – the so-called Inertial Measurement Units or IMUs.

At some stage of this project, I must decide which kind of sensor to use. The website recommended:

Type Accelerometer:

  • Grove – 3-Axis Digital Accelerometer
  • ADXL335 Accelerometer

Type: Accelerometer/Gyroscope:

  • Grove – 6-Axis Accelerometer + Gyroscope

Type IMU:

  • Grove – IMU 9DOF v2.0

However, no matter which kind of sensor I choose, a microcontroller is necessary to process the data gathered. Such a microcontroller could be an Arduino board for example. Considering that one sensor should pick up pick movements, the great challenge is to find a sensor as well as a microcontroller that are small enough to fit in a guitar player’s hand without compromising playability. The Arduino Nano measures 1.8 cm x 4.5 cm which probably makes it small enough to either fit into a guitar player’s palm or onto the back of his/her hand. Another great board would be the Arduino Nano 33 BLE – it comes with Bluetooth functionality as well as a 9-axis inertial measurement unit (IMU) which makes it a perfect choice for my project.

The software side of the system comprises the integrated development environment (IDE) of Arduino as well as PureData. In PureData, a patch must be programmed that allows for receiving the incoming data of the sensors and using it to modulate the audio signal of the guitar with various effects and/or filters.

The custom setup is, as expected, a lot cheaper than pre-made products. The Arduino microcontrollers all cost less than 20€ and the Arduino IDE as well as PureData are free open-source software. The sensors I found tend to cost around 10-15€. Nevertheless, the custom setup will require a lot more personal effort from my side, especially on the software part which for me as an entry-level programmer will definitely be a challenge.

Sources:

https://www.seeedstudio.com/blog/2019/12/24/what-is-accelerometer-gyroscope-and-how-to-pick-one/

https://store.arduino.cc/products/arduino-nano

https://store.arduino.cc/products/arduino-nano-33-ble

https://store.arduino.cc/collections/sensors/products/grove-6-axis-accelerometer-gyroscope

Setup for Idea #2 – Part One

This weekend, I decided to focus one my second idea “Extended Guitar Performance”.

The first, practical challenge of this project is to develop a first working setup that is reliable and allows for further practical research regarding suitable movements, playability and performability.

General considerations

The first decision to be made is, of course, the make or buy decision. Both possibilities come with their own advantages and disadvantages. Making a setup from scratch is less expensive, grants higher control over specifications/features and the setup can be better tailored to the individual needs of the project. Additionally, more learning is involved. On the downside, developing such a setup is quite complex and potentially less powerful than a professional setup.

Buying the setup or at least some parts of it comes with the advantage of less complexity and potentially better functionality. However, a ready-made setup is not as flexible and, of course, comes with a much higher price tag.

I will divide this blog series into two parts: the first part will focus on commercially available products and the second on plans for a custom-made solution.

Commercially available products

In order to decide on make or buy, it makes sense to research and evaluate products that are already commercially available. Such products include:

Roland/ Enhancia NEOVA Expressive MIDI Ring Controller

A MIDI ring controller that allows to assign parameters to the four gestures vibrato, tilt, pitch, bend and roll. According to the website, the ring comes with low latency, an 8-hour battery life, and it is DAW-compatible. However, with 399$ it is quite expensive – especially for a study project. Just by analyzing the website, the NEOVA ring seems to be very synth focused and it would be interesting how adept it is at controlling parameters for a guitar or in a guitar-context. Availability is good – you can order it through the company website as well as on Thomann.

https://www.enhancia-music.com/product/neova/

https://www.thomann.de/at/roland_enhancia_neova.htm

Genki Wave MIDI Ring

This MIDI ring is very similar to the NEOVA product, as far as its specifications are concerned. It costs 250$ and thus somewhat cheaper than the NEOVA ring (however, still rather expensive). Additionally, it can be used not only for music but also in the working environment (controlling conferences, calls, etc.). Available only through company website.

https://genkiinstruments.com/

Source Audio Hot Hand 3 Universal Wireless Controller

Priced at 50$, it is the cheapest option by far, however, its suitability for the purposes of the project is questionable. For instance, the Hot Hand ring can only be used to control parameters of hardware effect pedals only and has no DAW integration. Additionally, it is not compatible with all hardware effect pedals. Instead, it is made especially for Source Audio products that feature a special Sensor Output and for third-party pedals that are equipped with an expression input. Another shortcoming is the availability: the online shop does not ship to Austria and local dealers are sparse and may not have the Ring itself but other Source Audio products (this however needs confirmation).

https://www.sourceaudio.net/hot-hand-3.html

Conclusion

The analysis of current products shows that there are possible solutions that can be used for the setup. Especially the first two options, the NEOVA and the Wave ring seem to be suitable for the project at a first glance. Unfortunately, they also come with a relatively high price tag. Here, consultation with my supervisor will be necessary to determine if such costs are appropriate for such a project.

In the second part of this blog series, I will focus on the custom-made setup.

Pure Data workout -Drum Machine

As my project will involve programming with Pure Data, one of my self-imposed tasks for this project is to learn Pure Data. Luckily, we currently have two courses that make us use Pure Data on a regular basis. Since I have no prior experience in Pure Data, I feel even more luckier that one course really started with the basics, permitting me to slowly dive into the subject.

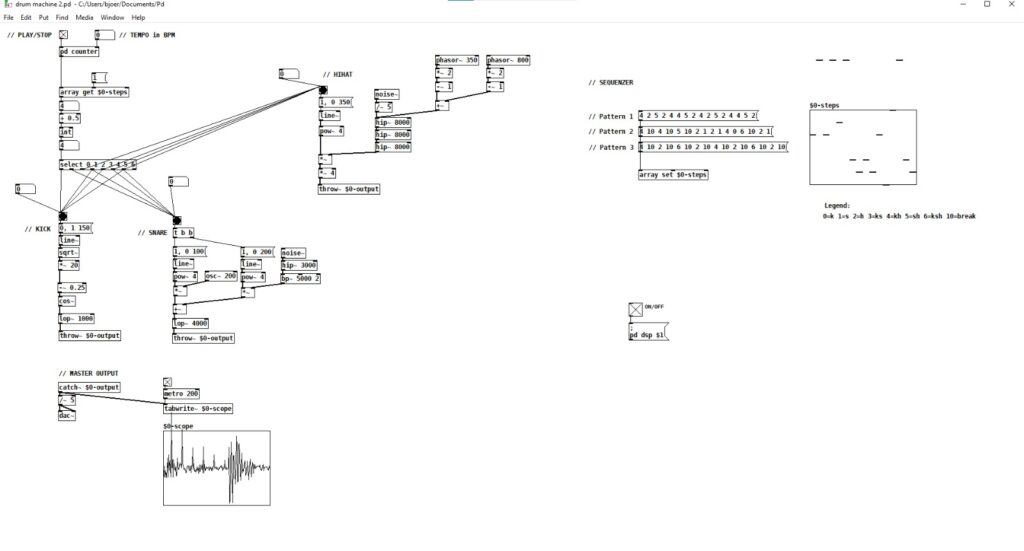
However, I also started programming my own patches outside of the course assignments, trying to further familiarize myself with the program. I would like to share one of the patches I made in this post. It is a kind of drum machine, featuring a kick, a snare and a hi-hat that allows you to play self-made drum patterns through a step-sequencer. The patch is a blend of two YouTube tutorials I found, taking from them the best of both worlds. Although it is based on these tutorials, I think that I learned quite a lot recreating the patches and just playing around with some settings, figuring out what they do and how they do it… The wavetable proved very useful because I could really see how the waveforms changed by adding different objects.

In fact, I strongly believe that while learning the theory of Pure Data is essential, it is also important to do some fun stuff, like this drum machine, in between to keep you motivated.

Screenshot of the Pd patch (frankly not the best quality)

I tried to attach the Pd file but could not upload it due to security reasons. If any of you are interested in the patch, I can send it to you!

However, I also attached the links to the tutorials for those interested in trying it out themselves.

Link 1: https://www.youtube.com/watch?v=wYlOw8YXoBs

Link 2: https://www.youtube.com/watch?v=nxnCkns-zMo

FOLEY STUDIO: TO GO

Als lauter und greller Blitz schoss mir die erste meiner Ideen in den Sinn. Sie war ein Produkt aus vielen Erfahrungen, die ich während dem Vertonen von Sound Effekten machte:

Da es in meinem bescheidenen Home-Studio schwierig ist gewisse Foley-Sounds zu recorden, sich jedoch rund ums, so wie im Gebäude Sound-Quellen finden lassen die dem Vertonen von Film dienen können, machte ich mich des Öfteren mit meinem Fieldrecorder auf, um jegliche Art von Sounds ausserhalb meines Studios aufzunehmen.

Ob Schlauch im Garten oder Metallplatte im Keller – Ich schnappte meinen Recorder, der Film musste jedoch zurückbleiben und ich versuchte mich meistens an die Dauer bzw. Intensität des gewünschten Effektes zu erinnern und den Ton dementsprechend aufzunehmen.

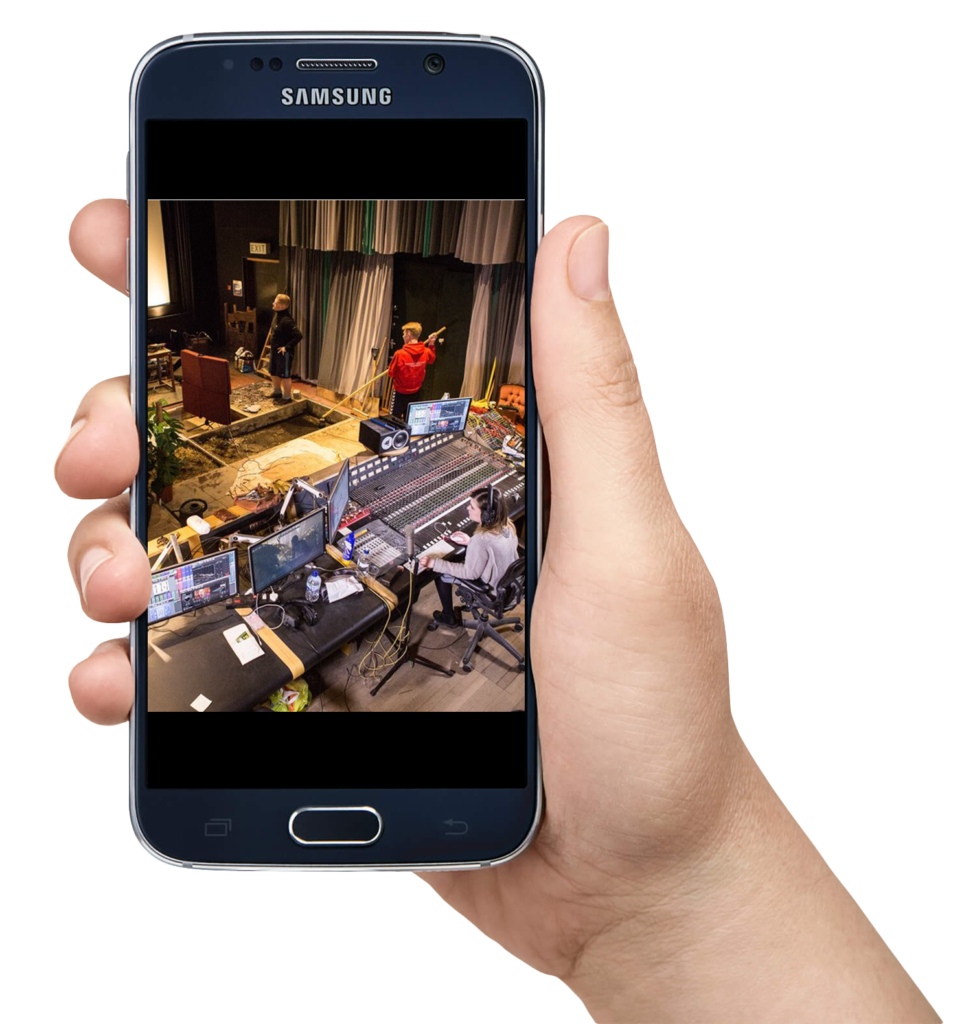
Doch dieser Vorgang stellte sich von der Datenübertragung bis zum Bearbeiten jedes Mal als mühsam heraus. So kam ich auf die Idee eine App für das Smartphone zu erfinden, die mit dem Recorder verbunden wird um die gewünschte Szene beim Aufnehmen des Sounds sehen zu können und die Datei ebenfalls mit einem Time Code zu versehen, sodass sie beim Importieren auch gleich an der richtigen Stelle liegt.

Bild1: https://de.cleanpng.com/png-f2r5f1/

Bild2: https://www.researchgate.net/figure/Foley-Recording-for-movie-at-Pinewood-Studio-https-wwwavidcom_fig2_339497993

EIN STURM ZIEHT AUF

Mit deutlicher Verspätung steuerte ich zum ersten Mal in meinem Leben das TU-Gelände an und war mit meinem kaputten “Studo”-Kompass noch immer vergebens auf der Suche nach dem richtigen Hafen, während die gesamte Sound Designer-Armada bereits ihre Bomben-Ideen für die Projektarbeit abfeuerte.

Als ich endlich ebenfalls angelegt hatte und den “Cube” betrat, wurde mir sofort klar dass ich vergessen hatte mich bei meinen Kollegen zu erkundigen, welche Aufgabe uns erteilt wurde, als ich mich noch in Startschwierigkeiten befand. Ebenfalls wurde mir bewusst dass ich für die Findung von 3 Ideen nun noch weniger Zeit als meine Kollegen hatte.

Mir blieb keine andere Wahl als furchtlos die Segel zu setzen und mich direkt, in den vor meinem inneren Auge aufziehenden Brainstorm zu begeben.

Bild: https://apkpure.com/de/storm-sea-live-wallpaper/com.DreamWallpapers.StormSea01

LIEBES (B)LOGBUCH

Nach einigen Startschwierigkeiten, habe auch ich Kurs in Richtung Projektarbeit genommen. Dich, liebes Logbuch, habe ich ebenfalls gerade erst für mich entdeckt und versuche nun meine Erfahrungen, bezüglich der Projektarbeit, wöchentlich mit dir zu teilen. Zuerst möchte ich mich jedoch kurz vorstellen:

Mein Name ist Flo, ich bin gelernter Maschinenbau- & Papiertechniker, habe die HTL bis zur Berufsreifeprüfung und anschließend den Bachelor in Informationsdesign an der FH JOANNEUM absolviert. Zur Zeit befinde mich im Master Studium “Sound Design”. Die Liebe zu Tönen und deren Klang ist als Sohn eines Musikers seit meiner Kindheit tief in mir verwurzelt, wodurch ich mich seit einigen Jahren mit dem Bedienen von Audiobearbeitungsprogrammen beschäftige. Ebenso gerne drücke ich mich Visuell aus und verwirkliche mich beim Erstellen von Bildkompositionen.

Im Bachelorstudium habe ich meine Liebe zum Erschaffen von Bildern und Klängen gestärkt und das Thema “Film” aus so vielen Seiten wie möglich beleuchtet, um zu verstehen was es braucht um als Zuseher auf inhaltlicher, visueller und auditiver Ebene „abgeholt“ zu werden. Ich war Teil einiger Produktionen von Videos und Clips, habe eigene Projekte realisiert und abschließend des Studiums einen Kurzfilm mit einer tapferen 12-köpfigen Crew produziert, um mich schlussendlich mit meinem gesammelten Knowledge meiner größten Leidenschaft und Berufung zu widmen, welche dem Angeln von Set-Ton, sowie dem vertonen von Bewegtbildern und dem Erschaffen von Filmmusik gilt.

Ich freue mich die nächsten 3 Semester von dir begleitet zu werden, meine Erkenntnisse durch dich zu reflektieren und bestenfalls die Entstehung bzw. den Fortschritt meiner Projektarbeit zu dokumentieren.

Bild: https://commons.wikimedia.org/wiki/File:Alfred_Jensen_-_Segelschiff_auf_See.jpg

Addendum 6th October or “how it all began…”

This blog entry is an addendum from the 6th October 2021.

It is concerned with the first (veeery) rough concepts that I presented on 7th October at the Institute of Electronic Music and Acoustics (IEM) at the TU Graz. We were tasked to come up with 3 different concepts/ideas and to rank them according to our preferences so that a suitable supervisor could be found for our idea. As I presented the ideas in German, the brief descriptions are also written in that language.

Gitarrenidee – 1. Priorität

Obwohl mein Hauptinstrument (E)-Gitarre ist, greife ich öfter zum MIDI-Keyboard, um Songs zu produzieren und verwende die Gitarre vergleichsweise wenig.

So ist mir die Idee gekommen Songs, ein Album oder einen Soundtrack zu produzieren und dabei nur die Gitarre als Input-Instrument bzw. als einzige Audioquelle zu verwenden.

Ziel ist es zu versuchen, alle anderen Instrumente wie Drums, Klavier, Effekte und auch eventuell Stimme etc. mit Gitarre umzusetzen. Zum Beispiel durch:

  • kreative Spieltechniken
  • Aufnahmetechniken
  • entsprechender Bearbeitung mit Effekten

Ich finde das Thema auch spannend, weil man heute so viel Auswahl und Möglichkeiten hat, Songs zu produzieren und es daher vielleicht interessant ist, sich dahingehend ein bisschen zu limitieren und zu eruieren, was mit der Gitarre alles möglich ist. Auch bietet es mir die Möglichkeit mein Instrument besser oder auf andere Weise kennenzulernen.

Die Idee könnte zusätzlich ausgeweitet werden, indem man auch bauliche Veränderungen an einer E-Gitarre in Betracht zieht, um so noch bessere Ergebnisse zu erzielen.

Audio Branding Idee – 2. Priorität

Konsequentes Audio Branding birgt viele Vorteile für Firmen, spielt aber eine vergleichsweise nebensächliche Rolle zum graphischen Branding und durch schlechte Entwicklung oder Implementierung können Unternehmen oftmals nicht von den Vorzügen von Musik und Sound profitieren.

Ich habe über dieses Thema meine Bachelorarbeit mit dem Titel:

“What does my brand sound like? Success factors for the implementation of sonic branding in a company’s brand strategy”

verfasst.

Nachdem ich somit die theoretische Grundarbeit geleistet habe, würde ich mich gerne dem Thema praktisch widmen und für ein konkretes Unternehmen ein Audio Branding Konzept ausgestalten.

Ziel sollte sein einen passenden Brand Sound zu finden, der Marke und Eigenschaften in sich vereint und als Basis verwendet werden kann, um andere Elemente abzuleiten. Diese anderen Elemente können u.a. sein:

  • Audio Logo
  • Jingle
  • Musik für Imagefilm und/oder Werbung

Ich möchte verschiedene Techniken untersuchen und ausprobieren, um auf den passenden Brand Sound zu kommen und dabei eruieren, welche Techniken, Elemente und Anwendungsbereiche am besten funktionieren.

An dieser Idee würde mich insbesondere der praktische und anwendungsorientierte Bezug reizen.

Musik von Bildern – 3. Priorität

Das Hauptziel dieser Idee ist es, Bilder hörbar zu machen bzw. auf einer anderen Sinnesebene erlebbar zu machen.

Bilder und deren Zusammensetzung werden anhand verschiedener Parameter analysiert; zum Beispiel anhand des elektromagnetischen Spektrums.

Anschließend werden den verschiedenen Frequenzbereichen bzw. Farbtönen spezielle musikalische Frequenzbereiche zugeordnet.

Nun scannt eine Art Detektor/Lesegerät horizontal/vertikal/im Kreis das Bild und ermöglicht so Bilder bzw. die Farben von den Bildern zu hören.

Dies kann im Kontext einer Ausstellung oder Ähnlichem geschehen.